Forums > Digital Art and Retouching > HighPass Sucks (+ solution)
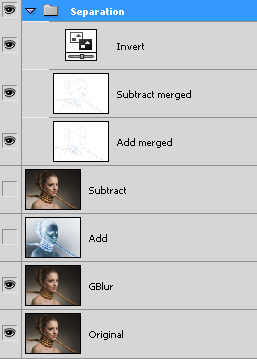
Photographer

Sean Baker Photo

Posts: 8044

San Antonio, Texas, US

Mask Photo wrote:

what's your method for tutorial capture, by the by?

I'll tell you tomorrow / the next day when I dredge it out and use it - offhand I'm not 100% sure. lol

I can tell you I was using two programs the last time I did it hmm.

Apr 30 10 05:48 pm Link

Retoucher

DerW

Posts: 254

Willich, North Rhine-Westphalia, Germany

I just had a thought, while playing around with Photoshop CS5's new blending modes.

The loss of detail while separating is easy to understand: the original highpass clips shadows and highlights because it doubles their values and having them clipped, divides them by two (50% opacity), the new version does the division first, meaning that something like 127 gets 63,5 and as we are dealing with integers, 63.
So what we need is separation without any division :-) (or a loss free division).

My idea now was to create three copies of the background layer.
Blur the lowest one with Gaussian Blur (called it "GBlur") or any other blurring filter you want and go on to the next layer (we call that "Add" and the topmost layer "Subtract").
Invert "Add" and set its blending mode to "Linear Dodge (Add)". Merge all visible layers to a new layer using [Shift]+[Ctrl]+[Alt]+[E] and call that layer "Add merged", disable the "Add"-layer as well as the "Add merged".
Now go on to the layer we called "Subtract". Change its blending mode to "Subtract" and once again merge visible to a new layer, called "Subtract merged".
Disable the "Subtract" layer and put "Add merged" and "Subtract merged" into a group.
It's important, that "Add merged" is on the bottom of the group, otherwise, there'll be clipping later!
Now invert the "Subtract merged" layer, set the opacity to 50% and change the blending mode to "Subtract".
Everything starts to look good, just... inverted. Because of that the next step is inverting the whole group by putting a new "Invert" adjustment layer above both layers.
Set the group's blending mode to "Linear Light" and watch what happens: you've got a split.
And from my testings so far it's loss-free :-)

I uploaded a screenshot of the layer's palette so maybe it's more understandable :-)

http://www.abload.de/img/sep1xl9.jpg

Just wondering, what do you think of this?

Best regards,
Jonas :-)

Btw. From what I've read Sean did some experiments on getting the "Subtract" mode in CS4 and earlier versions, so I'm pretty sure he'll be able to help out find ways for those as well :-)

PS: I tested in 8Bit because the possible loss should be greater.
PPS: You could as well merge the group, that way you'll get the normal split layers :-)
PPPS: I found it :-). Instead of using "Subtract", just invert the layer and set the mode to "Linear Burn".

Edit: Forget, what I just said... doesn't seem to work on tough images :-(

May 09 10 04:06 am Link

Photographer

Sean Baker Photo

Posts: 8044

San Antonio, Texas, US

More on this when I finish the article proper, but to dovetail with what Jonas has said above (he is correct that the above does not get 100% results - very close, but not quite):

One can get 100% reconstruction in 8bpc or 16bpc by using three layers to do so (vs. 2).  I'll explain the math in the article, but here's the procedure:

1.) Duplicate the image to separate 3x (twice if you don't care to retain a copy of the original for comparison).  For discussion, we will now call these the bottom, middle, and top layers.
2.) Blur the bottom layer as you see fit - for testing, do something intermediate to make sure you get enough that you should see loss if it's present.
3.) Disable the top layer; select the middle layer.
4.) Apply Image.  Select the bottom layer as Source, RGB as channel, check the Invert box, choose 'Add' as your blend mode, 100% opacity, Scale 1, Offset 0.
5.) Disable the middle layer; select and show the top layer.
6.) Apply Image.  Select the bottom layer as Source, RGB as channel, do not check the Invert box, choose 'Subtract' as your blend mode, 100% opacity, Scale 1, Offset 0.
7.) Show all layers.
8.) Set the top layer's blend  mode to Linear Dodge.
9.) Set the middle layer's blend mode to Linear Burn.
10.) If desired, compare the merged result to the original - you should find 0/0/0 discrepancy.

But like I said - more later.

May 09 10 05:24 am Link

Retoucher

GabrieleMonte

Posts: 691

Padova, Veneto, Italy

DerW wrote:
I just had a thought, while playing around with Photoshop CS5's new blending modes.

The loss of detail while separating is easy to understand: the original highpass clips shadows and highlights because it doubles their values and having them clipped, divides them by two (50% opacity), the new version does the division first, meaning that something like 127 gets 63,5 and as we are dealing with integers, 63.
So what we need is separation without any division :-) (or a loss free division).

My idea now was to create three copies of the background layer.
Blur the lowest one with Gaussian Blur (called it "GBlur") or any other blurring filter you want and go on to the next layer (we call that "Add" and the topmost layer "Subtract").
Invert "Add" and set its blending mode to "Linear Dodge (Add)". Merge all visible layers to a new layer using [Shift]+[Ctrl]+[Alt]+[E] and call that layer "Add merged", disable the "Add"-layer as well as the "Add merged".
Now go on to the layer we called "Subtract". Change its blending mode to "Subtract" and once again merge visible to a new layer, called "Subtract merged".
Disable the "Subtract" layer and put "Add merged" and "Subtract merged" into a group.
It's important, that "Add merged" is on the bottom of the group, otherwise, there'll be clipping later!
Now invert the "Subtract merged" layer, set the opacity to 50% and change the blending mode to "Subtract".
Everything starts to look good, just... inverted. Because of that the next step is inverting the whole group by putting a new "Invert" adjustment layer above both layers.
Set the group's blending mode to "Linear Light" and watch what happens: you've got a split.
And from my testings so far it's loss-free :-)

I uploaded a screenshot of the layer's palette so maybe it's more understandable :-)

http://www.abload.de/img/sep1xl9.jpg

Just wondering, what do you think of this?

Best regards,
Jonas :-)

Btw. From what I've read Sean did some experiments on getting the "Subtract" mode in CS4 and earlier versions, so I'm pretty sure he'll be able to help out find ways for those as well :-)

PS: I tested in 8Bit because the possible loss should be greater.
PPS: You could as well merge the group, that way you'll get the normal split layers :-)
PPPS: I found it :-). Instead of using "Subtract", just invert the layer and set the mode to "Linear Burn".

Edit: Forget, what I just said... doesn't seem to work on tough images :-(

WoW, tested with 16bits and looks great.

smile

Did you create this all alone?? yikes

May 10 10 08:24 am Link

Retoucher

DerW

Posts: 254

Willich, North Rhine-Westphalia, Germany

Gabriele M89 wrote:
Did you create this all alone?? yikes

Well, yes :-)

In fact, the idea was quite simple to subtract the dark tones and add the bright tones.
That gave me the base for the overall effect (the "Subtract" and "Linear Dodge (Add)" blending mode.
The rest was a little testing - and a little bit of logical thinking - of what's possible (always with a background copy in "Difference" mode with a clipped levels and threshold adj. layer on top).

But the overall principle is based on the Degrunge tutorial at RetouchPRO and of course Sean's almighty thread here :-).
And as I later noticed, the method I've posted is not as accurate, as it was supposed to be :-).

Although I'm thinking, whether I'd rather use Sean's new, 100% accurate method or the old one.
Because the new method doesn't give you the 50% gray layer with all the details, but two separate layers, which makes retouching a little harder again (and the whole purpose of this thread was to simplify and speed up retouching while maintaining best quality as far as I noticed :-). I'll do some more testing on this!).

May 10 10 08:52 am Link

Photographer

Michael Magers

Posts: 4050

Fullerton, California, US

Must not let thread DIE

BUMP . smile

May 18 10 10:29 pm Link

Retoucher

GabrieleMonte

Posts: 691

Padova, Veneto, Italy

Michael Magers wrote:
Must not let thread DIE

BUMP . smile

+1

lol

May 19 10 08:53 am Link

Digital Artist

Koray

Posts: 6720

Ankara, Ankara, Turkey

SRB Photo wrote:
More on this when I finish the article proper, but to dovetail with what Jonas has said above (he is correct that the above does not get 100% results - very close, but not quite):

One can get 100% reconstruction in 8bpc or 16bpc by using three layers to do so (vs. 2).  I'll explain the math in the article, but here's the procedure:

1.) Duplicate the image to separate 3x (twice if you don't care to retain a copy of the original for comparison).  For discussion, we will now call these the bottom, middle, and top layers.
2.) Blur the bottom layer as you see fit - for testing, do something intermediate to make sure you get enough that you should see loss if it's present.
3.) Disable the top layer; select the middle layer.
4.) Apply Image.  Select the bottom layer as Source, RGB as channel, check the Invert box, choose 'Add' as your blend mode, 100% opacity, Scale 1, Offset 0.
5.) Disable the middle layer; select and show the top layer.
6.) Apply Image.  Select the bottom layer as Source, RGB as channel, do not check the Invert box, choose 'Subtract' as your blend mode, 100% opacity, Scale 1, Offset 0.
7.) Show all layers.
8.) Set the top layer's blend  mode to Linear Dodge.
9.) Set the middle layer's blend mode to Linear Burn.
10.) If desired, compare the merged result to the original - you should find 0/0/0 discrepancy.

But like I said - more later.

niiice smile

May 19 10 10:55 am Link

Photographer

Photons 2 Pixels Images

Posts: 17011

Berwick, Pennsylvania, US

This might be nothing new to some of you.

Clip a B&W adjustment layer onto the LF layer and set to Luminosity mode. Play with the sliders. Mask to taste.

big_smile

May 20 10 07:26 am Link

Photographer

Mask Photo

Posts: 1453

Fremont, California, US

Photons 2 Pixels Images wrote:
This might be nothing new to some of you.

Clip a B&W adjustment layer onto the LF layer and set to Luminosity mode. Play with the sliders. Mask to taste.

big_smile

i'm not near any quality images to test and have no imagination at this time of the morning. what does this effect do?

May 20 10 10:26 am Link

Photographer

Sean Baker Photo

Posts: 8044

San Antonio, Texas, US

Photons 2 Pixels Images wrote:
This might be nothing new to some of you.

Clip a B&W adjustment layer onto the LF layer and set to Luminosity mode. Play with the sliders. Mask to taste.

big_smile

Why stop there?  Why not convert LF to a smart object, run shadows / highlights, and put an auto-curves / levels on top of everything?

May 20 10 10:40 am Link

Photographer

Photons 2 Pixels Images

Posts: 17011

Berwick, Pennsylvania, US

Mask Photo wrote:

i'm not near any quality images to test and have no imagination at this time of the morning. what does this effect do?

Not that it's a quality image, but it's something. big_smile

No mask (or anything else for that matter) applied at all...

https://www.nunuvyer.biz/Photoshop/LF-BWAdj.gif

May 20 10 04:19 pm Link

Photographer

ymmot tunes

Posts: 35

Melbourne, Victoria, Australia

Photons 2 Pixels Images wrote:
This might be nothing new to some of you.

Clip a B&W adjustment layer onto the LF layer and set to Luminosity mode. Play with the sliders. Mask to taste.

big_smile

Awesome - seriously this is blowing my mind and that is the cherry on the cake!

I came across this thread last night, and although I have been skin retouching by creating a GB layer and a HP layer previously (so conceptually not that big a leap), this COMPLETELY changes my level of control. I want to thank all of you from the bottom of my heart. This here is what makes the internet so great!

I have started re-editing files and am blown away. It feels like I have been given the keys to a department store for a night smile

I am curious about one thing from the SeparationRGB/16 action in the Frequency set by P2P. I was wondering about the workflow re sharpening.

As I am making changes to the file once split into LF and HF layers in the Freq group, ie spotting and cloning, surely then there are parts that the sharpening layers retained from the original that I would no longer wish to appear. Has this been an issue for anyone, or is it negligible? If it is a problem, perhaps I could split the action to 1st create the Freq group, and then after retouching run a 2nd action to stamp and build the sharpening layers...

May 21 10 07:49 am Link

Photographer

NothingIsRealButTheGirl

Posts: 35726

Los Angeles, California, US

I'm fascinated by this MATLAB stuff, but it's too expensive


http://www.mathworks.com/products/image/demos.html

May 21 10 12:17 pm Link

Photographer

Sean Baker Photo

Posts: 8044

San Antonio, Texas, US

NothingIsRealButTheGirl wrote:
I'm fascinated by this MATLAB stuff, but it's too expensive


http://www.mathworks.com/products/image/demos.html

+1 on both counts. I tried to implement 10 lines of MATLAB code in PixelBender and wanted to pull (what little I have) hair out.

May 21 10 01:58 pm Link

Photographer

Peter Claver

Posts: 27130

Toronto, Ontario, Canada

NothingIsRealButTheGirl wrote:
I'm fascinated by this MATLAB stuff, but it's too expensive


http://www.mathworks.com/products/image/demos.html

Dunno how they do for feature parity in the image processing realm but these two are (seemingly) good open-source equivalents:

http://www.scilab.org/
http://www.gnu.org/software/octave/

May 21 10 02:03 pm Link

Photographer

Mask Photo

Posts: 1453

Fremont, California, US

Photons 2 Pixels Images wrote:
Not that it's a quality image, but it's something. big_smile

No mask (or anything else for that matter) applied at all...

img

oh oh yeah, of course. I've done similar things with multiple targeted channel-mixed layers before the b/w adjustment layer was released.
that's what i did with this one:
https://www.maskphoto.com/images/content/portfolio/maskphoto_studio_girl_sm.jpg

but that's not really too related to the high-pass sucks solution, is it?

May 23 10 12:36 am Link

Retoucher

Pixels 2 Pixels

Posts: 190

Berwick, Pennsylvania, US

Just a quick tip to share.

If you are like me and don't like to clone/heal onto the original layers but instead onto a blank layer, this could present a problem when cloning/healing with the High Frequency layer. The only way to do this is to select "Current layer" for your sample. This would cause you to have to go back and forth from the HF layer to the blank layer each time you want to resample. Or, if you want to use "Current & below" for your sample, you can hide all layers below the HF layer but then you will only see the grey-ish HF layer which is not always the easiest to judge how the changes you are making will look in the final.

Cheer up, there's a way to change this to use "Current & below" for your sample and still see what the overall will look like so you can see what your changes are doing to the final. And it's very simple.

1. Hide all layers below the HF layer.
2. Make a copy of your LF layer and place it above the HF and HF heal/clone layers.
3. Change this copy to blend mode "Overlay".
4. Unhide this copy.

You should now see something that looks very close to the original. Close enough that you can determine what your cloning/healing on the HF is doing to the overall image. You can now also keep the HF heal/clone layer active and for sample use "Current & below" since the only layer visible below that is the HF layer.

You can also create an action that will hide all the layers below HF and unhide the LF copy and another action to do the opposite. Or, if you're like me, use a script that will do this for you as soon as you select the HF heal/clone layer and change it back when you select another layer.

I hope this is useful for some of you. smile

There may be other uses for this, also. I haven't explored the possibilities.

Jun 05 10 05:04 am Link

Photographer

Martin Benes

Posts: 33

Rome, Lazio, Italy

I'v red a lot of this great stuff here and wow, it's great.
But really sorry, can't make it work on a fabric wrinkles removal, can someone please please show me the way?

I really need some help.
Ok, seems i'm on it, i'm using the script provided and i'm working on the low freq layer. Dark areas are going out, wow this is grat. What about removing the high freq stuff? Just clone and heal inside the high freq layer?

Thanks for answers and sorry for all this questions.

Thanks a lot

Jun 30 10 05:29 am Link

Retoucher

Pixels 2 Pixels

Posts: 190

Berwick, Pennsylvania, US

Martin Benes wrote:
I'v red a lot of this great stuff here and wow, it's great.
But really sorry, can't make it work on a fabric wrinkles removal, can someone please please show me the way?

I really need some help.
Ok, seems i'm on it, i'm using the script provided and i'm working on the low freq layer. Dark areas are going out, wow this is grat. What about removing the high freq stuff? Just clone and heal inside the high freq layer?

Thanks for answers and sorry for all this questions.

Thanks a lot

I hope my PM helped you figure it out. big_smile

Jun 30 10 04:26 pm Link

Digital Artist

Koray

Posts: 6720

Ankara, Ankara, Turkey

900th post big_smile

Jul 01 10 04:54 am Link

Retoucher

Krunoslav Stifter

Posts: 3884

Santa Cruz, California, US

Koray wrote:
900th post big_smile

Congratulations, Sean! smile

For a rematch, I should start Imagenomic Portraiture Sucks (+ solution) thread. big_smile
[Just Kidding] The last one went underground!

P.S.
At time tiresome, but awesome thread BTW.

Jul 01 10 06:59 am Link

Photographer

Martin Benes

Posts: 33

Rome, Lazio, Italy

Pixels 2 Pixels wrote:
I hope my PM helped you figure it out. big_smile

Yep thanks!

Jul 01 10 07:45 am Link

Photographer

Sean Baker Photo

Posts: 8044

San Antonio, Texas, US

lol

Thanks guys - who knew this would hang on so long?

The credit is the forum's, though - I'm just a nerd who blurts what he's thinking a little too often.  Without a community that buys into sharing knowledge, this wouldn't have gone anywhere.  So props to all of you.

Jul 02 10 03:31 am Link

Retoucher

James Minshall

Posts: 218

Bedford, Indiana, US

wtf happened to robert randall?  havn't seen him on forums in ages, and his acct is closed?

Jul 02 10 01:44 pm Link

Retoucher

Pixels 2 Pixels

Posts: 190

Berwick, Pennsylvania, US

syd47421 wrote:
wtf happened to robert randall?  havn't seen him on forums in ages, and his acct is closed?

PM sent. smile

Jul 02 10 04:15 pm Link

Retoucher

Pixels 2 Pixels

Posts: 190

Berwick, Pennsylvania, US

SRB Photo wrote:
lol

Thanks guys - who knew this would hang on so long?

The credit is the forum's, though - I'm just a nerd who blurts what he's thinking a little too often.  Without a community that buys into sharing knowledge, this wouldn't have gone anywhere.  So props to all of you.

I think one of the reasons it did hang on so long is that there are so many uses and different ways to apply a separation and for me, it's fun trying things out and discovering those different uses.

Jul 02 10 04:17 pm Link

Photographer

NothingIsRealButTheGirl

Posts: 35726

Los Angeles, California, US

Simple frequency separation to make photos of textures with light falloff into nicely tile-able textures.

http://www.neilblevins.com/cg_education … exture.htm

via this thread

Jul 04 10 03:01 am Link

Photographer

haydenwoodphotography

Posts: 1

Vancouver, British Columbia, Canada

SRB Photo wrote:

I had no idea I was losing everyone so thoroughly - that's embarrassing sad.

Hey there, I'd love to understand this process, I'm a newbie to MM but have been retouching for years and was rather fond of the High Pass method for sharpening. So when I saw this thread I had to see what this commotion was all about smile
My head now hurts from attempting to follow this 23 page monster, is there a post which sums this process up in a nutshell?

Pizza sounds good!

Jul 05 10 12:16 am Link

Digital Artist

Koray

Posts: 6720

Ankara, Ankara, Turkey

haydenwoodphotography wrote:
My head now hurts from attempting to follow this 23 page monster, is there a post which sums this process up in a nutshell?

Pizza sounds good!

do what first post says and follow links to the other posts and you shall be fine smile

Jul 05 10 01:04 am Link

Photographer

Sean Baker Photo

Posts: 8044

San Antonio, Texas, US

haydenwoodphotography wrote:

Hey there, I'd love to understand this process, I'm a newbie to MM but have been retouching for years and was rather fond of the High Pass method for sharpening. So when I saw this thread I had to see what this commotion was all about smile
My head now hurts from attempting to follow this 23 page monster, is there a post which sums this process up in a nutshell?

Pizza sounds good!

As Koray points out, please review the "sticky'd" posts referenced in the first message and then let us know if / where you're still stuck.

Jul 05 10 07:11 am Link

Photographer

Ashley Daws

Posts: 27

Auckland, Auckland, New Zealand

Wow, what a read!

You guy's are bloody geniuses. Many thanks to those of you that created these actions. Stunning work!

My head is hurting after trying to absorb what was said, however beer is helping LOL

Have a good weekend.

Jul 09 10 02:06 am Link

Photographer

Sean Baker Photo

Posts: 8044

San Antonio, Texas, US

Koray wrote:
ok here is a quick comparison...dont complain about quality etc, look for the effect and possibilities.

Remember, Nik Tonal Contrasts default settings adds to saturation and adjusts shadows and highlights slightly.

and sorry for the little type crop tongue

https://www.twicebakedphotography.com/download/Koray/Comparison1.jpg

we win IMO big_smile

FWIW, I think that this article is the basis for how NiK are able to make TC operate so quickly.  Not surprisingly, it was written by one of Kai's original gurus.  The technique is patented, so direct duplication is out for the time being.  I've emailed the author asking whether he's licensed any direction implementations which are available for download / purchase - I'll let you know if / when I hear something.

Jul 18 10 07:45 am Link

Photographer

Kantorka

Posts: 115

Berlin, Berlin, Germany

I'm sorry for being an idiot, but how do I determine what blur radius I need? I haven't wrapped my head around that unfortunately.

Aug 04 10 05:28 pm Link

Photographer

NothingIsRealButTheGirl

Posts: 35726

Los Angeles, California, US

Peter Claver wrote:

Dunno how they do for feature parity in the image processing realm but these two are (seemingly) good open-source equivalents:

http://www.scilab.org/
http://www.gnu.org/software/octave/

https://www.modelmayhem.com/po.php?thread_id=617336

Aug 04 10 05:31 pm Link

Retoucher

Pixels 2 Pixels

Posts: 190

Berwick, Pennsylvania, US

Kantorka wrote:
I'm sorry for being an idiot, but how do I determine what blur radius I need? I haven't wrapped my head around that unfortunately.

http://www.model-citizens.com/Tutorials … tion-1.wmv

Aug 04 10 06:06 pm Link

Photographer

Stecyk

Posts: 365

Calgary, Alberta, Canada

Pixels 2 Pixels wrote:

http://www.model-citizens.com/Tutorials … tion-1.wmv

Here's another video which might be helpful to shedding light on radius:

http://www.youtube.com/watch?v=kcY0Anrd5Yk

Aug 05 10 08:23 am Link

Photographer

Ruben Vasquez

Posts: 3117

Las Vegas, Nevada, US

syd47421 wrote:
wtf happened to robert randall?  havn't seen him on forums in ages, and his acct is closed?

Pixels 2 Pixels wrote:
PM sent. smile

Can you PM me as well? I'd really like to know too.

Pixels 2 Pixels wrote:
http://www.model-citizens.com/Tutorials … tion-1.wmv

This link doesn't seem to be working for me. Did something happen to it or is my computer giving me a hard time?

Aug 08 10 09:44 am Link

Retoucher

Pixels 2 Pixels

Posts: 190

Berwick, Pennsylvania, US

Ruben Vasquez wrote:

syd47421 wrote:
wtf happened to robert randall?  havn't seen him on forums in ages, and his acct is closed?

Pixels 2 Pixels wrote:
PM sent. smile

Can you PM me as well? I'd really like to know too.


This link doesn't seem to be working for me. Did something happen to it or is my computer giving me a hard time?

You may get a couple errors. It should still load, though. But it is a windows media video. I also made a flash video of it. You can find that one here..

http://www.model-citizens.com/Tutorials … tion-1.flv

Aug 09 10 07:14 pm Link

Photographer

Ruben Vasquez

Posts: 3117

Las Vegas, Nevada, US

Pixels 2 Pixels wrote:
You may get a couple errors. It should still load, though. But it is a windows media video. I also made a flash video of it. You can find that one here..

http://www.model-citizens.com/Tutorials … tion-1.flv

Thanks! Can you send that pm to me as well?

Aug 09 10 09:02 pm Link