Retoucher
Peano
Posts: 4106
Lynchburg, Virginia, US
The purists will huff and puff, of course, but a gentle touch of Portraiture might be all you need. 200% crop: ![https://i1005.photobucket.com/albums/af171/retouch46/Forums/portraiture2_zps0f20d93d.gif]() EDIT: 100% crop ![https://img844.imageshack.us/img844/6819/co0q.jpg]()

Photographer
Tulack
Posts: 836
Albuquerque, New Mexico, US
Or negative clarity brush in RAW converter.

Photographer
QQphotographY
Posts: 6
Garden Grove, California, US
Thank you for helpful tips Peano & Tulack. You guy are so great.

Digital Artist
Koray
Posts: 6720
Ankara, Ankara, Turkey
Peano wrote:
The purists will huff and puff, of course, but a gentle touch of Portraiture might be all you need. What a gentle Portraiture touch you have right there peano 
Do you really believe that you have improved the image and helped the OP?
here is a good video about how to retouch skin:
http://www.youtube.com/watch?v=RM0byiIcTJ0

Photographer
TFPPhotography
Posts: 6
Hurstpierpoint-Keymer, England, United Kingdom
If you do not have portrait professional or any other face manipulation software here is a basic technique in photoshop. This may seem like a lot to do but once you have done it and got used to it, it will only take a few minutes for a basic picture. I teach photoshop at 6th form and I am sure I have created a video to show students how to do this. I will have a look for it, upload to YouTube and paste the link, in the meantime:
1. Duplicate your layer
2. Add a slight blur to the top layer (try which one works best, I just use Gaussian blur, make the blur a little too much, this will make it easier to see what is sharp and what is not, this will be sorted finally in step 8)
3. Add a masking layer to the top layer
4. Ensure you are drawing on the masking layer and choose the brush tool.
5. Using the black brush, draw black over where you do not want the blur, ie eyes, hair, jewellery. If you are drawing on the mask layer, you will see the area become its original sharpness. Use a big brush as possible to cover the area. If you do not want an area 100% sharpness, take the brush opacity down a bit. Remember to put it back up though.
6. If you make a mistake, choose the white brush to bring the blur back in.
7. To check you have covered all the areas you want sharp, turn off the bottom layer and you will see through the parts that will be sharp.
8. Finally, turn down the opacity of the top layer and the blur will start to become less, drop it down until you are happy with the outcome. This merges the sharpness if the bottom layer with the blur to create the perfect final. It is a good way to try out different smoothness and if client or model is not happy you can reload and just change opacity.
Hope this helps.

Retoucher
Natalia_Taffarel
Posts: 7665
Buenos Aires, Buenos Aires, Argentina
Peano wrote:
The purists will huff and puff, of course, but a gentle touch of Portraiture might be all you need All he needs for what? For growing as a professional or for getting good enough results for FB?
A Hass costs 25.000 Euros + 5000 for a couple of lenses + 5000 for lights - mEverything to get more details.
Use portraiture on the pores and you will get rid of 35.000 euros in one click
Use portraiture on the pores and you'll never work in the beauty industry again.
My advice: Don't sharpen the image from the raw, apply contrast more selectively. Get used to an organized workflow where you get density of color/light from the raw, then work on texture (and just texture) then work on evening the gradients of lights with D&B and finally try to enhance definition of features with selective use of shadows and lights (also D&B)
If you want a general tone effect, do it in the top and work on texture underneath that.
if you want to sharpen, do it in the end, when everything is clean.
http://vimeo.com/68360962 that's a simple image with an organized workflow. Not a step by step but I hope it helps

Photographer
R.EYE.R
Posts: 3436
Tokyo, Tokyo, Japan
Natalia_Taffarel wrote:
All he needs for what? For growing as a professional or for getting good enough results for FB?
A Hass costs 25.000 Euros + 5000 for a couple of lenses + 5000 for lights - mEverything to get more details.
Use portraiture on the pores and you will get rid of 35.000 euros in one click
Use portraiture on the pores and you'll never work in the beauty industry again.
My advice: Don't sharpen the image from the raw, apply contrast more selectively. Get used to an organized workflow where you get density of color/light from the raw, then work on texture (and just texture) then work on evening the gradients of lights with D&B and finally try to enhance definition of features with selective use of shadows and lights (also D&B)
If you want a general tone effect, do it in the top and work on texture underneath that.
if you want to sharpen, do it in the end, when everything is clean.
http://vimeo.com/68360962 that's a simple image with an organized workflow. Not a step by step but I hope it helps I am genuinely intrigued. Could you possibly elaborate on industry's dislike of Portraiture?
Retoucher
Natalia_Taffarel
Posts: 7665
Buenos Aires, Buenos Aires, Argentina
R.EYE.R wrote:
I am genuinely intrigued. Could you possibly elaborate on industry's dislike of Portraiture? I didn't say the industry didn't like portraiture, I said the industry doesn't like to get rid of texture like that.
I don't like portraiture, tho I've seen it used right (NOT on pores) and only as a compliment for other techniques, never on its own.
I can recognized the use of it and so can most people with a budget for retouching.
Photographer
R.EYE.R
Posts: 3436
Tokyo, Tokyo, Japan
Natalia_Taffarel wrote:
I didn't say the industry didn't like portraiture, I said the industry doesn't like to get rid of texture like that.
I don't like portraiture, tho I've seen it used right (NOT on pores) and only as a compliment for other techniques, never on its own.
I can recognized the use of it and so can most people with a budget for retouching. Makes sense.
I personally think it does good job on averaging unevenness in tonal transitions in skin.

Photographer
In Balance Photography
Posts: 3378
Boston, Massachusetts, US
R.EYE.R wrote:
Makes sense.
I personally think it does good job on averaging unevenness in tonal transitions in skin. That's what I use it for. I wouldn't say it does a good job, but I would say it does a better job than I can do with photoshop.
I feel like I'm giving up texture when I'm using portraiture to even out the tones - I may not be using it right. I would certainly like to learn how to even out skin tones using Photoshop so that the image looks better as opposed to worse.
Retoucher
Natalia_Taffarel
Posts: 7665
Buenos Aires, Buenos Aires, Argentina
In Balance Photography wrote:
I would certainly like to learn how to even out skin tones using Photoshop so that the image looks better as opposed to worse. Then stop using shortcuts and spend more time D&B 
It is really that simple, the more you do it, the more proficient you get at it
Retoucher
Peano
Posts: 4106
Lynchburg, Virginia, US
In Balance Photography wrote:
I feel like I'm giving up texture when I'm using portraiture to even out the tones - I may not be using it right. How about this: Post a 100% crop of a before and after that you've done with Portraiture, one that you feel has lost too much texture. Maybe others who use Portraiture can suggest ways to get better results.
Photographer
R.EYE.R
Posts: 3436
Tokyo, Tokyo, Japan
My d&b is uneven. Exceedingly so in fact. I can preserve texture using Portraiture and even tones in 5 minutes as opposed to redoing d&b for days. It's win-win in my book of reference 

Photographer
REMOVED
Posts: 1546
Atlanta, Georgia, US
It seems to me that software isn't the answer, better lighting is.
Photographer
R.EYE.R
Posts: 3436
Tokyo, Tokyo, Japan
Fotopia wrote:
It seems to me that software isn't the answer, better lighting is. How about situations where harsh lighting is required?
Retoucher
Natalia_Taffarel
Posts: 7665
Buenos Aires, Buenos Aires, Argentina
R.EYE.R wrote:
My d&b is uneven. Exceedingly so in fact.
I can preserve texture using Portraiture and even tones in 5 minutes as opposed to redoing d&b for days.
It's win-win in my book of reference It's a win win if you have no aspirations of working with high end clients ever
Not my cup of tea
Photographer
R.EYE.R
Posts: 3436
Tokyo, Tokyo, Japan
Natalia_Taffarel wrote:
It's a win win if you have no aspirations of working with high end clients ever
Not my cup of tea Yet again we are in "industry". Do enlighten me why industry frowns upon use of portraiture?
Additionally, which is better - having a good result with portraiture or plastic skin with d&b?
Photographer
AJ_In_Atlanta
Posts: 13053
Atlanta, Georgia, US
In Balance Photography wrote:
That's what I use it for. I wouldn't say it does a good job, but I would say it does a better job than I can do with photoshop.
I feel like I'm giving up texture when I'm using portraiture to even out the tones - I may not be using it right. I would certainly like to learn how to even out skin tones using Photoshop so that the image looks better as opposed to worse. You can use it on the low freq layer to try and prevent some of that. It's still not the same as doing it the D&B way but it's better.
Photographer
Camerosity
Posts: 5805
Saint Louis, Missouri, US
Natalia_Taffarel wrote:
It's a win win if you have no aspirations of working with high end clients ever
Not my cup of tea R.EYE.R wrote:
Yet again we are in "industry". Do enlighten me why industry frowns upon use of portraiture?
Additionally, which is better - having a good result with portraiture or plastic skin with d&b? Used properly, D&B doesn't give plastic skin. It leaves the skin texture intact and just gives uniform texture.
It's Gaussian blur, surface blur, etc., that obliterates skin texture and gives plastic-y skin.
I've used both. The first approach I learned used blur for everything. There are still some instances when I use Gaussian blur - certain types of avant-garde images, Vargas-style pinups, etc.
D&B can be very tedious. Sometimes I just use split frequency and use the healing brush on the high frequency.
Retoucher
Natalia_Taffarel
Posts: 7665
Buenos Aires, Buenos Aires, Argentina
Camerosity wrote:
D&B can be very tedious. Sometimes I just use split frequency and use the healing brush on the high frequency. You don't D&B texture. You D&B shape

Digital Artist
RixDigital
Posts: 159
Crystal Lake, Illinois, US
It's ultimately budget-related, right? (time and money). Depending upon what your budget is (or your client's budget), that will pretty much dictate what tools you can use. Sometimes you have to go with an "80-20" approach. i.e. how can you achieve 80% of the ultimate vision, but with only a 20% effort.
Also, as with anything, there can be over-use of any tool/process. A plugin as well as hand-done D&B can both beautify an image, but also destroy it. Personally, I try to employ a toolset of multiple tools and not swing the pendulum one direction vs. the other.
Example: I looked at the before & after examples on the Portraiture web site. While it did smooth out the skin, seemed to not always address blemishes. So some prior clone/healing brush work would still be required. One could then do some basic D&B to perhaps provide a bit more depth.
Retoucher
Natalia_Taffarel
Posts: 7665
Buenos Aires, Buenos Aires, Argentina
RixDigital wrote:
It's ultimately budget-related, right? (time and money). Depending upon what your budget is (or your client's budget), that will pretty much dictate what tools you can use. Sure, let the budget dictate your workflow and you will never have the clients that can afford a different workflow
Under promise, over deliver. Use any image you can get your hands on to create the next portfolio piece that will get you the bigger clients.
Retoucher
Natalia_Taffarel
Posts: 7665
Buenos Aires, Buenos Aires, Argentina
R.EYE.R wrote:
Yet again we are in "industry" Most certainly not
The industry is defined by the elite
Editorial Beauty/Fashion: Vogue, Numero, Vanity Fair, Harpers, Elle
Commercial Beauty: LÓreal, Lancome, Wella, Max
Commercial Fashion: Designer brands
Each industry has standards
eta: Take into account the OP is trying to do beauty - That's why I'm talking about the beauty/fashion industry
R.EYE.R wrote:
Additionally, which is better - having a good result with portraiture or plastic skin with d&b? It's like asking: what's better? Good powder instant cakes or crappy nade from scratch cakes - when talking about setting up a cake shop.
If you can't make cakes, you're in the wrong business.
Photographer
R.EYE.R
Posts: 3436
Tokyo, Tokyo, Japan
Natalia_Taffarel wrote:
Most certainly not
The industry is defined by the elite
Editorial Beauty/Fashion: Vogue, Numero, Vanity Fair, Harpers, Elle
Commercial Beauty: LÓreal, Lancome, Wella, Max
Commercial Fashion: Designer brands
Each industry has standards
eta: Take into account the OP is trying to do beauty - That's why I'm talking about the beauty/fashion industry I know. Believe me, many of us would like to work in the industry.
As recent as this morning I saw a recognised industry publication and the advert at the back featured absolutely atrocious hair masking - it was a terrible cut out.
Making me question the standards..
I hope you also understand that to me it sounds fishy when one method is bashed without any thorough explanation?

Photographer
Jakov Markovic
Posts: 1128
Belgrade, Central Serbia, Serbia
Natalia_Taffarel wrote:
R.EYE.R wrote:
Yet again we are in "industry" Most certainly not
The industry is defined by the elite
Editorial Beauty/Fashion: Vogue, Numero, Vanity Fair, Harpers, Elle
Commercial Beauty: LÓreal, Lancome, Wella, Max
Commercial Fashion: Designer brands
Each industry has standards
eta: Take into account the OP is trying to do beauty - That's why I'm talking about the beauty/fashion industry
It's like asking: what's better? Good powder instant cakes or crappy nade from scratch cakes - when talking about setting up a cake shop.
If you can't make cakes, you're in the wrong business. Ahahahha, so true, but it's even funnier how everyone compares things to cakes. ahahhahha
Lotsa hungry people around here.
Photographer
R.EYE.R
Posts: 3436
Tokyo, Tokyo, Japan
If you can't make cakes, you're in the wrong business. To me it's more of a question, what is better: hand assembled Leica or conveyer belt mass produced Canon...
Just because something is washed in the tears of 13yo virgins from only one small village at the bottom of Mt. Krakatau then sprinkled with exactly 10 days and 14minutes sundried peppers from Argentina followed by carefully wrapping in gold to steam for exactly 24.3seconds and served with chives hand picked by a village shaman from lower micronesia - it is not necessarily better than something one's mum prepared using a recipe from memory and goods from local market..
and oh..McDonalds is a successfull company
Photographer
In Balance Photography
Posts: 3378
Boston, Massachusetts, US
Natalia, Peano, and AJ - Thanks for the suggestions - there's no doubt that I need improved skill in this area - both with D&B and Portraiture and learning to *anything* on the lo pass layer. There's also no doubt that the minute I get the resolve to push through to the next level on this, I'll be tapping your collective expertise to help me through it (yet again). Thanks in advance
Retoucher
Natalia_Taffarel
Posts: 7665
Buenos Aires, Buenos Aires, Argentina
R.EYE.R wrote:
and oh..McDonalds is a successfull company Succesful = Money
Reality TV is watched by millions - is still NOT GOOD nor is mc donnals
Art direction lesson:
ANY creative field
Concentrical circles
(AvantGard ( Masses ( Quality (ELITE) Quality)Masses)AvantGarde)
Mc Donnals would be "masses" - so would portraiture.
Automatic, good enough, cheap
Why? Is based on the selective bluring of intermedian visual frequencies
You have no control over the frequencies, and with photoshop you have entire control.
Some detail contained in those intermedian frequencies it's essencial for human looking skin
The more manual the process is, the better. I disagree with the local cake from mum with groceries from the local market, unless that market is in italy and your mum is a recognized experienced chef
x

Photographer
m_s_photo
Posts: 605
Port Moody, British Columbia, Canada
Strokes for folks.
OP take your pick. Lots of good options.
Photographer
Tulack
Posts: 836
Albuquerque, New Mexico, US
Natalia, may I ask you a question? You are one of top 10 retouchers in the world. How did you end up on this forum?
Photographer
R.EYE.R
Posts: 3436
Tokyo, Tokyo, Japan
Natalia_Taffarel wrote:
Why? Is based on the selective bluring of intermedian visual frequencies
You have no control over the frequencies, and with photoshop you have entire control.
Some detail contained in those intermedian frequencies it's essencial for human looking skin
The more manual the process is, the better. I disagree with the local cake from mum with groceries from the local market, unless that market is in italy and your mum is a recognized experienced chef
x Now this is the explanation I accept. Makes perfect sense to me.
Digital Artist
Koray
Posts: 6720
Ankara, Ankara, Turkey
Tulack wrote:
Natalia, may I ask you a question? You are one of top 10 retouchers in the world. How did you end up on this forum? there was a time when she wasnt one of the top and here we were having fun learning how to split frequencies and all. most of whom were around here those times are successful and busy, except a certain someone 
Photographer
Camerosity
Posts: 5805
Saint Louis, Missouri, US
Camerosity wrote:
D&B can be very tedious. Sometimes I just use split frequency and use the healing brush on the high frequency. Natalia_Taffarel wrote:
You don't D&B texture. You D&B shape Maybe that's why I'm still struggling with Photoshop after a year and a half. I use D&B for shaping and carving, but I've also spent hours painting out three lines in a models forehead and (worse) epic stretch marks with a 1-pixel brush.

Photographer
mcclary
Posts: 84
Plantation, Florida, US
From an outsider that knows nothing on the subject and would actually hire someone to retouch my work. I would listen to Natalia_Taffarel. She is talking about taking the work to an entirely different level of quality which will show in any shot.
Photographer
Trill Imagery
Posts: 126
Los Angeles, California, US
Photographer
QQphotographY
Posts: 6
Garden Grove, California, US
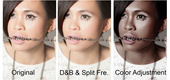
![https://photos.modelmayhem.com/photos/130718/22/51e8cc9b309c2_m.jpg]() I've been learning D&B from Knuno. & Split Frequency from Natalie and come up with the middle pic. Thank you Knuno. and Natalie for these great techniques. After using these techniques, I made some color adjustment. However, the skin pores showed up badly made the pic not smooth any more. My concern right now is how to make my pic smooth again. I would love to learn more from the great retouchers in here. Thank you all.
Photographer
Jakov Markovic
Posts: 1128
Belgrade, Central Serbia, Serbia
WHY DO ALL THE TOPICS END UP IN THE SAME DISCUSSION.
IF YOU WANT TO BE THE BEST, LOOK AT THEIR WORK, BECOME AS GOOD, THEN BUILD ON TOP OF THAT.
No one will ever ever ever ever ever be good at anything if they're inspired by mediocre results!!!
develop film/raw
stamp and heal
fix all the stupid things that bother you
enhance the shape via shading
enhance color dynamic via selective color adjustments
sharpen
save

Photographer
Bella Photoshoot
Posts: 229
Laguna Beach, California, US
AndyPaul wrote:
If you do not have portrait professional or any other face manipulation software here is a basic technique in photoshop. This may seem like a lot to do but once you have done it and got used to it, it will only take a few minutes for a basic picture. I teach photoshop at 6th form and I am sure I have created a video to show students how to do this. I will have a look for it, upload to YouTube and paste the link, in the meantime:
1. Duplicate your layer
2. Add a slight blur to the top layer (try which one works best, I just use Gaussian blur, make the blur a little too much, this will make it easier to see what is sharp and what is not, this will be sorted finally in step 8)
3. Add a masking layer to the top layer
4. Ensure you are drawing on the masking layer and choose the brush tool.
5. Using the black brush, draw black over where you do not want the blur, ie eyes, hair, jewellery. If you are drawing on the mask layer, you will see the area become its original sharpness. Use a big brush as possible to cover the area. If you do not want an area 100% sharpness, take the brush opacity down a bit. Remember to put it back up though.
6. If you make a mistake, choose the white brush to bring the blur back in.
7. To check you have covered all the areas you want sharp, turn off the bottom layer and you will see through the parts that will be sharp.
8. Finally, turn down the opacity of the top layer and the blur will start to become less, drop it down until you are happy with the outcome. This merges the sharpness if the bottom layer with the blur to create the perfect final. It is a good way to try out different smoothness and if client or model is not happy you can reload and just change opacity.
+ 10!
Hope this helps.

Photographer
Drew Smith Photography
Posts: 5214
Nottingham, England, United Kingdom
R.EYE.R wrote:
To me it's more of a question, what is better: hand assembled Leica or conveyer belt mass produced Canon...
Just because something is washed in the tears of 13yo virgins from only one small village at the bottom of Mt. Krakatau then sprinkled with exactly 10 days and 14minutes sundried peppers from Argentina followed by carefully wrapping in gold to steam for exactly 24.3seconds and served with chives hand picked by a village shaman from lower micronesia - it is not necessarily better than something one's mum prepared using a recipe from memory and goods from local market..
and oh..McDonalds is a successfull company Quite so.
But.. if your ambition is to be a cordon blue chef then you might want to avoid making McDonalds your reference point.
|