|
Forums >
Digital Art and Retouching >
Curves to get this look?
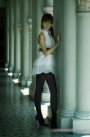
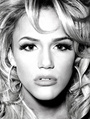
Does anyone know what kind of curve setting I need to get this look?  I tried raising the dark parts of the curve but it still doesn't match this picture. Oct 07 15 06:07 pm Link What's the image that you're working on? it's always easier that way. Oct 07 15 08:30 pm Link Maybe start by using curves to bring it back to 'normal'. Then consider the reverse settings. Three moves should get you there. A tone curve, A colour curve (separately adjusting R,G and B channels), and a Hue/Saturation adjustment. Oct 07 15 11:40 pm Link What's the difference between a tone curve and a color curve? In a curve layer, we're adjusting color, right? Oct 08 15 12:26 am Link Sausage69 wrote: If you make a curves adjustment in the default RGB, then you are adjusting all three channels equally and therefore there should be no significant colour shift (a tone curve). If you select Red, Green and/or Blue channels from the Curves pop down menu, and adjust one or more of those channels, then you are changing the colour. (a colour curve) Oct 08 15 12:43 am Link Add a white solid color adjustments and play with the opacity.You may change the white to blue, cyan or whatever tint you like. Oct 08 15 01:30 am Link you need to have a light filter too there are some good light effects to play with on alienskin exposure etc. however that is not just one effect. curves cannot imitate the way that actual light desaturates and brightens some parts of the image and not others. Maybe shoot into the sun more next time. Oct 08 15 01:54 am Link  I did this on my Macbook, so the colours/tones will not be very accurate. But, in principle, these are the three moves I was suggesting to reverse engineer it to something like the image might have been before adjustments. Then you can record the settings and apply their inverse values to another image. Oct 08 15 01:14 pm Link Here is a mini tutorial-like reply... that gives you a step by step approach and rationale. AKMac...The above post is great to see! Yes, Curve Adjustment Layers are a great way to do this image. To duplicate the color results you want...make some observations and measurements on your sample image first. How is your sample deviating from a normal image? Are the highlights white? Are the blacks dark and neutral like a regular image for example? Here are some areas to visually observe in your sample image...and then make notations on...so you can tell what the retoucher or photographer DID...to make his sample image different! - Is the exposure different in my sample... from a normal image? - Are the highlights white or yellow or gray? What is the color cast of the whites? - Are the Dark parts of the image a true neutral black...or are they colored or a tone of gray? - How about the contrast of the image? Is it different from normal? - How about color Saturation? Is it high or low in different parts of the image for example. - Is there a color Theme or very obvious Different LOOK to the image? What is it? Define it by observation - And other characteristics that are different from a normal looking image. Visually note and define the differences. So, here are some specific steps and rationale... to re-create the sample image: 1. Observed in your sample image...The blacks are not black...they are some higher shade of black. Put a color sampler or color picker on the dress to see how far up you have to go to duplicate the loss of contrast due to the lifting up of the blacks. Your Blacks are NOT true dark neutral Black! To change this... In a separate curve adjustment layer use the RGB channel... and click the curve line a little bit lower left of center (where the blacks are) and bring it UP. This will raise the lightness of just the black parts of the image. Your own original image might be 0,0,0 in the blacks like it should be... BUT... In this image... the blacks are at approx 80,80.80. So, the new RULE #1 for you to duplicate this image is: Bring the RGB blacks UP in your new image to approx 80. 2. The background highlights as observed... are a low saturation cyan color instead of pure white as in a normal image. The pale cyan color replaces what would otherwise be a blown out White in a normaly taken image. In your sample image... the usually white highlights have been color changed to a washed out cyan color. To do this change: make a new Curves Adjustment Layer and then go into the red channel...and pull down the top right point. This will instantly change all of your white highlight colors into a cyan color. You can leave this global adjustment be effective across the whole image as it is in your sample image...OR... you can use a mask on your adjustment layer to lay down the cyan tone selectively just in certain key places in the image. Do a control I to invert the mask from a white mask to a black mask. The cyan color will now disappear. Now, paint on the mask with a soft, 6% opacity, white brush. Where ever you paint... the white highlights will selectively turn to cyan. This allows you to be artistic and creative on where the effect occurs and how strong it will be. You can then artistically use your Opacity Slider on that same adjustment layer to reduce the strength and intensity of the cyan color. Paint with a black brush to erase where the cyan was laid down. So the new RULE #2 is: Make an adjustment layer and pull down the top right corner in the red channel so the white highlight areas turn cyan...use the opacity slider to reduce their strength to taste. Have the effect be global throughout the whole picture as in the sample image...or optionally... use a mask to paint in the effect in just key creative places. 3. Observed in your Sample: There are some red accents added to the image... to bring warmth back into the image in selective places. When you add global cyan to an image like in your sample image... it Cools Down the and contaminates the color balance across the whole image. To correct this: The retoucher appears to have added some selective warmth back into the image in some key creative and usual places. To do this: Make a new curve adjustment layer and go into the red channel and pull up the center point. This will make your whole image red (warmer). It will also neutralize the the cyan you just put down...because cyan is the opposite of red on the color wheel. SO... you will have to use the black mask from step 2 to turn off the red curve that you just put in... just for a minute. When the mask turns black...your red coloration will disappear. Now, Paint on the image with that soft, 6% opacity, white brush. Paint on the girls desktop, her legs, and the hair areas. This will selectively add a red color cast to these areas and warm them back up!! Selectively add in enough red to overwhelm the cyan cast where appropriate. So, Visual Duplication Rule #3 is: Add in a red curve to the image to overcome the global cyan cast. Use a black mask to selectively reveal this warm color back into the image using a white brush. Paint on the image anywhere there is flesh... or something in the image that should be warm. You are done. You observed and noted 3 characteristics in the new sample image that were different than a normal image! You used adjustment layers and some masks to selectively color and tone correct the image! You created 3 Visual Rules for duplicating this image Look and Feel! Thats it...Well done! Now...here is a caveat. If your new images dont have a washed out background, or some predominant real black areas, and if they dont have any areas that should be warm red...then... your new images will not retouch very well!! When you have a Look...sometimes your new images are "Not Shot Correctly" to give you the end result you would like! Keep that in mind! Coloring an image with these 3 Rules will NOT work...unless... your new images have the proper characteristics. For example: You are trying to create this Look on an image that has a dark background...NOPE...that wont work!! You need an image that has a great amount of white highlights in the background... that are almost all washed out... to achieve THIS characteristic LOOK! If you dont have a strong white background in your new images...then you wont be able to have that Observed Cyan Look... that is So Characteristic of this sample image. You will have to figure out something different by observing and being creative...and maybe come up with a New and Different Kind of Creative Look YOURSELF... that is suitable for THAT particular image! Every image may need a slightly different creative approach from you... unless the images were all shot with similar visual characteristics. Oct 08 15 01:49 pm Link Sausage69 wrote: It's a mix of what you're trying to do with the curve and lens flare from the window. Oct 08 15 05:06 pm Link Webspinner wrote: Exactly. Oct 08 15 05:07 pm Link Webspinner wrote: Curves actually can do that just by changing the blending mode and masking. Curves + blending modes and you got a very powerful tool. Oct 08 15 06:56 pm Link There may be a lens flare involved in this image from the left window. It is not a direct visible sun... or the rays of the sun...but the brilliance of the left window IS very high...and it may have caused a slight, widespread, flaring in the lens. Great observation Mikey. You can replicate the look of a lens flare effect by creating a new clear transparent layer at the top of your layer stack and then painting in the flare with a 100% opacity and 1% flow white soft brush. Just paint and paint in the area till the flaring effect very gradually builds up to what you like. You can also do a 1% opacity brush at 100% flow...it builds up the effect a bit faster and stronger. The first way is a very subtle and transparent application... the second way builds up faster but sometimes becomes just a bit opaque. You can also download many kinds of "Free Flare Brushes" (just Google) on the net... and use them to insert a great and realistic flare effect within the image. It is usually placed on a clear transparent layer above the main image or over a 50% gray layer with the blend mode set to softlight. These flare brushes can be resized, and rotated and moved into any position for the best visual effect. There are some gorgeous flare brush sets that can be used to really make your regular images amazing in atmospherics. There are also hundreds of various regular "Light Flare Images" across the net...pick a copy free image...place it above your image stack... and then use the Blend-If sliders on the layer styles dialogue box to take the brightest parts of the flare and drop away the rest of the image to pure clear. You do that by alt clicking on the top set of blend-if sliders and separate the left hand slider from its partner. Drag it left and it will begin to cut out the flare interactively...also drag over the other slider point until the edges become soft in the cutout... you now have a perfectly cutout flare on a clear transparent background in just seconds. Use the move tool to move its position and use the opacity slider to change its opacity...or go back to the layer style blend-if sliders again to re-adjust the look of the flare. On this image...the potential flare effect is a very widespread soft flare... and it is very diffuse and almost transparent. So Yes, add in another visual copy cat rule that adds in a thin, diffuse, white wash layer... that adds extra brightness and fog over some of your new image. That will give it that flare-ish look. Oct 08 15 07:55 pm Link AKMac wrote: Excellent!! Nov 07 15 07:37 am Link |