Photographer
Dreamscape Creative
Posts: 479
Charleston, South Carolina, US
I certainly appreciate anyone that's clearly taking the time to explore Photoshop's potential, but I don't think I'm in a good position to fully grasp why this is supposed to be a big improvement. I read the whole thread, and most of the original "High Pass Sucks" thread. It's certainly possible I missed something.
I'm also not understanding why there are stops in the OP's actionscript for Liquify and Gaussian Blur (which doesn't give me the benefit of a visual confirmation of what the blur is doing if I decide to dial it up or down).
Photographer
tigerfist photography
Posts: 2100
Toronto, Ontario, Canada
thank you for this thread bc i couldn't bother to read the complicated other version.
THANK YOU.
Photographer
Mask Photo
Posts: 1453
Fremont, California, US
Dreamscape Creative wrote:
I'm also not understanding why there are stops in the OP's actionscript for Liquify and Gaussian Blur (which doesn't give me the benefit of a visual confirmation of what the blur is doing if I decide to dial it up or down). the stop for liquify is because I find that doing one liquify isn't always sufficient to get it all done; sometimes i want to undo and try again, or i miss something while zoomed in. I got tired of the action blasting ahead after one liquify, when i realized i might need more. It also stops to allow a lens correction filter, if needed (i rarely do, which is why it's not built into the action).
The stop for blur isn't crucial, but it's helpful to target the blur to the size of the details that have to be removed. For a really close headshot, i might blur 8px, for a full-length, i might blur only 2. It defaults to 10 and ideally you'll dial it down until you just start to see the skin texture, then you'll dial it back up a notch.
If you blur too little, detail will be left on the low frequency layer. If you blur too much, you'll run into more problems when you clone near edges; the bleed from the neighboring edge's blur will come through, and you'll have to airbrush it away on the "smoothen" layer. This becomes really visible, say, near the mouth on a model with white skin and red lips.
Are you not seeing anything blur in the dialog box? When I run the action, it's set to hide the highfrequency layer so i can see the effects of the blur.
If you're not seeing the effects of the blur in the dialog window, it's possible that either i copied the action out wrong, or you're on a version of photoshop that doesn't understand part of the action. Which version are you running?
Photographer
Dreamscape Creative
Posts: 479
Charleston, South Carolina, US
I'd be surprised if my version wasn't executing it correctly. I'm running CS2. I know CS2 is old now, but I didn't see anything out of the ordinary when I scrutinized your script.
Photographer
Dreamscape Creative
Posts: 479
Charleston, South Carolina, US
Sorry, it doesn't look like I fully answered your question. The dialog box for the Gaussian Blur is coming up, defaults to 10, but no adjustments to the dial are visually confirmed with the preview enabled. I didn't know if that was intentional or not.
Photographer
remerrill
Posts: 3880
Arcata, California, US
Natalia_Taffarel wrote:
Everywhere, it's hardly noticeable but I NOTICE and it bugs me.
x SRB Photo wrote:
I guess I'm wondering if it's true banding or is just the PS preview engine showing false banding because of the approximations it uses? I was thinking the same thing...
are you getting the banding when looking at the image at 100%?

Retoucher
Natalia_Taffarel
Posts: 7665
Buenos Aires, Buenos Aires, Argentina
Everywhere, it's hardly noticeable but I NOTICE and it bugs me. I guess I'm wondering if it's true banding or is just the PS preview engine showing false banding because of the approximations it uses? remerrill wrote:
I was thinking the same thing...
are you getting the banding when looking at the image at 100%? Yup, is real.
x

Photographer
Sean Baker Photo
Posts: 8044
San Antonio, Texas, US
Natalia_Taffarel wrote:
Everywhere, it's hardly noticeable but I NOTICE and it bugs me. I guess I'm wondering if it's true banding or is just the PS preview engine showing false banding because of the approximations it uses? Yup, is real.
x Can you post or send along a how-to for recreating it? I'm going to be miffed if I'm causing people to induce banding in their images; especially if I can't fix it  . .
Photographer
Mask Photo
Posts: 1453
Fremont, California, US
Dreamscape Creative wrote:
Sorry, it doesn't look like I fully answered your question. The dialog box for the Gaussian Blur is coming up, defaults to 10, but no adjustments to the dial are visually confirmed with the preview enabled. I didn't know if that was intentional or not. so, the dialog window comes up, set to 10, shows a blurred image int he box, but the image doesnt change when you adjust the slider?
If i'm not understanding you, i apologize.
try centering the dialog window on a subject's face, see if it's blurred, and then bring the blur amount back to zero and see if it unblurs. If it doesnt update the dialog window, there might be something funny going on. if it does update the diaog window but not the whole document, either i messed up and it's not hiding the top layer, or possibly when i made it, i didn't deem it that important, since i can get a view of a face in the dialog window and that's the real reason for me to use the separation.
Thanks for the feedback!
Photographer
Dreamscape Creative
Posts: 479
Charleston, South Carolina, US
Mask Photo wrote:
so, the dialog window comes up, set to 10, shows a blurred image int he box, but the image doesnt change when you adjust the slider?
If i'm not understanding you, i apologize.
try centering the dialog window on a subject's face, see if it's blurred, and then bring the blur amount back to zero and see if it unblurs. If it doesnt update the dialog window, there might be something funny going on. if it does update the diaog window but not the whole document, either i messed up and it's not hiding the top layer, or possibly when i made it, i didn't deem it that important, since i can get a view of a face in the dialog window and that's the real reason for me to use the separation.
Thanks for the feedback! Yes, the blur is updated in the dialog window, and it does update the document with the blur. I was just assuming that you'd have the have the layers above the blurred layer disabled so you can see it as a whole? In hindsight, I suppose that's just a difference in workflows; it's not something I'm used to.
Photographer
Mask Photo
Posts: 1453
Fremont, California, US
Little things about my odd choices in the creation of these actions have bugged me, so I sat down to examine them again and figure out why i did what i did. I've made some changes, with which I'll update the OP. thanks again for the scrutiny! SRB Photo wrote:
- Why a USM in the Workspace action? ok. I'm removing the USM, since there are other ways to affect local contrast, and because the method i was using was image-destructive.
out of curiosity, what would be good settings for a local contrast boost using the "apply image" method?
Mask Photo wrote:
"- Why "Hard Light" for the noise reintroduction? (vs. LL)"
Now that you mention it, it *may* have been the fact that the noise layer was inside a linear light layer or that it was applying it directly to a split HF layer, instead of to the source image I've just reexamined it, and i get the exact values in several points if I use hard light, but not if I use linear light. This is *not* how it behaves when i denoise outside of a group that's set to linear light, but I'm not complaining; the blend mode on the layer is crucial for my healing process, so that's what it's gotta be.
SRB Photo wrote:
- Why add noise to the LF data? of course, you're right; it's not optimal to add noise to an already-smooth layer. What I've done instead is to move the layer of removed noise above the healing later; noise can be masked back in if banding presents itself.
I actually ran into a problem with the new noisy layer making it difficult to composite several white-cyc images together; selecting color range wouldn't give me a good mask.
I'm debating with putting the noise above or below the capture sharpen. I'm tending toward "below" because if actual detail is removed, I'll want to mask it back in AND sharpen it with the rest of the data, and if i just want to add noise to cancel banding, I can mask in less than the full amount if i desire.
SRB Photo wrote:
- Why a Levels adjustment of the HF data? running the numbers gives me no plausible reason for this. I suspect that at one point in the action creation, I was in 8-bit mode with a 16-bit procedure, and this was the correction i found to be most tolerable. this has been corrected (good lord, all of my photos are 1 bit brighter in the midtones than i thought!!) 
SRB Photo wrote:
- Why midpoint your sharpening curve @ 128,129? (vs. 128,128) fixed
Hopefully the action is a bit more useful at this point.
Photographer
Sean Baker Photo
Posts: 8044
San Antonio, Texas, US
Now this is dedication!  Mask Photo wrote:
ok. I'm removing the USM, since there are other ways to affect local contrast, and because the method i was using was image-destructive.
out of curiosity, what would be good settings for a local contrast boost using the "apply image" method? USM is actually an 'ideal' filter, in as much that it does the exact same thing as the Apply Image technique - even, in fact, behaving itself in 8bpc mode. I was asking simply because it hadn't been mentioned at the time of the OP, and as you mention is destructive in the changes it makes to our basis for the remainder of editing. It's my opinion that early in one's retouching career it's better to front-load most LCE operations as it helps to identify problem areas which one might miss otherwise. Later on in one's learning, though, it becomes more a problem inasmuch that it's (a) destructive (b) not easily refined after the fact and (c) amplifying problems areas as much as 'good' areas. That's just my opinion, though.
Mask Photo wrote:
I've just reexamined it, and i get the exact values in several points if I use hard light, but not if I use linear light. This is *not* how it behaves when i denoise outside of a group that's set to linear light, but I'm not complaining; the blend mode on the layer is crucial for my healing process, so that's what it's gotta be. I submit that that shouldn't be going on, and that the difference is likely either a rounding / previewing error or caused by some other layer. Hard Light should inherently be messing things up a bit (from the perspective of perfect reconstruction), while LL is literally the inverse of our (inverted) Add operation. Is the action linked from the OP now the most up to date? In your original version (0.3), the operations involved in the noise separation appeared to be perfect - the variance was just coming from the other layers used.
Mask Photo wrote:
of course, you're right; it's not optimal to add noise to an already-smooth layer. What I've done instead is to move the layer of removed noise above the healing later; noise can be masked back in if banding presents itself. I would still love if someone could give me a reproducible example of this banding.
Mask Photo wrote:
I'm debating with putting the noise above or below the capture sharpen. I'm tending toward "below" because if actual detail is removed, I'll want to mask it back in AND sharpen it with the rest of the data, and if i just want to add noise to cancel banding, I can mask in less than the full amount if i desire. If you end up using LL, you should be able to put them in any order and achieve the same result. I'd have to sit down and think a bit about the other modes, but I suspect that they will be more order-dependent (for better or for worse).
Mask Photo wrote:
running the numbers gives me no plausible reason for this. I suspect that at one point in the action creation, I was in 8-bit mode with a 16-bit procedure, and this was the correction i found to be most tolerable. this has been corrected (good lord, all of my photos are 1 bit brighter in the midtones than i thought!!) Oh the travesty!  It was a good solution to the 8bpc problem; just not for a 16bpc workflow. It was a good solution to the 8bpc problem; just not for a 16bpc workflow.
Mask Photo wrote:
Hopefully the action is a bit more useful at this point. As before, lots of great work!

Photographer
DH Studios
Posts: 88
Davenport, Florida, US
First of all, thank you guys very much, these actions seem very useful. I am toying and tinkering with them now...
However, I am running into problems on the "Sharpening" action. nearly everything it tries it's saying "is not currently available" or something like that.. as an example "The Command Gaussian Blur is not currently available".. it does this for every "filter" it's trying to use (or so it seems).
Photographer
Lawrence Guy
Posts: 17716
San Diego Country Estates, California, US
DH Studios wrote:
However, I am running into problems on the "Sharpening" action. nearly everything it tries it's saying "is not currently available" or something like that.. as an example "The Command Gaussian Blur is not currently available".. it does this for every "filter" it's trying to use (or so it seems). I am getting the same results.
Adobe Photoshop Version: 11.0.1 (11.0.1x20090218 [20090218.r.523 2009/02/18:02:00:00 cutoff; r branch])
Operating System: Windows XP 32-bit
Version: 5.1 Service Pack 3

Photographer
Photons 2 Pixels Images
Posts: 17011
Berwick, Pennsylvania, US
You have to run the other 2 actions first....in order. Then:
In the "Sharpen" action set, select the second action Select layer "Original". Press the record button at the bottom and click on the lock icon at the top of the layers stack list to unlock the layer. Press the stop button.
Now try running the action again.
Photographer
DH Studios
Posts: 88
Davenport, Florida, US
Photons 2 Pixels Images wrote:
You have to run the other 2 actions first....in order. Then:
In the "Sharpen" action set, select the second action Select layer "Original". Press the record button at the bottom and click on the lock icon at the top of the layers stack list to unlock the layer. Press the stop button.
Now try running the action again. This does seem to fix the problem... I guess the issue it was running into is it was trying to manipulate the original file, and that file was locked... Now that it's been unlocked, it is manipulating the original file, which is bad right? Because it's supposed to be sharpening the "liquified" image and not the original... or am I incorrect?
Photographer
Mask Photo
Posts: 1453
Fremont, California, US
DH Studios wrote:
However, I am running into problems on the "Sharpening" action. nearly everything it tries it's saying "is not currently available" or something like that.. as an example "The Command Gaussian Blur is not currently available".. it does this for every "filter" it's trying to use (or so it seems). Lawrence Guy wrote:
I am getting the same results. sweet. it's great when 2 people have a problem; you *know* it's real.
I think the issue might be that you haven't run the other actions first?
When i run the sharpen on a flat image, it squawks at me about problems.
here's how I'd change the action to make it work with flat images:
Uncheck all "select layer "original", because you don't have that layer.
Uncheck the "copy merged" command because it doesn't work with flat images (stupid stupid PS developers)
place a "copy" command in the place of "copy merged".
works fine for me after that.
but it won't work for a multi-layered image.
SRB Photo wrote:
USM is actually an 'ideal' filter, in as much that it does the exact same thing as the Apply Image technique - even, in fact, behaving itself in 8bpc mode. I was asking simply because it hadn't been mentioned at the time of the OP, and as you mention is destructive in the changes it makes to our basis for the remainder of editing. yeah... as soon as they make an USM adjustment layer, i'll build it right back in.
SRB Photo wrote:
I submit that that shouldn't be going on, and that the difference is likely either a rounding / previewing error or caused by some other layer. Hard Light should inherently be messing things up a bit (from the perspective of perfect reconstruction), while LL is literally the inverse of our (inverted) Add operation. Is the action linked from the OP now the most up to date? In your original version (0.3), the operations involved in the noise separation appeared to be perfect - the variance was just coming from the other layers used. Perhaps there's something about blending the noise into a HF layer with LL that honks it up?
I tested this pretty extensively last night... I'd split out the noise, put it in the LL layer with the "normal mode" HF layer, with 4 eyedropper samplers at various points in the image. When the noise layer was set to LL, the eyedroppers would change when i'd enable the original layer, but when set to HL, the samplers didn't change at all.
Perhaps I could set up a scratch-paper action to demonstrate this behavior, since it's hard to be certain from examining an action, exactly what's going on.
SRB Photo wrote:
I would still love if someone could give me a reproducible example of this banding. run a frequency split...
get a gradient from dark-gray to light-gray, corner to corner, and fill your low frequency layer with that.
mask out your HF layer and the banding below appears.
I found this to be the quickest way to duplicate the problem, since I couldn't remember the last image i saw the issue with (but i have seen it).
and, interestingly enough, while testing my action last night, i found that whenever i'd leave an image in 8-bit, the banding would be very noticeable, but would all but vanish when i'd back up and convert to 16.
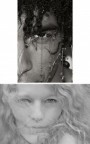
edit: here's one. note the circular banding in the gray area in the middle (for the record, i can barely see it on this monitor, but it was fairly clear on my monitor at home):
banding test
SRB Photo wrote:
If you end up using LL, you should be able to put them in any order and achieve the same result. I'd have to sit down and think a bit about the other modes, but I suspect that they will be more order-dependent (for better or for worse). nope. and here's why. I'm cloning from the HF layer to the healing layer, and if the healing layer is LL, then i'll have the original blemish AND the corrected area, superimposed over each other, so the healing layer has to be a normal layer. Since this is the case, the group it's in has to be LL, rather than pass-through. This means that the HF layer has to be normal as well.
Which means that if the noise layer is under the healing layer, then that noise won't display no matter what, in the areas that the healing layer occludes it.
I was actually contemplating sticking the noise layer *above* the capture layer, and since that layer sharpens everything below it, the order really matters there.
Photographer
Lawrence Guy
Posts: 17716
San Diego Country Estates, California, US
Photons 2 Pixels Images wrote:
You have to run the other 2 actions first....in order. Then:
In the "Sharpen" action set, select the second action Select layer "Original". Press the record button at the bottom and click on the lock icon at the top of the layers stack list to unlock the layer. Press the stop button.
Now try running the action again. DH Studios wrote:
This does seem to fix the problem... I guess the issue it was running into is it was trying to manipulate the original file, and that file was locked... Now that it's been unlocked, it is manipulating the original file, which is bad right? Because it's supposed to be sharpening the "liquified" image and not the original... or am I incorrect? Worked for me too. Thanks.
Photographer
Sean Baker Photo
Posts: 8044
San Antonio, Texas, US
Mask Photo wrote:
Perhaps I could set up a scratch-paper action to demonstrate this behavior, since it's hard to be certain from examining an action, exactly what's going on. If you can come up with such an example, I'd be excited to take a look. As it is, while I understand that you're having difficulty getting 'correct' results through LL, I can't replicate the problem here.
Mask Photo wrote:
run a frequency split...
get a gradient from dark-gray to light-gray, corner to corner, and fill your low frequency layer with that.
mask out your HF layer and the banding below appears.
I found this to be the quickest way to duplicate the problem, since I couldn't remember the last image i saw the issue with (but i have seen it).
and, interestingly enough, while testing my action last night, i found that whenever i'd leave an image in 8-bit, the banding would be very noticeable, but would all but vanish when i'd back up and convert to 16.
edit: here's one. note the circular banding in the gray area in the middle (for the record, i can barely see it on this monitor, but it was fairly clear on my monitor at home):
banding test Thanks for posting an example. I'm saying that that's still the result of display limitations, though. And here's why - open a new 16bpc document of sufficient resolution to fill your screen. Create a linear gradient going one direction. Change the gradient tool blend to Overlay or Linear Light mode, and add another gradient going at a right angle to the first. Zoom in and out and see if you don't experience the same banding which you do in the blurred images. The gradient tool doesn't use any bit of blur - it's just interpolating values along its control axis to the bit depth selected, so it's not getting this banding from the 'bad' blur tool. And because we're in 16bpc, it can't be that we've run out of values between pixels either (though we do start to).
What we are running up against, though, is the limits of our displays. While we might have 8bpc LCD panels and 24M+ individual colors which we can display, that doesn't actually mean that we have as many representable colors between two arbitrary colors as we do pixels between their physical location. Some would call this an argument for not pixel peeping , but I'm more inclined to look forward to 10+bpc displays becoming the norm.
Mask Photo wrote:
nope. and here's why. I'm cloning from the HF layer to the healing layer, and if the healing layer is LL, then i'll have the original blemish AND the corrected area, superimposed over each other, so the healing layer has to be a normal layer. Since this is the case, the group it's in has to be LL, rather than pass-through. This means that the HF layer has to be normal as well.
Which means that if the noise layer is under the healing layer, then that noise won't display no matter what, in the areas that the healing layer occludes it.
I was actually contemplating sticking the noise layer *above* the capture layer, and since that layer sharpens everything below it, the order really matters there. Why can't you have the Healing layer in Normal, clipped to the HF layer?
Photographer
Mask Photo
Posts: 1453
Fremont, California, US
Photons 2 Pixels Images wrote:
Press the record button at the bottom and click on the lock icon at the top of the layers stack list to unlock the layer. Press the stop button. nooooo. there should be nothing editing the original folder. don't unlock it.
DH Studios wrote:
This does seem to fix the problem... I guess the issue it was running into is it was trying to manipulate the original file, and that file was locked... Now that it's been unlocked, it is manipulating the original file, which is bad right? Because it's supposed to be sharpening the "liquified" image and not the original... or am I incorrect? it shouldn't be doing that at all... doesn't do it for me on CS2 or CS4...
what it does is selects the original folder just to get to the top of the layer stack. it then copies the entire visible image and pastes it above the original group.
Can you post a psd of what's happening when it tries to alter the original group?

Photographer
Jerry Bennett
Posts: 2223
Philadelphia, Pennsylvania, US
Koray wrote:
I have three steps; cleaning, retouching, contouring.
After I'm done with cleaning I already have an idea about what the other problems are.
Then I separate targeting for my approach on how to fix those problems kinda guessing what goes up and what stays down.
Thats why I usually need more than one separation most of the time. Sounds like you & I have developed simuler working styles Koray. I also tend to do 2 splits now.
Photographer
Mask Photo
Posts: 1453
Fremont, California, US
SRB Photo wrote:
If you can come up with such an example, I'd be excited to take a look. As it is, while I understand that you're having difficulty getting 'correct' results through LL, I can't replicate the problem here. try this
3 groups, identical layers in each.
one with stacked layers in linear light,
2 groups ARE linear light, with layers inside; one of them has the noise layer set to linear light, one to hard light. the hard light version blends the noise in much better than the linear light version.
but of course the stacked version does it best. however, the histogram's combing changes slightly when enabling the original layer...
Why can't you have the Healing layer in Normal, clipped to the HF layer? *blank stare*
i guess i didn't realize clipping would honor blend modes. i thought it only worked with alpha channels. will look into it.
Photographer
Sean Baker Photo
Posts: 8044
San Antonio, Texas, US
Mask Photo wrote:
edit: try this
3 groups, identical layers in each.
one with stacked layers in linear light,
2 groups ARE linear light, with layers inside; one of them has the noise layer set to linear light, one to hard light. the hard light version blends the noise in much better than the linear light version. Here is a modification of the above which demonstrates both HL's failings and how to set up the LL version to work.
Photographer
DH Studios
Posts: 88
Davenport, Florida, US
Mask Photo wrote:
DH Studios wrote:
However, I am running into problems on the "Sharpening" action. nearly everything it tries it's saying "is not currently available" or something like that.. as an example "The Command Gaussian Blur is not currently available".. it does this for every "filter" it's trying to use (or so it seems). sweet. it's great when 2 people have a problem; you *know* it's real.
I think the issue might be that you haven't run the other actions first?
When i run the sharpen on a flat image, it squawks at me about problems.
here's how I'd change the action to make it work with flat images: I have ran the other 2 first. It's still giving me issues. Unlocking the "Original" layer group fixed the issue. My next question is, is the sharpening action supposed to run on the Original layer group, or the edited/liquified image we created with action 1?
Photographer
Mask Photo
Posts: 1453
Fremont, California, US
SRB Photo wrote:
Here is a modification of the above which demonstrates both HL's failings and how to set up the LL version to work. yeah, the bottom group is what you made the top group into.
I'll play with clipping the healing layer. while i was chuffed with myself for getting damn close with a complex layer structure, it's clearly better to be able to restore the image to exactly original state after all the splitting is done.
Photographer
Sean Baker Photo
Posts: 8044
San Antonio, Texas, US
Mask Photo wrote:
it's clearly better to be able to restore the image to exactly original state after all the splitting is done. It's more control over your result - that's not what is always needed, but IMO it's a great baseline to start from.
Photographer
Mask Photo
Posts: 1453
Fremont, California, US
DH Studios wrote:
I have ran the other 2 first. It's still giving me issues. Unlocking the "Original" layer group fixed the issue. My next question is, is the sharpening action supposed to run on the Original layer group, or the edited/liquified image we created with action 1? the sharpen action does the following:
select canvas
copy-merged (this gets a snapshot of how the image looks right when you run sharpen)
paste as a layer
...
profit
if you need the "original" group to be unlocked to do this... that's odd, because i don't... but it shouldn't be modifying anything in that layer group. try locking just the layer inside the original group and see if it runs for you. if so, you know it's not modifying the original layers, and is just sitting inside the original group while it runs.
Photographer
Mask Photo
Posts: 1453
Fremont, California, US
SRB Photo wrote:
It's more control over your result - that's not what is always needed, but IMO it's a great baseline to start from. and the best thing is that I can retroactively change the blend mode in all my images to this, to bring them all into perfect "as shot" condition plus edits.
(though that could technically change things in them... might be best to leave well enough alone. )
Photographer
DH Studios
Posts: 88
Davenport, Florida, US
Mask Photo wrote:
Photons 2 Pixels Images wrote:
Press the record button at the bottom and click on the lock icon at the top of the layers stack list to unlock the layer. Press the stop button. nooooo. there should be nothing editing the original folder. don't unlock it.
it shouldn't be doing that at all... doesn't do it for me on CS2 or CS4...
what it does is selects the original folder just to get to the top of the layer stack. it then copies the entire visible image and pastes it above the original group.
Can you post a psd of what's happening when it tries to alter the original group? Sorry about the reply above. I am assuming you want a screenshot?
Here's what I've done so far:
Opened image, changed to 16 bit (just to try the actions)
Ran first action, edited the image in liquify, clicked ok
Ran second action
Ran Sharpen action and got: "The Guassian Blur is not available" (along with about 15 other filters it tried to use)
So I followed the advice of another person here, I recorded under open image the unlock of the original layer stack and that seemed to fix the problem. However, now, it's placing the sharpen under the original layer stack section... inside the "original" folder.
I hope that answered your question, if not I will post a screenshot with my next reply.

Photographer
Jim White Photography
Posts: 593
Orlando, Florida, US
I thought I knew how to use PS. I guess I don't know S***.
I'm going to try this when I haven't been drinking.........
Thanks for taking the time to write this up. Interesting stuff.
Photographer
Jerry Bennett
Posts: 2223
Philadelphia, Pennsylvania, US
SRB Photo wrote:
Thanks for posting an example. I'm saying that that's still the result of display limitations, though. And here's why - open a new 16bpc document of sufficient resolution to fill your screen. Create a linear gradient going one direction. Change the gradient tool blend to Overlay or Linear Light mode, and add another gradient going at a right angle to the first. Zoom in and out and see if you don't experience the same banding which you do in the blurred images. The gradient tool doesn't use any bit of blur - it's just interpolating values along its control axis to the bit depth selected, so it's not getting this banding from the 'bad' blur tool. And because we're in 16bpc, it can't be that we've run out of values between pixels either (though we do start to).
What we are running up against, though, is the limits of our displays. While we might have 8bpc LCD panels and 24M+ individual colors which we can display, that doesn't actually mean that we have as many representable colors between two arbitrary colors as we do pixels between their physical location. Some would call this an argument for not pixel peeping , but I'm more inclined to look forward to 10+bpc displays becoming the norm. Yes, I've noticed the banding on my monitor after Surface Blurring especially, but haven't seen it in the prints at all....
Photographer
Sean Baker Photo
Posts: 8044
San Antonio, Texas, US
Jerry Bennett wrote:
Yes, I've noticed the banding on my monitor after Surface Blurring especially, but haven't seen it in the prints at all.... It's not real and irrelevant!
Photographer
Photons 2 Pixels Images
Posts: 17011
Berwick, Pennsylvania, US
Mask Photo wrote:
Photons 2 Pixels Images wrote:
Press the record button at the bottom and click on the lock icon at the top of the layers stack list to unlock the layer. Press the stop button. nooooo. there should be nothing editing the original folder. don't unlock it.
it shouldn't be doing that at all... doesn't do it for me on CS2 or CS4...
what it does is selects the original folder just to get to the top of the layer stack. it then copies the entire visible image and pastes it above the original group.
Can you post a psd of what's happening when it tries to alter the original group? What happens is the paste step pastes the merged copy into the group Original. Then it continues from there putting all new layers within that group.
Photographer
Photons 2 Pixels Images
Posts: 17011
Berwick, Pennsylvania, US
Mask Photo wrote:
the sharpen action does the following:
select canvas
copy-merged (this gets a snapshot of how the image looks right when you run sharpen)
paste as a layer
...
profit
if you need the "original" group to be unlocked to do this... that's odd, because i don't... but it shouldn't be modifying anything in that layer group. try locking just the layer inside the original group and see if it runs for you. if so, you know it's not modifying the original layers, and is just sitting inside the original group while it runs. That's exactly what's happening. It doesn't modify the original layer in any way, but places the layers from the Sharpen action within that group.
Photographer
DH Studios
Posts: 88
Davenport, Florida, US
Photons 2 Pixels Images wrote:
That's exactly what's happening. It doesn't modify the original layer in any way, but places the layers from the Sharpen action within that group. Ahh.. ok... that makes sense. I didn't think it was necessarily modifying the original layer, just thought that perhaps it was using the original layer for it's basis of making it's mask and edits... in which case that's not something we want, since the edges of the liquified image will be moved slightly in comparison to the original.
Photographer
Photons 2 Pixels Images
Posts: 17011
Berwick, Pennsylvania, US
DH Studios wrote:
Ahh.. ok... that makes sense. I didn't think it was necessarily modifying the original layer, just thought that perhaps it was using the original layer for it's basis of making it's mask and edits... in which case that's not something we want, since the edges of the liquified image will be moved slightly in comparison to the original. Something else you can do to fix it is right after the "Paste" step, record a step to move that layer above the Original group. Then it should run as intended.
Photographer
Mask Photo
Posts: 1453
Fremont, California, US
Photons 2 Pixels Images wrote:
Something else you can do to fix it is right after the "Paste" step, record a step to move that layer above the Original group. Then it should run as intended. curses! looks like CS2 pastes into the group you've highlighted, while CS4 pastes ABOVE the group you've highlighted.
try the one in this; it selects the detail group, pastes, then immediately moves the layer it pasted to the top.
Photographer
Lawrence Guy
Posts: 17716
San Diego Country Estates, California, US
Mask Photo wrote:
curses! looks like CS2 pastes into the group you've highlighted, while CS4 pastes ABOVE the group you've highlighted.
try the one in this; it selects the detail group, pastes, then immediately moves the layer it pasted to the top. That works. Thanks.
Now I have to figure out how to use this; I've been splitting my layers manually using the method in the other thread, but I only end up with a HF and a LF layer. Now I have to learn your fancy schmancy stuff 
Photographer
Mask Photo
Posts: 1453
Fremont, California, US
Lawrence Guy wrote:
That works. Thanks.
Now I have to figure out how to use this; I've been splitting my layers manually using the method in the other thread, but I only end up with a HF and a LF layer. Now I have to learn your fancy schmancy stuff stay tuned; there will be (at least) one more version coming once i verify that the healing layer will clip to the HF layer and blend correctly.
edit: cute avatar, by the way
Photographer
Photons 2 Pixels Images
Posts: 17011
Berwick, Pennsylvania, US
Mask Photo wrote:
curses! looks like CS2 pastes into the group you've highlighted, while CS4 pastes ABOVE the group you've highlighted.
try the one in this; it selects the detail group, pastes, then immediately moves the layer it pasted to the top. I use CS4 and it pastes into the group for me.
And just in case you wanna use it, I started a simple repository for the scripts/actions/examples dealing with the Frequency Separation methods....
http://www.model-citizens.com/FreqSep/
|

 .
.
 It was a good solution to the 8bpc problem; just not for a 16bpc workflow.