|
Forums >
Digital Art and Retouching >
adding cigarette smoke
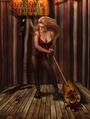
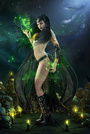
i would like to add cigarette smoke to a photo of mine but don't know how to go best about it......any suggestions? Nov 08 12 12:03 pm Link find a 'brush' of cigarette smoke. Use that. But be careful with brushes, they lead to monochromatic work. Your smoke may end up as just shades of gray with no color variation. If it's a color image you are making, notice the smoke color. It often tends to be blueish. Not just white.  Might want to use curves so that the darker parts of the smoke have a little more saturation. Nov 08 12 12:07 pm Link Shoot your own smoke in a dark room. Backlight it. You might try using the white smoke on black as a layer mask, and painting your color into the top layer itself. Nov 08 12 12:08 pm Link I dont really like it but: http://www.youtube.com/watch?v=crkrCDzD4Zg or you can get some smoke stocks from like sxc: http://www.sxc.hu/browse.phtml?f=search&w=1&txt=smoke and use screen blend mode if they are against balck bg. for some weird reason if the bg is white invert and then use screen. desaturate if needed too  Nov 08 12 12:21 pm Link cgtextures.com has a lot of very nice, free to download smoke stock images. Grab one, paste it in as a layer, set to screen blending, transform, and tweak contrast/color as you like. Nov 08 12 12:28 pm Link http://qbrushes.net/photoshop-abstract- … brush-set/ No need to complicate this. One click with a smoke brush:  Nov 08 12 02:00 pm Link PhotoEclat wrote: I shot a load recently for a personal project. They're all against a black background. If you want a few i can provide. Nov 08 12 03:08 pm Link don't hesitate shooting smoke, if you don't know how to mask it out It will be another Difficut task . best bet is to use a brush as Peano suggested you. good luck. Nov 08 12 06:08 pm Link .. not sure wheather you are asking about shooting smoke - or about post-production technique (I only have answer for post-work). For ´smoke images´ (white/light smoke on black background) the Screen Blend mode can be used (pretty effectivelly, and quickly, one-click basically) to get rid of black background - as others have already said/showed. The reason /the answer why is that possible/ is that the Screen Blend mode is ´capable of ignoring´ blacks. In other words - it makes all black pixels ´invisible/transparent´ (very ´simplified´ definition of how this particular blend mode works, just to keep explanation simple here). So - the darker/blacker the background on the initial smoke image, the better/cleaner the effect will work. (Just as a side note - the ´same´ applies/works for Multiply blend mode, too - just in the opposite way. Meaning: while with Screen you can easily get rid of black background, with Multiply - analogically - you can just as well get rid of white background. Multiply and Screen are the opposite/complementary blend modes, technically - which is practical to know especially when working with positive/negative versions of the same image, for example. Getting rid of uniform backgrounds - either white or black - is just one random example of how this ´duality´/complementarity´can be used/useful.) But - this is usually just the first step in a workflow, actually - in case you want to achieve ´convincing/real-looking´ illusion of a smoke incporporated into new image, since - with Screen mode - you might/will also loose/sacrifice some other important information from the Smoke layer (blueish color cast, for example) - that - actualy - needs to be ´recovered´ back. There are a few different possible ways how to do it (depending on the image, level of transparency, type of background image etc.). In general - probably the easiest one - is just copying the Smoke layer one more time (above the Screen layer) - set the copy in in ´Normal´ or ´Color´ mode this time (depending on the image and/or the effect to be achieved) - completely mask/hide with a layer mask - and than just softly reveal back (unmask) those parts that need to be ´recovered´. (But - you still might need some more ´recovering/tweaking´ steps to apply, so as also the contrast is enhanced, etc. .. ) Here´s an example - just to show that/how it works even for different backgrounds. Original image: white smoke on black background. Green background added here, beneath/below the Smoke layer (set in Screen). Some more further ´enhancing´ (contrast, edges) applied here, too.  Nov 08 12 11:27 pm Link Shoot some smoke from incense stick against a black back ground. Side light them with a gridded softbox. Gentle air motions to get the shape. Spin your hand slowly above it to get spirals, small circles on the side for more billowy. Place the final image with the black background onto the image you want to add smoke into, set the blend mode to screen and the black disappears leaving only the smoke. Vary your exposure to get different looks on the smoke. Stop down to get thinner strands, open up for more volume in the smoke. Focus before you shoot, it's hard for cameras to focus on smoke. Then shoot some out of focus to blend in with in focus smoke, that gives it a sense of depth when done subtly. Nov 09 12 10:42 am Link Nov 12 12 05:13 pm Link Find a smoke stock image isolated on a black background. Open in Photoshop, copy it over your image, set layer mode to "Screen" and size & place where you need it to be. Nov 13 12 02:56 am Link If your smoke is on black background then, as said above, try to change blending modes, probably screen will work the best. Nov 13 12 08:03 am Link  If the smoke in a comp is meant to obscure, sometimes the screen blend mode creates too transparent an effect. In that case, try using the smoke on black as a layer mask for a pale gray layer. Nov 13 12 09:28 am Link PhotoEclat wrote: Shoot smoke on black. Screen it in. Nov 13 12 09:29 am Link OP still couldnt figure it out from what I see checking his portfolio  Nov 13 12 10:17 am Link cocein scarlet on the base of the film ... fine wet.//. oops you mean digital Nov 13 12 02:50 pm Link I try not to use stock photos if I don't have too. The best way I believe is to make your own smoke via photoshop. Use a paint brush, color white. Set the opacity to however you want and pain the general shape. Now to actually make it flow like smoke, I use 2 tools. Smudge (change the pressure to how you like) and liquify. If you're not use to creating/drawing things by hand, this might be slightly difficult, but its the best way to have control over everything. Just give it a try. Nov 13 12 03:30 pm Link Noodleputer wrote: Give this a try. Nov 13 12 04:31 pm Link Peano wrote: Not all pre-made brushes look good or even match with photos. My suggestion doesn't actually take that long, if anything maybe equivalent to the same amount of time you'd spend looking for "just the right brush" and installing it. Nov 13 12 04:43 pm Link Noodleputer wrote: Yes it does. It takes that long and a good deal longer. if anything maybe equivalent to the same amount of time you'd spend looking for "just the right brush" and installing it. No, it isn't anywhere close to equivalent. Use a paint brush, color white. Set the opacity to however you want However I want? Do you mean that I can get a realistic result no matter what opacity I set? and pain[t] the general shape. The general shape? I have no training in painting. Do you think it's a simple matter to "paint the general shape" of smoke for someone who has never painted anything? Now to actually make it flow like smoke, I use 2 tools. Smudge (change the pressure to how you like) Change the pressure how I like? I have no like. I asked how to add smoke to an existing image. I've never used the smudge tool. How do you expect me not only to choose the correct pressure but also to use a proper technique to create smoke? and liquify. If you're not use to creating/drawing things by hand, this might be slightly difficult ... No kidding. (If you're not used to repairing an internal combustion engine, this might be slightly difficult.) The liquify filter has a bunch of different tools, and each one has several settings (brush size, brush density, brush pressure, etc.). Which tool am I supposed to use? Which settings? What technique to create realistic smoke? Nov 13 12 05:32 pm Link Peano wrote: Noodleputer wrote: Yes it does. It takes that long and a good deal longer. if anything maybe equivalent to the same amount of time you'd spend looking for "just the right brush" and installing it. No, it isn't anywhere close to equivalent. Use a paint brush, color white. Set the opacity to however you want However I want? Do you mean that I can get a realistic result no matter what opacity I set? and pain[t] the general shape. The general shape? I have no training in painting. Do you think it's a simple matter to "paint the general shape" of smoke for someone who has never painted anything? Now to actually make it flow like smoke, I use 2 tools. Smudge (change the pressure to how you like) Change the pressure how I like? I have no like. I asked how to add smoke to an existing image. I've never used the smudge tool. How do you expect me not only to choose the correct pressure but also to use a proper technique to create smoke? All suggestions were under the assumption that the request was made from somebody who was not a complete beginner in Photoshop and it's tools. The "best ways" to go at something differ, which is why there are various suggestions. If your goal here is to try to convince me or whoever- that you're correct, I applaud you for taking the time in dissecting a suggestion and having a rebuttal for each sentence. I will not discuss this further with you. Nov 13 12 05:46 pm Link Peano wrote: True. As soon as I suggested using a brush the thread pretty much could have ended there. Nov 14 12 10:54 am Link NothingIsRealButTheGirl wrote: Yep. Nov 14 12 11:32 am Link Peano wrote: Use a paint brush, color white. Set the opacity to however you want However I want? Do you mean that I can get a realistic result no matter what opacity I set? and pain[t] the general shape. The general shape? I have no training in painting. Do you think it's a simple matter to "paint the general shape" of smoke for someone who has never painted anything? Now to actually make it flow like smoke, I use 2 tools. Smudge (change the pressure to how you like) Change the pressure how I like? I have no like. I asked how to add smoke to an existing image. I've never used the smudge tool. How do you expect me not only to choose the correct pressure but also to use a proper technique to create smoke? This is the best post...ever. Nov 14 12 11:42 am Link |