Forums > Digital Art and Retouching > Best way to remove eye bags from behind a veil?

Photographer

David S April

Posts: 130

Hồ Chí Minh City, Pomorskie, Vietnam

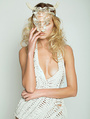
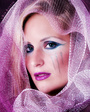
Hi all -

Does anyone have advice for removing or softening the bags under the subject's eyes in this pic?

https://www.dsa157.com/april/gallery/prash-sunil/proofs/IMG_1126.jpg

I am having trouble working around the veil. Should I clone it out, work on the face then put the veil back via a lot of precision masking or is there a magic trick someone can share? smile

Thanks in advance!

Dave

Aug 28 14 05:11 pm Link

Retoucher

201retarded

Posts: 74

Hoboken, New Jersey, US

dodge and burn with the native tools right on the layer, try that.

Aug 28 14 05:16 pm Link

Retoucher

D A N

Posts: 124

Jacksonville, Florida, US

Retouch07 wrote:
dodge and burn with the native tools right on the layer, try that.

Even better yet... dodge and burn on an empty layer filled with 50% gray set to softlight blending mode. That way if you go too far then you can dial back the move. If there's any discoloration then just mask the area and use a curve adjustment layer to fix the problem.

Aug 28 14 06:33 pm Link

Retoucher

201retarded

Posts: 74

Hoboken, New Jersey, US

D A N wrote:
Even better yet... dodge and burn on an empty layer filled with 50% gray set to softlight blending mode. That way if you go too far then you can dial back the move. If there's any discoloration then just mask the area and use a curve adjustment layer to fix the problem.

not better sir just different and they both work so give both a go. But you can take a look at my images and see that my images don't look i ran a filter and kept the reality of the skin. So just jumping the original layer and d&b right on there low opacity you can mask out and bring back if needed and if you have any color issues you can use a color brush at low opacity and paint color in.

Aug 28 14 06:57 pm Link

Photographer

David S April

Posts: 130

Hồ Chí Minh City, Pomorskie, Vietnam

Thank you both for the replies. I do not retouch nearly as well as you, plus I'm colorblind, but here is my attempt using your suggestions.

https://www.dsa157.com/april/gallery/prash-sunil/IMG_1126a-mm.jpg

Aug 28 14 08:14 pm Link

Retoucher

D A N

Posts: 124

Jacksonville, Florida, US

Retouch07 wrote:
not better sir just different and they both work so give both a go.

With the difference that one is destructive and the other one is a non-destructive approach. It's a matter of workflow and best practices, if you dodge and burn in the original layer you can't go back or change your mind, your pixels are already altered.

Retouch07 wrote:
But you can take a look at my images and see that my images don't look i ran a filter and kept the reality of the skin.

Woah there fellow retoucher!! I haven't said anything at all about your work or anything like that, don't take it so personal. It is not.

Retouch07 wrote:
So just jumping the original layer and d&b right on there low opacity you can mask out and bring back if needed

By jumping you mean a *copy* of the original layer, right? because if you are working on the original background layer then there's no way to mask anything out and bring back smile
Tell you what the problem of using that is... for example let's say that you did that to the bags under her eyes but not only you did dodge and burn but you cleaned the skin. If you mask out to reveal the original then whatever other work you've done is lost! and to fix that then you'll have to create another layer and redo your work.

Retouch07 wrote:
and if you have any color issues you can use a color brush at low opacity and paint color in.

Now that's blurring. Any painting you do with color over texture you'll be effectively blurring whatever is under. If I was to give that advice then that's done on an empty layer set to color blending mode.

It's a matter of workflow and preferences. I prefer to work in a way that my client can say to me, you know what I think you can bring back some of this and that and it'll take me less than a minute to do that. Instead of having to mask out and bring an original and having to redo work again.

Aug 28 14 09:25 pm Link

Retoucher

D A N

Posts: 124

Jacksonville, Florida, US

David S April wrote:
Thank you both for the replies. I do not retouch nearly as well as you, plus I'm colorblind, but here is my attempt using your suggestions.

Good job, you're getting there! I like that you're preserving the shape there.

You could also darken a bit the lighter parts under the bag, next to the nose, just a little bit, to blend in some more.

Aug 28 14 09:29 pm Link

Retoucher

Tincture

Posts: 126

New York, New York, US

Retouch07 wrote:
dodge and burn with the native tools right on the layer, try that.

I work this way, too.  Makes things much more simple.  I think it's funny when people take offense to this workflow though; if I'm retouching on a jumped layer (from the layer that was liquified, in case you're wondering), then I can always go back if need be.  Sure, it might not fit the description of 'non-destructive', but to that I say, at some point you have to commit. It's really not a problem if you know what you're doing.

Aug 29 14 07:49 am Link

Retoucher

Beth F PDX

Posts: 69

Portland, Oregon, US

Heck you could even create a mask for the veil with channels and calculations. Then you can just focus on the skin.

Aug 29 14 05:33 pm Link

Retoucher

Beth F PDX

Posts: 69

Portland, Oregon, US

the reason that people prefer using %50 grey or 2 curves layers is because if you go to far and want to dial it back you would have to mask your duplicated layer. Sure fine good. But now if you wanted to paint a new shadow or highlight you can't because the layer is masked out so you have to make a new stamped layer. By that mean if you need to change any of the other adjustments your out of luck. And My file sizes are big enough as it is, I don't need that. I prefer to preform local dodge and burn in one group then global dodging and burning in another. So I can adjust them separately. You cannot do that with a stamped layer. I mean you can but you can't go back. I work with brands/ art directors/photographers that CONSTANTLY change their minds. I'm not committing to anything! And what if they don't like the liquefying you have done? What then? This may not apply to photographers retouching their own photos or even some fashion or lifestyle stuff. It may not be technically better but it is smarter.

Aug 29 14 06:03 pm Link

Retoucher

201retarded

Posts: 74

Hoboken, New Jersey, US

No Dan, it seems your paranoid. I asked him to look at my images so he can get an idea how it should look, it's not about you.

But yes, you can d&b right on the layer and if you mess up you have the original right underneath and can bring back you NEVER touch the base layer. Also, you not blurring if the brush is on color mode but you knew that already, right?? so silly.

Also, it seems you don't understand we all have different workflows. Here's one scenario jump the layer get rid of the stuff that has to go. Then you can clone/heal on that layer then jump that one and d&b on the next like that you can go back to the cloned on and it if your able to retouch like that you can pick up lots of speed and give solid pro work. When your at a good spot you can merge it all into one retouch layer right above the original.

Aug 29 14 06:04 pm Link

Retoucher

201retarded

Posts: 74

Hoboken, New Jersey, US

Beth Furumasu wrote:
the reason that people prefer using %50 grey or 2 curves layers is because if you go to far and want to dial it back you would have to mask your duplicated layer. Sure fine good. But now if you wanted to paint a new shadow or highlight you can't because the layer is masked out so you have to make a new stamped layer. By that mean if you need to change any of the other adjustments your out of luck. And My file sizes are big enough as it is, I don't need that. I prefer to preform local dodge and burn in one group then global dodging and burning in another. So I can adjust them separately. You cannot do that with a stamped layer. I mean you can but you can't go back. I work with brands/ art directors/photographers that CONSTANTLY change their minds. I'm not committing to anything! And what if they don't like the liquefying you have done? What then? This may not apply to photographers retouching their own photos or even some fashion or lifestyle stuff. It may not be technically better but it is smarter.

here is another scenario

the original layer
the retouch layer
the liquified layer
the sharpened layer
extra d&b on a soft light to maybe change the light some (good for when you get lots of images) layer
the rest is silos, background, foreground (clothes and skin), base color.
last but not least the grain layer.


There is no right way to retouch sometime you have to switch it up i try something about 3 times if it doesn't work i try something else. But my way seems to work for me 90% of the time. If you work in the industry I am sure what I just listed rang true.

Aug 29 14 06:09 pm Link

Retoucher

Beth F PDX

Posts: 69

Portland, Oregon, US

I do work in the industry. Not just the fashion retouching industry. Possibly contracting with happy finish here in Portland. I can tell you it didn't ring true. And that your view of retouching seems very narrow.

Aug 29 14 06:18 pm Link

Retoucher

201retarded

Posts: 74

Hoboken, New Jersey, US

Beth Furumasu wrote:
I do work in the industry. Not just the fashion retouching industry. Possibly contracting with happy finish here in Portland. I can tell you it didn't ring true. And that your view of retouching seems very narrow.

haha, i said it's all good and that's narrow?? duh! I just gave you structure sweety. When you settle down at an official studio then get back to me.

Aug 29 14 06:32 pm Link

Retoucher

Beth F PDX

Posts: 69

Portland, Oregon, US

I've delivered files to clients with over 139 different layers, grouped, named, color coded anything can be changed at the drop of a hat. I'm good thanks. You can achieve the same thing with different tools for sure, that not my point though.

Aug 29 14 06:39 pm Link

Retoucher

201retarded

Posts: 74

Hoboken, New Jersey, US

David S April wrote:
Thank you both for the replies. I do not retouch nearly as well as you, plus I'm colorblind, but here is my attempt using your suggestions.

https://www.dsa157.com/april/gallery/prash-sunil/IMG_1126a-mm.jpg

oh, i don't know much about being colorblind. But please correct me if I am wrong but you can see color at all or just certain colors? even though you can make the image gray scale and see that you made the eye bags look puffy. I would make the light more even, take the bright spots under the eye down so the eye bags fall back into her face.

In this instance being your not sure try it Dan's way with the soft light d&b tools or paint brush low opacity with pen pressure on and "don't" zoom in, zoom out and be able to see the whole image on your screen when you do this.

I really like the way you kept the reality of the rest of the skin, don't loose that.

Aug 29 14 06:41 pm Link

Photographer

A-M-P

Posts: 18465

Orlando, Florida, US

Retouch07 wrote:
haha, i said it's all good and that's narrow?? duh! I just gave you structure sweety. When you settle down at an official studio then get back to me.

You sound like a piece of work.

And honestly don't know why so much ego since your port doesn't back it up. Take from that what you wish.

Aug 29 14 10:28 pm Link

Photographer

A-M-P

Posts: 18465

Orlando, Florida, US

OP

dodge and burn on a 50% grey layer or with two curves adjustment layers if you want to do it non destructively and want to have more control  over the finish product. For example if you change your mind or went to far you can always go back and fix without ruining  the rest of your work.

Aug 29 14 10:30 pm Link

Retoucher

201retarded

Posts: 74

Hoboken, New Jersey, US

A-M-P wrote:
You sound like a piece of work.

And honestly don't know why so much ego since your port doesn't back it up. Take from that what you wish.

huh?  All I offered was a alternative and your port is terrible by the way, very plasticy skin. Not to mention nobody was talking to you.

Aug 30 14 04:59 am Link

Photographer

A-M-P

Posts: 18465

Orlando, Florida, US

Retouch07 wrote:
huh?  All I offered was a alternative and your port is terrible by the way, very plasticy skin. Not to mention nobody was talking to you.

Says the guy with no website and only 4 photos and all from MM.

My response was to your dick answer to the other poster above who respectfully disagreed with you.

You had to thrown in remarks that they don't know how it works in the industry and honestly  to me it seems like you are the one pretending. You have a horrible attitude and I have no problem calling you out on it.


If you are going to have an ego and belittle other peers simply because they disagreed with your chosen technique and throw snide remarks then you better have something to back up your so called high end industry claims and so far it seems like you just like to pretend online.


This is the post I was replying to  by the way.

Retouch07 wrote:
haha, i said it's all good and that's narrow?? duh! I just gave you structure sweety. When you settle down at an official studio then get back to me.

Oh and it is a public forum I can reply to whomever I want. Might want to figure out how forums work before playing in them.

Good Day!

Aug 30 14 07:49 am Link

Retoucher

Lightweavers

Posts: 28

Macclesfield, England, United Kingdom

Oh come on people if your going to bicker over who is professional or not do it in private messages not on this thread.  You have all offered good advice and obviously work in different ways but no need for arguments here.

David S April - Well done in taking on board the advice given your reworking is a great improvement on the original you posted it could be refined further to reduce the puffiness by taking down the highlights and mid highs with a little more time as already advised. If you get image fatigue leave it for a bit or even a day or two and come back with fresh eyes.

Keep up the good work, best of luck for the future.

Aug 30 14 08:23 am Link

Retoucher

201retarded

Posts: 74

Hoboken, New Jersey, US

A-M-P wrote:

Says the guy with no website and only 4 photos and all from MM.

My response was to your dick answer to the other poster above who respectfully disagreed with you.

You had to thrown in remarks that they don't know how it works in the industry and honestly  to me it seems like you are the one pretending. You have a horrible attitude and I have no problem calling you out on it.


If you are going to have an ego and belittle other peers simply because they disagreed with your chosen technique and throw snide remarks then you better have something to back up your so called high end industry claims and so far it seems like you just like to pretend online.


This is the post I was replying to  by the way.


Oh and it is a public forum I can reply to whomever I want. Might want to figure out how forums work before playing in them.

Good Day!

Your still talking!!! mind your business. Lay off the coffee and gaussian blur please : )

Aug 30 14 08:27 am Link

Retoucher

201retarded

Posts: 74

Hoboken, New Jersey, US

Lightweavers wrote:
Oh come on people if your going to bicker over who is professional or not do it in private messages not on this thread.  You have all offered good advice and obviously work in different ways but no need for arguments here.

David S April - Well done in taking on board the advice given your reworking is a great improvement on the original you posted it could be refined further to reduce the puffiness by taking down the highlights and mid highs with a little more time as already advised. If you get image fatigue leave it for a bit or even a day or two and come back with fresh eyes.

Keep up the good work, best of luck for the future.

You are so right and thank you for that.

Ladies please stop fighting with/over me : ) Please send me a message instead and we can discuss this there.

Sincerely,

007

Aug 30 14 08:34 am Link

Photographer

BillyPhotography

Posts: 467

Chicago, Illinois, US

07 stfu

OP, you can try selecting the veil and masking or better yet putting it on its own layer... Might be worth it in case you want to do something selective, like drop shadow or something then just work on the bags normally

Aug 30 14 08:45 am Link

Photographer

BillyPhotography

Posts: 467

Chicago, Illinois, US

And how to select it.... I have no idea, pen tool would take a weekend

Aug 30 14 08:47 am Link

Retoucher

201retarded

Posts: 74

Hoboken, New Jersey, US

BillyVegas wrote:
07 stfu

OP, you can try selecting the veil and masking or better yet putting it on its own layer... Might be worth it in case you want to do something selective, like drop shadow or something then just work on the bags normally

Billy stfu and a special smd to you too. You can send me message too.

Aug 30 14 08:56 am Link

Retoucher

201retarded

Posts: 74

Hoboken, New Jersey, US

here for you non believers there are other ways to do this. Just d&b and brush on color mode, no masking masking necessary. Takes only a few minutes this way if you want to go perfect it or go further you can.

https://photos.modelmayhem.com/photos/140830/08/5401f4cb7e497.jpg

Aug 30 14 09:02 am Link

Photographer

Rik Austin

Posts: 12164

Austin, Texas, US

Moderator Warning!
Folks, its a holiday weekend here in the US.  Don't make me throw all of you in the brig.  The jailers will get pissed at me for all the extra work.  Besides I know they are not going to be serving hamburgers and brats.  Just cold gruel.  You don't want to be there.

Aug 30 14 09:13 am Link

Retoucher

Beth F PDX

Posts: 69

Portland, Oregon, US

I would just like to say I have not broken any form rules or felt any need to be condescending towards another poster. I only backed up my own opinions and suggested that someone only knew how to perform one type of retouching given their own remarks on this post.

Aug 30 14 02:58 pm Link

Retoucher

D A N

Posts: 124

Jacksonville, Florida, US

Retouch07 wrote:
No Dan, it seems your paranoid. I asked him to look at my images so he can get an idea how it should look, it's not about you.

No, you're wrong. You quoted me and gave this reply, which clearly shows that you're talking to me, not him.

Retouch07 wrote:
not better sir just different and they both work so give both a go. But you can take a look at my images and see that my images don't look i ran a filter and kept the reality of the skin.

Honestly I think you're just a troll and I'll just treat you like such.

Retouch07 wrote:
Also, you not blurring if the brush is on color mode but you knew that already, right?? so silly.

Who told you that? Stop being so condescending and either way, layer on color or brush on color you're blurring pixels by painting over them. Simple as that.
Anyways, I'm here to help the OP and I'm done arguing with you. You clearly have shown all of us how you treat people that think/act in a different way than you.

Aug 30 14 03:21 pm Link

Retoucher

201retarded

Posts: 74

Hoboken, New Jersey, US

D A N wrote:

No, you're wrong. You quoted me and gave this reply, which clearly shows that you're talking to me, not him.


Honestly I think you're just a troll and I'll just treat you like such.


Who told you that? Stop being so condescending and either way, layer on color or brush on color you're blurring pixels by painting over them. Simple as that.
Anyways, I'm here to help the OP and I'm done arguing with you. You clearly have shown all of us how you treat people that think/act in a different way than you.

No sir, i never I was just explaining. I see what your saying but I wasn't communicating properly, my apologies. But you were being the troll when you said "Even better yet..." that isn't trollish?

And no sir the paint brush on color mode or hue is not blurring just try it and see.

Aug 30 14 03:31 pm Link

Retoucher

201retarded

Posts: 74

Hoboken, New Jersey, US

Aug 30 14 03:46 pm Link

Photographer

LA StarShooter

Posts: 2730

Los Angeles, California, US

Retouch07 wrote:
let me add the brush on color (or hue) mode can be used with pen pressure at about 20% or even 100%. Then very precisely paint where you want to and if it's too much you can fade your strokes back some by hitting shift, command, F and take it down to where you like it. It shouldn't change the texture or anything.

You can do this with the stamp tool too.

https://www.modelmayhem.com/portfolio/pic/36805872 You didn't paste his credits. I realise you view it as just helping but it is standard to post the photographer's credits when putting his work in your portfolio.

Aug 30 14 03:54 pm Link

Retoucher

D A N

Posts: 124

Jacksonville, Florida, US

My apologies for starting my post with that phrase. I never meant it like that.

I know what you're saying about the color mode. I have tried it before and it works fine, if it's a minor tweaking. I don't like it though because if you keep going over and over and over again you'll see how the stroke builds and the texture gets softer. Just for that reason I know that it blurs the texture because it removes micro contrasts that the skin has.

Aug 30 14 03:59 pm Link

Retoucher

201retarded

Posts: 74

Hoboken, New Jersey, US

LA StarShooter wrote:

https://www.modelmayhem.com/portfolio/pic/36805872 You didn't paste his credits. I realise you view it as just helping but it is standard to post the photographer's credits when putting his work in your portfolio.

Thanks for that but I'm going to take it down soon I didn't retouch that file all the way and don't want to take any credit for something I didn't do. but I will add the photographers name to avoid any problems. We are all just trying to learn and get a little better each time.

Aug 30 14 04:42 pm Link

Retoucher

201retarded

Posts: 74

Hoboken, New Jersey, US

D A N wrote:
My apologies for starting my post with that phrase. I never meant it like that.

I know what you're saying about the color mode. I have tried it before and it works fine, if it's a minor tweaking. I don't like it though because if you keep going over and over and over again you'll see how the stroke builds and the texture gets softer. Just for that reason I know that it blurs the texture because it removes micro contrasts that the skin has.

Its cool Dan, things come off the wrong way just like mine did.

Yeah, it just for minor stuff only. I wouldn't go over and over on it I might do one or two swipes at most and if that doesn't work I try something else.

Aug 30 14 04:50 pm Link

Photographer

David S April

Posts: 130

Hồ Chí Minh City, Pomorskie, Vietnam

I appreciate the help and advice from everyone.

No need for the flame war this turned into, kids. It's just photography and photo editing. There's more than 1 way to do it and we all benefit from different perspectives.

Aug 31 14 10:33 pm Link