Forums > Digital Art and Retouching > 
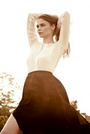
How to convert 'This' image to 'that' (Pictures)

Photographer

HBA 1

Posts: 112

Kansas City, Kansas, US

This is my photo, raw with no editing:  https://33.media.tumblr.com/142402962b22f6c1c2f2872b32de85ff/tumblr_ndhlpqGjmg1two7t9o5_1280.jpg


How can I get it to this (Alex Saladrigas Photo) ?

http://photos-g.ak.instagram.com/hphoto … 3396_n.jpg 

Both photos are one light setups with vflat

Oct 16 14 06:45 am Link

Photographer

Jakov Markovic

Posts: 1128

Belgrade, Central Serbia, Serbia

B+W adjustment layer, reduce lightness of reds.

Underneath dodge and burn, cloning.

It's a quite simple process.

Oct 16 14 06:56 am Link

Photographer

HBA 1

Posts: 112

Kansas City, Kansas, US

Jakov Markovic wrote:
B+W adjustment layer, reduce lightness of reds.

Underneath dodge and burn, cloning.

It's a quite simple process.

What do you mean underneath dodge and burn, cloning?  As in make the color adjustment, then dodge and burn on top of that?  How do you reduce lightness of reds, down on red luminosity? 

How do you get the background to be that grey?  I know the photographer and we use the same color savage seamless.

Oct 16 14 07:05 am Link

Photographer

Tulack

Posts: 836

Albuquerque, New Mexico, US

Hazem Giballi  wrote:
How do you get the background to be that grey?

Background is blue, not grey.

Oct 16 14 08:08 am Link

Photographer

HBA 1

Posts: 112

Kansas City, Kansas, US

Hazem Giballi  wrote:
What do you mean underneath dodge and burn, cloning?  As in make the color adjustment, then dodge and burn on top of that?  How do you reduce lightness of reds, down on red luminosity? 

How do you get the background to be that grey?  I know the photographer and we use the same color savage seamless.

Lol my friend is the photographer.  It's thunder grey.  He was the one that helped me pick out mine. smile

Oct 16 14 08:10 am Link

Photographer

Tulack

Posts: 836

Albuquerque, New Mexico, US

Hazem Giballi  wrote:
Lol my friend is the photographer.  I know what is in his studio, it's thunder grey.  He was the one that helped me pick out mine

You are funny. It doesn't matter what he pick. It's blue on the picture you show.

Hazem Giballi  wrote:
This is my photo, raw with no editing:

smile Why is it showing editing sign, if there is none?

Oct 16 14 08:13 am Link

Photographer

HBA 1

Posts: 112

Kansas City, Kansas, US

Tulack wrote:

Hazem Giballi  wrote:
Lol my friend is the photographer.  I know what is in his studio, it's thunder grey.  He was the one that helped me pick out mine

You are funny. It doesn't matter what he pick. It's blue on the picture you show.


smile Why is it showing editing sign, if there is none?

There has been no retouching done.. I changed the color temperature of the photo set and that is why.

Oct 16 14 08:15 am Link

Photographer

Tulack

Posts: 836

Albuquerque, New Mexico, US

See, it's blue.

https://scontent-b-dfw.xx.fbcdn.net/hphotos-xap1/v/t1.0-9/s720x720/10690046_10154698364740153_3266922918832834709_n.jpg?oh=d1d8a4baa7634a56d4a30dd2ca3688f3&oe=54B9A121

Oct 16 14 08:16 am Link

Photographer

Tulack

Posts: 836

Albuquerque, New Mexico, US

Make you histogram matching, and then work on color luminosity.

Oct 16 14 08:22 am Link

Photographer

cwwmbm

Posts: 558

Vancouver, British Columbia, Canada

Why not ask your friend? If he helped you to pick the background, maybe he will help you with retouching as well?

Oct 16 14 10:29 am Link

Photographer

HBA 1

Posts: 112

Kansas City, Kansas, US

Tulack wrote:
Make you histogram matching, and then work on color luminosity.

I literally just spoke to Alex Saladrigas (the photographer).  He confirmed it is a dark grey background.

Oct 16 14 10:48 am Link

Photographer

HBA 1

Posts: 112

Kansas City, Kansas, US

cwwmbm wrote:
Why not ask your friend? If he helped you to pick the background, maybe he will help you with retouching as well?

He is shooting a campaign in his new NYC studio.  He doesn't have the time.  I wouldn't have posted here if it was that easy smile

Oct 16 14 10:48 am Link

Photographer

Tulack

Posts: 836

Albuquerque, New Mexico, US

Hazem Giballi  wrote:
I literally just spoke to Alex Saladrigas (the photographer).  He confirmed it is a dark grey background.

smile How does it related to the picture? On your picture background is blue. You can make it red or any other color. And it has nothing to do with background in his studio. We are talking about picture background, and it's blue.

Is it hard to check for yourself?


https://fbcdn-sphotos-d-a.akamaihd.net/hphotos-ak-xpa1/t31.0-8/10604663_10154698834835153_9025449529733562263_o.jpg


Here is an image with just saturation increased.

https://scontent-a-dfw.xx.fbcdn.net/hphotos-xpa1/t31.0-8/10688108_10154698841520153_6316197477157148169_o.jpg

Oct 16 14 11:25 am Link

Photographer

HBA 1

Posts: 112

Kansas City, Kansas, US

Ah!  My apologies I thought you meant what he shot it on. Yes, he told me he added 'a bluish silver tint' 

Miscommunication wink

Oct 16 14 11:43 am Link

Photographer

Tulack

Posts: 836

Albuquerque, New Mexico, US

Yes, you said "How do you get the background to be that grey?" and I answered , it's not grey, it's blue. Beside that, grey is just luminosity of white (or black). blacks are clipped. Whites are down. low contrast in midtones. You can see all this on histogram. Match it and you would have the same image.

Oct 16 14 11:53 am Link

Photographer

Jakov Markovic

Posts: 1128

Belgrade, Central Serbia, Serbia

Hazem Giballi  wrote:

What do you mean underneath dodge and burn, cloning?  As in make the color adjustment, then dodge and burn on top of that?  How do you reduce lightness of reds, down on red luminosity? 

How do you get the background to be that grey?  I know the photographer and we use the same color savage seamless.

In your color adjsutments, that si on top, make B+@ adjustment layer, reduce the lightness of reds, and maybe yellows on it. That's what gives you "the look". Blue tint you can add with selective color, or curves on top of the B+W.

Underneath, like you always do, dodge and burn, clone etc.

Like I showed you in the layer stack.

Sharpen
Color, Contrast and other adjustment layers
D&B
Heal
Fix issues/composite/graft
Processed Raw

Oct 16 14 03:40 pm Link

Photographer

WES DEASON

Posts: 280

Houston, Texas, US

3 Easy Steps:
1. Do a black(foreground) and White(background) Gradient map
2. Go to curves channel and lift the blue up to the desired tone.
3. Go to Brightness and Contrast and boost the Contrast slightly.

Oct 18 14 01:23 am Link