|
Forums >
Digital Art and Retouching >
"glazed" photo look
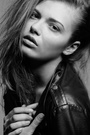
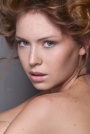
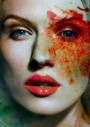
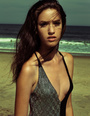
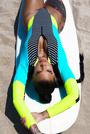
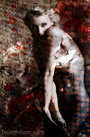
My first try...  Apr 01 11 12:15 pm Link Danny Rodriguez wrote: that shot is awsome. Apr 01 11 01:19 pm Link Danny Rodriguez wrote: Danny, Apr 02 11 02:55 pm Link Julian Marsalis wrote: +1 Apr 02 11 10:55 pm Link Here's my attempt. This is a less colourful rendition. I've been really trying to figure this effect out while still holding a different style.  Apr 03 11 09:08 pm Link I can't post steps cause they are too many and it will take for ever to explain. The only thing I can do is send you a PSD file and you can open it in Photoshop to see what I've done. This will be my last image that I post and I have the PSD file in case some of you want it. THe steps I use are all little twists I've found by accident on my search for a formula that would give me the look. I've come to find that there is no formula. Each image would require something different. It all depends on the look you are looking for and playing with the tools to get it. This would be my last image and i hope I helped those who sent me e-mails. I'm constantly posting images on facebook if you want to keep checking on the styled images. You can contact me through there.  Apr 08 11 07:40 pm Link You got it Apr 08 11 10:04 pm Link Apr 09 11 05:28 am Link Danny Rodriguez wrote: Sounds great [email protected] Apr 09 11 02:59 pm Link @Danny, wonderfull result would be nice to have a look inside youre psd-file. Thank you for sharing, my email is [email protected] :-) Apr 10 11 01:40 am Link  After quite a bit of research, i will be doing a blog post on this faded, blurred and textured look. For those interested i'll send a link when its done. Also i will show the steps involved in getting the above image. May 06 11 09:47 pm Link I just save your blog in my favs thanks! I can't wait!!! May 07 11 02:23 am Link Haerii wrote: +1 But I saved it in my favs a month ago! A very interesting blog May 07 11 03:12 am Link The 'Faded, Blurred and Textured Look' post is up and running....read here: http://sidvasandani.blogspot.com/2011/0 … -look.html Hope you find it interesting. May 11 11 09:53 am Link Great! May 11 11 02:45 pm Link Sid Vasandani wrote: It is interesting. May 12 11 10:30 pm Link It's a thinly disguised advertorial again. May 13 11 02:44 am Link Brock and Rob, i'm sorry you feel that way after all the effort i put in. Color tones have been shown a lot throughout this thread but not the other details i have mentioned in my post. May 13 11 08:58 am Link Sid Vasandani wrote: Not having a dig at you Sid, merely calling a spade a spade. May 13 11 11:39 am Link I spent the $300 and took a personal video lesson from Jaime over the weekend. Really nice guy- you can ask him anything and he'll tell you, no problem. Think we spent a little over 2 hours- got to see his personal workflow, projects he was working on, photoshoots he did, etc. Was incredibly entertaining and informative. Though i can't disclose his personal style, I can say that he's been working with Photoshop since v2.0... so you can say he's quite knowledgeable about how to work it. And no one has hit on his technique yet... though that hasn't stopped folks here from coming out with some impressive near identical looks using their own style.  A few other things i learned from Jaime: 1. He shoots with a 5d and mainly 2 lenses, usually a 24-70l and a prime- think it was a 50mm 1.8? 2. He doesn't use any reflectors, modifiers and rarely any flash- it's all natural light. 3. Looking at just his raw photos of various shoots, he is insanely gifted. 4. He inspires me to leave all my gear at home and just shoot with the camera. (Though it will be a while before I tell my Einsteins they'll be staying home. After spending $300 on 2 diff courses in town here and not learning a thing, this was definitely the best $300 i've spent on anything, if only to learn how a popular photographer shoots. May 23 11 07:25 pm Link 10 pages but still I do not get that look...  May 24 11 05:02 am Link May 27 11 02:10 am Link Jun 21 11 02:08 pm Link Jun 21 11 02:15 pm Link Gareth Byrd wrote: looks like u got it Jun 21 11 04:24 pm Link Danny Rodriguez wrote: Thks your sharing. Can you send me your psd at [email protected]. Jun 21 11 06:25 pm Link Played around a bit with this "style"..  Jun 21 11 11:31 pm Link Gareth and HT, really nice work! Jun 23 11 10:10 am Link New 18+ glazed set https://www.modelmayhem.com/portfolio/1828505/viewall Opinions and criticism welcomed. Jun 26 11 07:33 pm Link Danny R, could you email your psd to me too please buddy, [email protected] Thanks, great thread guys Sep 05 11 05:15 pm Link @Danny I would greatly appreciate it if you can email me the PSD file as well, [email protected]. Thanks Sep 05 11 08:54 pm Link Try: Alien Skin Software: Exposure 3 - Polaroid 669 - Creamy Blown Highlights (what was used in the video linked above) or basically a curve layer with a moderate "S" curve on the Red and Green channel and a slight "S" curve on the blue channel. Add a solid color adjustment layer on the lighten blend mode in the color that you would like the shadows to pick up (try using darker colors). Adjust the opacity of the color fill to what you are looking for. Curve and Solid Color on lighten mode is how I would do it. I can't stand plugins. Sep 06 11 03:16 am Link deleted Sep 06 11 03:44 am Link I have to admit, I'm amazed this thread is still running. That said, I'm even more amazed that more people haven't said to actually take a class from Jaime. He's a great guy and you will definitely get what you pay for, and much more. And just for fun, here is a recent image that was toned in a way similar to how he does his thing.  Sep 07 11 11:48 am Link Based on Ibarra example i made this:  the look looks quite the same. Maybe i've to add a bit of yellow on middle tones. I have done two curves, one for brightness and one for blue/yellow, then added some dodge and burn. Sep 08 11 04:37 am Link Ok. It is amazing the different ways you guys have gotten to deconstruct Jaime's work. Many roads take you to sometimes very similar results. Some are samples of excellent knowledge and technical prowess. I congratulate you all! I just spent more that three hours with him on a class and agreed not to disclose his techniques. Only fair. What I can tell you is that none of you are close to his workflow! (I did not disclose anything improper Mr. Ibarra, right? ) My point, everyone here has amazing capabilities of reasoning and can figure out the path to similar images. What you get taking his class is an insight of not only his technique, but his workflow from conception of an image to its final result. So if you think paying him money for disclosing a technique is too much, you are right. But that is not what you are paying for, you are getting an inside view of a complete process that took him years to develop. Well worth it!! Sep 21 11 10:41 am Link I'm just glad no one has spilled the beans on Jaime's workflow. Bravo!! Magician's shouldn't tell how the tricks are done;) I like having some things still be special. Sep 22 11 04:09 am Link Joseph Jason Photograph wrote: You guys make it sound like Jaimes work has that 'Secret Ingredient' from Kungfu Panda. Sep 30 11 06:31 pm Link Sid Vasandani wrote: It does. That's why we're talking about Jaime, and not someone else. Sep 30 11 08:02 pm Link This forum helped me work out my own tint styles and I wanted to share....     Sep 30 11 08:12 pm Link |