|
Forums >
Photography Talk >
Lighting Setup Tutorials: basic to advanced
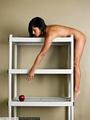
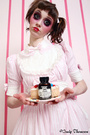
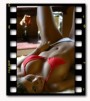
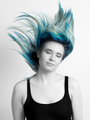
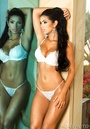
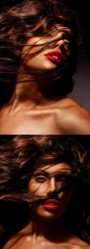
Please post your lighting setups to share with other photographers. Try to include a picture or diagram of the setup along with the final capture. Also try to include any important lighting ratios, as well as camera/lens info. If there is extensive post work, please describe. I hope you will find this an informative and useful thread. I'd rather focus on sharing tips and techniques than debating what you like or don't like about particular lighting setups. No hijacking or flaming, please. Thanks and enjoy, Tom LINKS TO PDF OF THIS THREAD: (provided by Brandon Ching) Pages 1-5: http://www.brandonching.com/pdf/lightin … _pp1-5.zip Pages 6-10: http://www.brandonching.com/pdf/lightin … pp6-10.zip Pages 11-15: http://www.brandonching.com/pdf/lightin … p11-15.zip More Here: http://www.mediafire.com/?sharekey=7a5e … 2dd560fa21 LINK FOR MAKING LIGHTING DIAGRAMS (provided by Brandon Ching): Try this: (courtesy of kevin kertz) new link: http://www.kevinkertz.com/fm/LightingSetup.psd.zip old link: http://www.fredmiranda.com/forum/topic/446987 To use... 1) Download file LightingSetup.psd.zip (size 200k) 2) Unarchive the Zip file 3) Open the Photoshop file: LightingSetup.psd. (size 500k) 4) The file defaults with a Background, Subject and 35mm Camera. 5) To view (add) an item, open the appropriate folder and click on the item (as seen below). You click on the "eye" icon to make it visible or to hide it. 6) Move and rotate into place. 7) Save a copy of your finished setup. Don't save over original file (for future use). Updates: Sept. 13, 2006 - Original file Sept. 25, 2006 - Version (1.1) Added Strip Softboxes and Hairlights Restrictions: ⢠For personal use and to share your setups only! ⢠NO commercial use ⢠Please leave the copyright on ALL setups...Thanks! Dec 08 06 12:29 am Link I'll start. This setup is courtesy of Richard Warren's Fashion Workshop. Equipment and Materials: - white seamless background - model approx 15 ft in front of background - background lit by beauty dish w/blue gel - model lit by 48" white umbrella - additional partial diffusion on umbrella using rolux tufflux fabric - two fill cards (placement seen in pics) - nikon d2x w/50mm Ratios - background about 2 stops below key Post-Production - minimal: basic post on skin, contrast, and color    Dec 08 06 12:30 am Link Great topic, thank you Tom. Nice photo. Dec 08 06 12:33 am Link Where was light to face coming from? I see the umbrella above, but below and to the right? edit--looking at it again, I guess she was back enough from the umbrella with the card that it is just that light? Dec 08 06 12:51 am Link Looks like it's bouncing off the foam core on the left. Dec 08 06 12:53 am Link Need a diagram, I think you are right about the bounce there, but can't tell if thats 45deg or 90deg to model.--- Dec 08 06 12:57 am Link The setup pic was taken from the side - sorry about the angle. The umbrella is almost directly to model's left (or camera right). The direction the model is looking in the setup pic would be facing the photographer during the shoot. In the final capture, she's looking just below the umbrella. Hope that helps. Dec 08 06 01:04 am Link He's also using the bottom of the umbrella with the soft spill light. Very nice soft light. With light like that, you don't need to Potatoshop the skin. Dec 08 06 01:06 am Link This is cool. Hard to add to it without documentary photos - of which I have none Dec 08 06 01:06 am Link Take a couple next time you shoot. Dec 08 06 01:15 am Link I hate making diagrams...  Dec 08 06 01:18 am Link One more before bed... again courtesy of Richard Warren Fashion Workshop. Equipment and Materials: - white seamless - four white umbrellas - two acute 1200R packs - two large 6'x6' scrim jims w/white panels - nikon d2x w/50mm f1.4 - 1/125, f4.5, ISO 100 Ratios: - light is bounced 3x: off umbrella, off background, off scrim jim to model - triple bounce gives extremely even, diffuse light for exceptional skin tones; highlights wrap from back to front; catch light from scrim jim in eyes is subtle and fills iris - lights were at full power - approx. 5 stop difference b/w background and model Post-Production: - minimal work on skin, contrast, and color     Dec 08 06 02:46 am Link Very nice Tom, thank you again. ps, much better diagram!! Dec 08 06 02:52 am Link wow these are great. i have loved both these images since i first saw them, thank you so much for the diagrams. Dec 08 06 02:54 am Link so the bounce card on the softbox in diagram one's sole purpose is to keep from spilling onto the background? Dec 08 06 03:04 am Link robert christopher wrote: yes, that's the primary purpose. it also adds a little more light on the model (probably a 1/3 to 1/2 stop). a black card would have been used otherwise. Dec 08 06 03:12 am Link LightLab Studios wrote: Try this: (courtesy of kevin kertz) Dec 08 06 04:03 am Link Cool. This is very helpful. I'll put it in the OP. Hope you will show us one of your setups... Dec 08 06 04:12 am Link wonderful, thanks.... Dec 08 06 06:21 am Link Jim: Thanks for the diagrams. The images are excellent. Cheers, ~ ward ~  Dec 08 06 06:29 am Link Thanks!! Dec 08 06 09:08 am Link This is an older thread that is also very useful. https://www.modelmayhem.com/posts.php?t … 626&page=1 Dec 08 06 09:49 am Link Jim- Thanks for the sharing the wealth. Great images and information! Dec 08 06 10:21 am Link You are welcome, but my name is Tom. Hoping to see some other contributions by the end of the day... Dec 08 06 11:40 am Link Alright, I'll bite since I provided the link to the lighting setup psd...   Dec 08 06 11:57 am Link Excellent shots here. I will try to share some examples of my more unorthodox hot light techniques for high key shots when I get some free time! You would be amazed at how I shot my default image with a few store bulbs and a point and shoot camera... Dec 08 06 12:44 pm Link Just out of curiousity, let's say if I don't have enough lighting equipment, what kinda interesting lighting can I get from just the equipment I have (i shoot on location most of the time) 2 ETTL flashes (with off shoe cord) 1 46" Umbrella 1 Reflector I'v ebeen experimenting with different setups but I haven't got the results I want. I guess my description here is still a bit vague as I didn't really include any concrete details on how I want the exact lighting to be on an object/model. But any thoughts would help, thanks! Dec 08 06 12:52 pm Link you can use all the basic one and two light setups (many of which will hopefully be posted and diagrammed here). the biggest difference will be the power output of your flashes vs. a power pack or monolight, especially as you lose light output shooting through or bouncing off modifiers. but those two camera flashes are still plenty to do a lot of things. you need to shoot and learn to use them effectively. Dec 08 06 01:09 pm Link LightLab Studios wrote: Cool thanks. Dec 08 06 01:13 pm Link I've used two studio strobes, plus added two porty flashes to my rigging when short on lights...if you slave them with peanut slaves, you can sometimes get them to add light where you need to. That's the beauty of trying new things...If it doesn't work for you, try again. If I don't fail sometimes, how can I ever learn ? Right. Dec 08 06 01:14 pm Link Brandon Ching wrote: Love this shot. Dec 08 06 01:15 pm Link LightLab Studios wrote: Tom ! sorry...thanks, and whoever Jim is...thank him when you see him...lol...j/k Dec 08 06 01:15 pm Link ward wrote: Ya sounds cool to me.. Dec 08 06 01:18 pm Link Brandon Ching wrote: Great shot. Dec 08 06 02:00 pm Link Honestly, I don't remember.. the shot was taken almost a year ago. If I were to replicate this setup again, I'd probably start off with the kicker at 2:1 to the key. You are right about the loss of light via the umbrella but I take the reading of light with the modifier, not according to what the flash is dialed to. I've gone back and edited the diagram with my guesstimates at what the lighting was set at. It was probably 1.5:1 Dec 08 06 02:23 pm Link The link does not work, and cant get Kevin Kertz's website either, but the file is available elsewhere on the internet. Rather freakin' cool and much better than the backs of envelopes and random post-it notes. Dec 08 06 07:41 pm Link Will post setup during next shoot. Best thread in my opinion... Dec 08 06 09:47 pm Link Great topic!!! This is what we should see threads on, not how models remove pubic hair! I may have a studio shoot Sunday, I will do the same with diagrams. For outdoor work I don't use much more than the sun because I have no assistants but if end up using bounce I will show this as well. The problem you will also find is photographers here, well not all but many, think they have some secret lighting ability lol unfortunately they don't realize that many techniques are just handed down from one person to another. I went to a great seminar last year where one of the biggest fashion photographers in NY spoke and said it perfect when someone asked if he was afraid showing his techniques, he did a live shoot at this, that someone would steal his style. He commented back to the person that he didn't care because if started seeing his techniques out there all of a sudden he would change his own so he was ahead. Okay best of luck...again this is a great stuff for photographers. Dec 08 06 09:54 pm Link Brandon Ching wrote: Brandon? Some have hated on the AB lights. Show them this model and you'll change some opinions about the AB lights. Dec 08 06 10:01 pm Link hmmm ok I'll play.   Dec 08 06 11:14 pm Link |