
Photographer
Telephoto Studio
Posts: 1439
Raleigh, North Carolina, US
slave to the lens wrote:
So, I love DIY lighting. I love hacking cameras as well.
With the constant stream of new photographers on MM with a shoestring budget, I thought it would be cool if there was a thread showing it's not ALL about how much money you spend..things can be improvised!
If you don't like DIY stuff, please don't post here telling DIY enthusiasts how they are stupid for not spending money on the latest gadget..just move on!
So, here's my latest completed project. It's a 2nd generation..the first had some bugs that this model addresses. (you can find it by searching homemade light modifiers)
snip
So there it is. Enjoy.
Please feel free to post your camera /lighting DIY projects here! I made one about 10 years ago with one sheet of archival foamcore board and some aluminum foil. It fit my Speedo 103 light head, and could either hang down from a boom or could be mounted on a strong tripod. That way I could have more power from the Speedo pack.

Photographer
paoloALFANTE
Posts: 187
Los Angeles, California, US
slave to the lens wrote:
So, I love DIY lighting. I love hacking cameras as well.
With the constant stream of new photographers on MM with a shoestring budget, I thought it would be cool if there was a thread showing it's not ALL about how much money you spend..things can be improvised!
If you don't like DIY stuff, please don't post here telling DIY enthusiasts how they are stupid for not spending money on the latest gadget..just move on!
So, here's my latest completed project. It's a 2nd generation..the first had some bugs that this model addresses. (you can find it by searching homemade light modifiers)
Home made DIY Ringflash
start with a few metal bowls, some plumber's putty (or JB Weld, epoxy..whatever is strong..)
If you follow these instructions, wear goggles and ear protection. This is for informational purposes only and I'll not be responsible if your scrotum gets caught in a belt sander or any other injury you sustain. Use common sense. Be safe.
![https://farm3.static.flickr.com/2235/2236622019_3539782162.jpg?v=0]()
All below was accomplished with a dremel and cutoff tool. A Rotozip is easier, but it wasn't here, so...
cut the first bowl ( about a 19" one..) to just under the width of the medium bowl, like so...
![https://farm3.static.flickr.com/2140/2236622209_0c7e0188e2.jpg?v=0]()
The medium sized bowl should accomodate the body of your camera a bit ( a problem with my last attempt) like this:
![https://farm3.static.flickr.com/2218/2237412860_0685f0111e.jpg?v=0]()
cut the second bowl to accomodate a lens.. a bit bigger is better...
![https://farm3.static.flickr.com/2311/2237413244_809c0a05c4.jpg?v=0]()
invert the third (smallest) bowl and cut a similar sized hole as you did in the medium ( 2nd) bowl:
when you're done, it might look like this:
![https://farm3.static.flickr.com/2378/2237413364_925c406fd2.jpg?v=0]()
Three bowls, all useless for mixing now. Still here? Cool.. Moving on...
affix ( epoxy, plumber's putty, etc) the medium and small bowls with the bottoms of the bowls inverted, like this:
![https://farm3.static.flickr.com/2403/2237414150_b95e260c4d.jpg?v=0]()
I like plumbers putty for a few reasons: It dries hard enough to sand, it's not messy, it's hand pliable to work with easily..and it fills in gaps/ covers sharp exposed areas nicely.
Now, place the sutup into the hole of the Large bowl with the rim of the Medium bowl up. It might look like this, assuming you cut the hole in the larger bowl a bit SMALLER than the rim of the medium bowl..(remember?):
![https://farm3.static.flickr.com/2359/2237412656_c5093409c0.jpg?v=0]()
Does it fit? need to trim a bit? Go ahead, I'll wait...
Ok. Done? Affix the medium bowl to the larger bowl with your chosen adhesive. put it upside down while it cures to apply pressure...Go inside and play curveball while you wait...
Later,
Does it look like this?:
![https://farm3.static.flickr.com/2390/2236622573_8477442400.jpg?v=0]()
Cool! let's keep going...
Trace the edge of whatever flashlights you're using onto the outside of the large bowl. Take care if you're using 2 or 3 lights to space them evenly around the bowl...
Cut it. try to fit the flash in.. if its snug, thats cool.. a bit loose? Hot glue or soft velcro tabs (add after painting!) should fix that.
![https://farm3.static.flickr.com/2353/2236623511_8c85e0ce0c.jpg?v=0]()
Sand anything you want smoothed out if you'd like... once everything is cured.
I added a handle (old table leg) with a wingnut and washers.. drilled out and enbedded/epoxied a nut to fit a quckplate for an older tripod head I rarely use..
![https://farm3.static.flickr.com/2414/2236621919_acd01d579c.jpg?v=0]()
![https://farm3.static.flickr.com/2269/2237412368_025cbd43a9.jpg?v=0]()
(yeah, it's off center..sue me)
attached to the large bowl. it works well enough.
Paint it. I like satin black. Remember to paint the interior of the smallest bowl as well to minimize flare and any vignetting when using a wide lens (problem #2 with my old design,..sigh)
![https://farm3.static.flickr.com/2336/2237413972_4c43c9d250.jpg?v=0]()
![https://farm3.static.flickr.com/2261/2236623141_d7a2456384.jpg?v=0]()
see my little old cruddy flashes peeking out? Hi ;-)
The mirror finish of the chrome throws a nice ring..WAyyyyyy better than aluminum foil ( problem ## with the first attempt)
attach the flash(es). I used hot glue, after putting soft side velcro around the sharp edges.
You could make velcro straps and make it a temporary rig if you like..up to you.
![https://farm3.static.flickr.com/2319/2237413720_5005ed9bd1.jpg?v=0]()
I spliced 2 pc wires together and attached them to a Wein hotshoe safesync.
Anywho..that light is bright and direct. Let's soften it a bit..
I used 216 Rosco diffusion. You could use that, or cut up a thin old cutting board, bleached muslin, a vinyl shower curtain..
fixed with 3M spray adhesive that I sprayed into the cap and brushed onto edges. I then cut off the unnecessary bits.
![https://farm3.static.flickr.com/2214/2237413466_b7f3bf3785.jpg?v=0]()
Done.
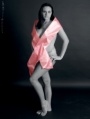
But how does it work?
Ben, at about 8 feet. 1/320 sec @ (I think) f 8.0
![https://farm3.static.flickr.com/2183/2236657835_2755dd5ae1.jpg?v=0]()
I like the halo effect, but I think I'll likely find some cheap flashes to add top/bottom to the ringlight to really punch it. the halo at the top is a bit too soft for me.
Final cost was about 45 bucks. 20 for the bowls, 17 for the paint, putty, etc... and the flashes came in a box of crap from a yard sale.
Total time about 2 hours, not counting curing/ paint drying time.
So there it is. Enjoy.
Please feel free to post your camera /lighting DIY projects here! First I must compliment your handy skills. However the entire point of a ring flash is for shadowless photos. Your sample has a ridiculous amount of shadow.
Photographer
Cardillo Photography
Posts: 1360
Palm Coast, Florida, US
The thing I would be concerned with is the angle of the flash units in comparison to the subject.
Are they bouncing into the center piece? thus reflecting into the larger bowl? or are they pointing slightly off-center making the lights criss cross each other? From the images posted...it looks like the lights are not at an angle that would reflect the light off the center section.
In the past i have made lightstands out of PVC pipe
I make wardrobe racks out of PVC
I use PVC pipe to store my paper rolls
damn I use a lot of PVC........

Photographer
Andrew Attah
Posts: 1699
London, England, United Kingdom
Fotografia di Paolo wrote:
However the entire point of a ring flash is for shadowless photos. Your sample has a ridiculous amount of shadow. Uhhhhhhhhhhhhhhhhhhhhhhhhhhhhhhhhm...

Photographer
slave to the lens
Posts: 9078
Woodland Hills, California, US
Cardillo Photography wrote:
The thing I would be concerned with is the angle of the flash units in comparison to the subject.
Are they bouncing into the center piece? thus reflecting into the larger bowl? or are they pointing slightly off-center making the lights criss cross each other? From the images posted...it looks like the lights are not at an angle that would reflect the light off the center section.
In the past i have made lightstands out of PVC pipe
I make wardrobe racks out of PVC
I use PVC pipe to store my paper rolls
damn I use a lot of PVC........ I addressed that in page 1..identical question.
Loves me some PVC too.
Photographer
slave to the lens
Posts: 9078
Woodland Hills, California, US
Fotografia di Paolo wrote:
First I must compliment your handy skills. However the entire point of a ring flash is for shadowless photos. Your sample has a ridiculous amount of shadow. Thank you.
That said, Where do I begin?
The entire point of ringflash is flat even lighting, and yes shadowless.. No light casts no shadows. A professional ringlight will "wrap around" projecting the ringlight directly behind the subject and often creating a "halo" effect. The effect differs depending on the distance from the light to the subject and the subject to a background.
But Paolo... I'm not a dentist, I'm a portraitist. No shadows = no depth, no detail. So ignoring the fact that you called my son shady, :-) I did another test for you. I was going to let it go..but my mannequin hates Italians.. Don't ask why.
Bob ( my stand in) said.. Ryan you're really going to take that? Paolo said your light is underpowered... and rridiculous!
No, Bob..I ain't.
Paolo, here is the setup:
![https://farm3.static.flickr.com/2347/2264428776_3eeb6b851a.jpg]()
Bob is 3 or 4 feet from the background, light is 5 feet from Bob.
These were shot on a Canon 30d at 1/50 at varying f/stops.
Bob @ f4
![https://farm3.static.flickr.com/2339/2263640775_3aff8a282e.jpg?v=0]()
Bob @ f5.6
Kinda blown out still, huh?
![https://farm3.static.flickr.com/2350/2264428670_7f856282ab.jpg?v=0]()
Bob at f6.3...right about where I want him..subtle modeling under the chin, soft highliughts and shadows (OOOO...SHADOWS! RUN!) along the collarbone:
![https://farm3.static.flickr.com/2258/2264428696_9e0a5ef6bb.jpg?v=0]()
And finally..Bob..where he's going to be great for shooting how I shoot. f8
![https://farm3.static.flickr.com/2407/2264428732_28ab1f845f.jpg?v=0]()
Now.... I realize the halo isn't tight and I'm going to adjust that.. but shadows are OK with me Paolo.
Also realize this light has 216 on the front which spreads and softens it..yes.. but also eats a stop.
Thanks for your input.
Again, THIS is what I think ringflash is for:
hard detail, shart highlights, soft, evenly flat... yet an overall pop..
![https://farm3.static.flickr.com/2183/2236657835_2755dd5ae1.jpg?v=0]()
Go ahead..call him shady. I dare ya. ;-)
Ryan

Photographer
Stephen Powers
Posts: 112
Buena Park, California, US
Does a home studio count as DIY? The backdrop support is 1.5" and 2" PVC with some eyebolts and clips to hang it from a couple ceiling beams. 3" clamps from HD for holding the backdrops on. Muslin from the fabric store finished by me. The back one was my first attempt at dying and I was unhappy with the pattern so I hit it again with plain black and it's still purple so I'll be replacing it with a real black one at some point. Lights are some cheapies from ebay. ![https://www.powers-photography.com/IMG_1373%20500.jpg]()

Photographer
Keith_R
Posts: 845
Philadelphia, Pennsylvania, US
This is my spin on the DIY beauty dish. I started out with a Morris DC Super Slave that I had laying around. It has a removable diffusion dome, which made it easy to mount the bowl/reflector. Check these out. The black spot on the diffusion dome in the second image is a bit of gaffer's tape. I get f/8 at 4' and change (asa200) with this rig, and 2sec recycle with fresh batteries. I get f/16 under the same condition without the tape. My camera only stops down to f/11, so you see that something had to be done :-). ![https://i253.photobucket.com/albums/hh46/kpbsmith52/DSCF0176.jpg]() ![https://i253.photobucket.com/albums/hh46/kpbsmith52/DSCF0190.jpg]() ![https://i253.photobucket.com/albums/hh46/kpbsmith52/DSCF0186.jpg]()
Photographer
Keith_R
Posts: 845
Philadelphia, Pennsylvania, US
|


