Robert Randall wrote:
First, some observationsâ¦
I didnât watch the nerd video, if there was one, because I didnât want to be affected by anything other than the image itself. If Iâm wrong about some of my observations, well tough shit.
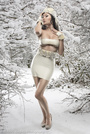
The nerd wasnât shot at the same time the hallway or other students were shot. Check for missing side highlights on other students.
DH seems to favor wider lenses, which lend a great deal of impact to his already surreal approach.
Iâm thinking he does a lot of his post in CMYK, mostly because it appears the colors are in gamut, which is difficult to obtain using the techniques Iâm going to outline for you.
Iâm still reeling over his technique of calling out â1 2 3 smileâ to his subjects. But it does seem to jive with his somewhat casual lighting format.
His lighting is very simple, but as is the case in this image, itâs not always with a camera mounted ring flash. Although from what Iâve seen in his videos, he probably had someone holding the ring flash off camera.
This particular image has the main on the nerd coming from high camera right. This light subtly helps to separate the others from the main nerd. The others are lit from a source that was probably behind the spot the nerd was inserted in front of. If you consider the placement of the ceiling lights, the scene is believable.
His final style is possibly aided by the placement of the lights, but more relevant are the white and black points he uses and the way he compresses the mid tone to off set the highlight, making the highlight the king of his scenes. Take away that one aspect and his pictures look like everyone elseâs, well, except maybe for the scene, the casting, the wardrobe, the expressions, the composition, the color palette, the wardrobe⦠you get my drift.
Notice the ceiling and how it separates from the sidewalls. This was done with some sort of selection and tone control. This is referred to as local contrast control.
Notice blown out highlight on low locker left. Nice way to separate the subjects from the scene and give everything an added dimension.
Notice how nothing Iâve said so far has anything to do with any fairy tale dragon filter.
Now, how he does itâ¦
First of all, forget all about any dumb ass High Pass techniques youâve been thinking of, because from what I can see, he doesnât use them. Nor does he use a huge amount of Unsharp Mask. He uses local contrast controls through selections and masks.
For instance, look at the back pack on the other guy camera a right. Normally that item would be blocked up and lacking detail. Make a lasso selection around the back pack and ask for a layer curve. Brighten to taste. Next go to the same guys pants and do the same thing over for the pants. Now go to the sweater. Now go to the next guy and do the same thing to his little blue bag, then his sweater. Cross the hall to the guy and his leather jacket. Curve that, then his pants and then his hair. Do this local selection curve technique to anything you feel like, when finished pumping up the local contrast, go get something to drink. Come back and judge whether youâve gone too far or not far enough, and then fix stuff to taste.
Next, make a Highlight mask like thisâ¦
![https://www.robert-randall.com/MM/HL%20mask%201.jpg]()
Load it to make it active, and then ask for a layer curve. Bring highlight up slightly.
Next, make a Highlight Mask like thisâ¦
![https://www.robert-randall.com/MM/HL%20mask%202.jpg]()
Load it to make it active, and then ask for a layer curve. Bring highlight up slightly more. Notice how the picture starts to take on a sense of depth and life that youâre not familiar with. Fun, huh?
Next, make a Shadow mask like thisâ¦
![https://www.robert-randall.com/MM/shadow%20mask%201.jpg]()
Load it to make it active, and then ask for a layer curve. Bring shadow down just a little bit, donât get carried away here, it isnât the right time for it.
Next, make a Shadow mask like this, or darker yetâ¦
![https://www.robert-randall.com/MM/shadow%20mask%202.jpg]()
Load it to make it active, and then ask for a layer curve. Now play with killing any detail you might have in this local select area of the shadow. This move sets up the down side of the picture just like the HL mask sets up the upside. By now you should be experiencing a sense of depth that will keep you off the porn sites for at least an hour. Weâre not done yet!
Next make a difference mask like thisâ¦
![https://www.robert-randall.com/MM/diff%20mask%201.jpg]()
Load it to make it active, and then ask for a layer curve. Now you can play with adding or detracting density from the midtone area to help create the illusion of more density. Usually this is a darkening move, but it can go the other way too.
Now ask for an empty layer and change its mode to softlight. Note that you can also use hard light or overlay if you prefer. Wherever you see a highlight that you want to embellish, start painting white with a brush, wrinkles, teeth, cheeks, lips, what ever you like, paint until youâre eyes bleed. My way of doing this is to then blur the painted layer and add a Highlight Mask from the selection I gave you above. This is why my pictures donât look like Jill Greenbergâs or Dave Hillâs. I use control over my painting emotional out bursts. Paint those arm and leg highlights too, donât miss a thing!
Now do the same think with black paint on another softlight layer. Use a mask, donât use a mask, itâs completely up to you.
If you still think there is room to screw the pooch a little harder, create a compound layer of all you have done and de-saturate it. Change the mode to soft or hard light and watch your contrast go through the roof. Still not enough? Make another compound copy and de-saturate it. Change the mode and ask for a HP filter. Give it a number of between 2 and 250 and watch that picture go thermo nuclear on you. Go to the closest mirror you can find and say the words âFuck Dave Hill, youâre the man!â.
Any rational person at this point will note there are a thousand ways to skin a digital cat. What Iâve laid out is the basis for how young Mr. Hill achieves his look. I havenât given you every nuance, because that could take days, and I may have missed a small point or two. But you should have learned at least one major point; there is no shortcut filter available that will do this. Also, you arenât Dave Hill and even armed with this info, your pictures wonât look like his. But hopefully they will look like yours.
Okay, Iâm ready for every malcontent know nothing wanna be that feels a need to challenge me on my DH dissection. Let me say in advance⦠fuck you, you donât know what youâre talking about.
You are my new hero, just for how u end this.