|
Forums >
Digital Art and Retouching >
Skin tones in Photoshop
I was wondering how I can use Photoshop to make a model's skin tone look more like the after-shot. What do I do?  May 02 09 09:00 pm Link I am no expert, but it looks like they just desaturated the yellows. May 02 09 09:02 pm Link There are a lot of ways but you can bet there is considerable dodging & burning as part of the process. May 02 09 09:03 pm Link try curves and tweak the reds... slightly May 02 09 09:05 pm Link in Adobe Camera Raw, reduce the saturation of the orange channel and adjust orange luminosity to taste. This usually wrangles in most skintones before the dodging and burning process. May 02 09 09:06 pm Link Michael Pandolfo wrote: +1 May 02 09 09:07 pm Link the way i do that sort of thing is use vibrance in photoshop CS4 i bring up the vibrance and then desaturate from tehre...dont know if its the right way but thats what i figured has worked for me May 02 09 09:08 pm Link MacLeod Designs wrote: dear god.... there is a cs 4 out already????????????? christ!!!!!!!! I have not fully adapted to cs2 yet. May 02 09 09:12 pm Link Also looks to me like a bit of diffuse glow, effective when used sparingly. May 02 09 09:12 pm Link Michael Pandolfo wrote: Along with proper color correction (I use icorrect portrait for skin tone) and try some curves layers on luminosity mode too. May 02 09 09:13 pm Link Thank you for all the replies thus far. As always, there is always at least 10 different ways do to something in Photoshop (I am using CS3). What would I need to do differently if the model has dark skin tones if anything at all? May 02 09 09:14 pm Link NewBoldPhoto wrote: I know, I even bought cs4 and went back to cs3. May 02 09 09:14 pm Link start with a hue sat adjustment layer with red at -40 then adjustment curves layer in luminosity to a contrast (S) curve, then some adjusting of contrast and burning in some areas for contour. Stephen Eastwood http://www.PhotographersPortfolio.com May 02 09 09:14 pm Link B Dani Photography wrote: What do you mean "dark skin tones" and what are you trying to achieve? May 02 09 09:15 pm Link StephenEastwood wrote: **bowing to the master** I just listened to a podcast featuring you by the way. Nice stuff Stephen. May 02 09 09:16 pm Link CGI Images wrote: By darker skin tones I mean an African-American person. I just like the look of the skin in the example provided. The after image just pops and looks more luminous than the before image, and that is sort of the look I am after. May 02 09 09:19 pm Link CGI Images wrote: ahhhh....... you should hear me sing, I am doing a Sinatra special next podcast May 02 09 09:23 pm Link StephenEastwood wrote: Awesome, it was actually an interview on lightsource photogrpahy's podcasts. May 02 09 09:27 pm Link B Dani Photography wrote: I think they key then would be in proper dodging and burning with the luminosity curves layers. I've seen good stuff from using luminosity masks with curves too. May 02 09 09:28 pm Link StephenEastwood wrote: Have you looked at what that image looks like at -40 red in a hue/sat layer? Is that really where you suggest to start? May 02 09 09:56 pm Link Terakawa wrote: yes, with no dodging or burning just that and an s curve in luminosity looks like this linked which already starts to get close. Add some more contrast and dodge the contours in and you are very close. May 02 09 10:16 pm Link damn, looking at it again, just that change got this close: Left half only before any added dodging or contouring or retouching.  its almost like I knew what I was talking about on my first guess  add a tad more contrast in a non Luminosity layer which will increase the color a bit and you are even closer still. Stephen Eastwood http://www.PhotographersPortfolio.com May 02 09 10:33 pm Link I would say start by reading the book Photoshop Artistry, that will get you proficient in using curves and layers among lots of other color correction tools! May 03 09 01:00 am Link B Dani Photography wrote: That looks just like a case of different CTs, plus a litle bit of curves. Setting the curves to match the hair and skin tones, then applying the 82 PhotoFilter and adjusting the slider gets it quite close. May 03 09 02:13 am Link I love threads like these! Why? because it shows how people with superior knowledge of photoshop can disagree as to the "secret sauce." The end results will be very similar in all cases but the "sauce" will be different. That is one of the coolest things about photography! May 03 09 04:36 am Link Angelo Lorenzo Photo wrote: thanks, just tried it out... May 03 09 04:56 am Link B Dani Photography wrote: that's the 'magic question' among shooters and retouchers May 03 09 04:57 am Link WMcK wrote: I generally use LAB to adjust the curves... you tired that? May 03 09 04:58 am Link StephenEastwood wrote: Bah, I was putting in -40 in red under hue instead of sat. Now its working. May 03 09 08:50 am Link Terakawa wrote: Uh, yea, that looks like crap! May 03 09 08:52 am Link bm bradley wrote: Yes, I often use Lab, especially when adjusting saturation, as Lab does it without damaging the luminance values, unlike RGB. May 03 09 09:19 am Link WMcK wrote: ditto on the above. May 03 09 10:20 am Link Terakawa wrote: Yeah, no arguing with the Eastwood. It knows what it's talking about... May 03 09 10:24 am Link |


 and it did.
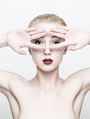


