|
Forums >
Digital Art and Retouching >
swapping the sky...
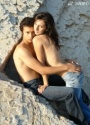
ok, so i ignore the butchery of the retouch that i've done here... the question here is about the sky... it happened to be a very humid type of overcast day, and the sky could best be described as "bleh"... still plenty birght (which is why she's squinting) but still just way too blend... i'd like to sub it for something a bit more dramatic... i'm not sure if i want the sunny sky with clouds, or a dramatic grey one... so my question is two fold... 1.) where can i get some samplings of different sky's, just to play with to see which one i like more... ? 2.) what are the best tecniques for swapping the sky seamlessly ? i don't want it to look too obviously out of place... any other ideas suggestions are welcome...  Oct 22 09 10:24 am Link your going to have an extremely difficult time doing it well. Here hair blends in with the white of the sky behind...if you have to ask how to do it, your going to have to spend a great deal of time learning how before it happens  I'm sure people will jump in with tutorials showing some cookie cutter method...but your going to have to try all of them, learn a bunch, and then maybe it will work... I'm sure people will jump in with tutorials showing some cookie cutter method...but your going to have to try all of them, learn a bunch, and then maybe it will work... but really from what I see on the lo-res this probably ins't a good candidate.....I would suggest some big billowy clouds which are strategically place behind here hair were it blends in...to put deep blue behind would be tough.. Oct 22 09 10:42 am Link There a lot of techniques for doing the extraction. You can find some tutorials here. http://www.russellbrown.com/tips_tech.html I have a bunch of sky images I have shot just for possible composite images that I would be happy to share. PM me if you are interested. Oct 22 09 10:48 am Link Rather than paste in a different sky, I would turn this one blue and maybe add some indications of clouds. Here is a technique for doing that using selective color.  Oct 22 09 12:28 pm Link I really like what http://www.cgtextures.com/ has to offer.. I usually change the blending mode to one that I like and drop the opacity down and mask it.. sorry I played with your photo.. just a real quick, messy job, just so you can see what I was talking about.  Oct 22 09 07:25 pm Link If you want to add a blue sky(without any clouds)then,select the shitty sky and replace it with a blue gradient...it does pretty much just the same(you may have to final touch with the opacity setting). Here is one that I did like this.I had a blue sky in the bank that I could have use to fill the totally white sky there was in that shot but I did it with a gradient and then with the imported blue sky and there was no difference so I kept the version with the gradient.  Oct 22 09 07:53 pm Link I'd try adjusting the color of the sky and maybe using dodge/burn to add hints of clouds, like already mentioned above. Remember that everything will be blurred... so it may not be worth it to put a whole new sky image on it. btw, I kind of like the image with the grey sky. Just sayin. Maybe instead of going for a bright bright blue, add some very subtle blue in a gradient. Oct 22 09 11:20 pm Link KKP Retouching wrote: i'm thinking of making it grayer... more clouds... just to add some drama or something to the background... it's just way to bleh... Oct 22 09 11:29 pm Link Yeah, you can do all of the above. Carefully blending and feathering around the model and where the sky meets the horizon is needed in different layers. I would probably add a gradient blend of light to dark blue, and keep all of that on the light side. In another layer I would use cloud brushes. You can make your own or find them in places online. DA provides some of these. These would be real clouds. Oct 22 09 11:29 pm Link thank you, everyone btw... will sit down over the weekend and start messing around... Oct 22 09 11:29 pm Link Here is a quick example for you. First I used the select-color range tool to select all the various colors of the original sky. Then I generated the selection and used it to mask the figure. I didn't worry about the bottom of the image since that was staying the same. I pasted in the sky,erased around the original green area (mountains?) with a low opacity soft edge brush to make it blend seamlessly and played with its color and tones with the hue/sat adjustment and levels. I then used a gausian blur filter on the sky since the background is originally very blurred. After that, I had to change the colors on the model, because a stormy grey sky and a tan sunny model don't flow too well. I used selective coloring and color balance for that. After that I airbrushed some subtle white around the figure of the model and set it on a soft light layer, since her edges were very light. Free stock image was found on deviantart.  Oct 23 09 12:07 am Link JSVPhotography wrote: I did a test color change--changed the sky to cyanish-blue and didn't have to do any precise blending. Oct 23 09 12:07 am Link There are also a few cloud brushes for Photoshop that are pretty decent, I think brusheezy has them. Another method I use for grey sky, is import your replacement sky, lay it over top, open up the blend options and play with the Blend if Grey sliders. Does a pretty remarkable job, and then you can just go back in and fine tune it with the mask. Oct 23 09 03:57 am Link You could also drop in another layer with a photograph of a sky you want, and use the blending mode to do most of the work for you. Soft Light, Vivid Light, Overlay, Luminosity, etc should work depending on the tones and colors you want.  The sky in this shot was totally blown out so I dropped in a new sky, moved the horizon to match this one, set the blending mode to Luminosity, and did a quickie mask to make her skin tones normal again. I think I spent maybe 2 minutes doing it. Oct 23 09 08:59 am Link |