|
Forums >
Digital Art and Retouching >
Cartoon effect
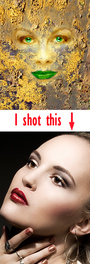
Hi all, I'd like to improve the technique to "cartoonize" pics. Michael Rosen is great at it. Ok, I know he has also gorgeous stylist and backgrounds, but I'd like to start. Someone has some ideas where to study (also paying)? Here's an example, but there are many  Thanks Jul 16 12 11:35 pm Link Very careful and selective shadow and highlights (or similar) and HDR toning adjustments should get you started. Then you'll need some local contrast and/or dodge and burn and sharpening and background replacements. The adjustments you need to experiment with are very easy to mess up so be careful. To make the HDR adjustment tool work you need to make a flat duplicate of your image. When you run the tool first make the saturation zero and then play around. You can make some weird tone and detail maps that look similar to his work. Once you get the look you want you can copy it to the original document, set to luminosity and mask. HDR adj. creates an 8 bit image keep that in mind. Oor he may just be using plugins  Jul 17 12 01:24 am Link I'm not too sure what you mean by cartoonize? I can't see anything that looks like a cartoon in your post. I am a Cartoonist ( www.pantelispalios.com ) so I'm sure that I could help whether with pen and paper or with a photograph. Jul 17 12 01:41 am Link Koray wrote: thanks! Jul 17 12 02:14 am Link tosk wrote: even if he is using plugins for shadows and details etc. just naming them will not help you if the other stuff I wrote doesnt make sense. Jul 17 12 02:29 am Link here...read the parts about the model: http://www.psdbox.com/tutorials/the-pol … -tutorial/ actually this place has alot of tutorials: http://www.psdbox.com/category/tutorials/ Jul 17 12 02:47 am Link The sample image looks far off from any cartoon image....it doesn't even look like a painted effect. Jul 17 12 02:53 am Link Oscar S wrote: thats very kind and helpful of you to point that out Sherlock. Any other usefull tips you may want to add? Jul 17 12 02:57 am Link that's not "cartoonish" in the least. That is good photography!!! and probably a 5D or better with expert lighting. Shooting in RAW with some fine tweeking can do this ... no problem. You can't make chicken salad with chicken shit. Jul 17 12 03:01 am Link Some things I have done is to make a lith image (very high contrast b/w) and then matte this over the original photo so that it looks like an inked image, and then manipulate the colour and contrast so that it looks like a comic book illustration. Another trick is to put comic book "skin" ( the red and white dot screen which make up a color comic image) on the lith photo, this is also good if you want the Roy Lichenstien pop art effect ie https://www.modelmayhem.com/portfolio/p … 7#28631597 Jul 17 12 03:03 am Link Rebel Photo wrote: Thanks for your insight but have you ever seen any of his RAWs? here if you havent: Jul 17 12 03:07 am Link devpics wrote: how could you possibly think that image looks similar to what op is asking? Jul 17 12 03:11 am Link Checking out Michael Rosen port shows variation on the look many ways to get it a simple way to get a similar is by using a product like topaz adjust or the like to get the colors and pop and the rest is artistic retouch. A similar look to the skin can happen I think using fs and then surface blurring a copy of the low layer and set opacity to taste. Oh well that's my take some what lol. Jul 17 12 06:04 am Link The first step is blemish removal. Remove anything that pulls focus from your intended point of interest. Then you can smooth the skin *slightly* with the blur tool. D&B where needed to enhance the existing light, etc.. Those skin tones & textures can be achieved a few different ways, after removing the blemishes. My preferred method is by masking multiple layers and playing with the gaussian blur to smooth things out. Avoid the eyes and anything with detail and handle those later with an unsharp mask. If you use gaussian blur on an overlay layer(which I recommend for this effect), the skin becomes very smooth and cartoon like, but the colors will be way off. Just simply adjust contrast/vibrance/levels and you should be able to find a skin tone that fits your scene.(adjust the layer beneath the overlay layer first.) Be sure to feather the edges well to hide your lines. I have a few similar examples in my port. Not quite as good as the above, but generally the same effect. 18+ (sort of) https://www.modelmayhem.com/portfolio/pic/27770764 If this is what you're looking for, shoot me a msg and I'll put together a screencast of the workflow. Jul 17 12 06:29 am Link Oscar S wrote: Koray wrote: I have to agree 100% - the sample image doesn't look like any definition of cartoon that I've ever seen. I think the OP needs to find a different word to define what he's looking to do...then I think people here could more likely help him. Jul 17 12 06:42 am Link Julian Marsalis wrote: Riiiiiiight. If it were just a push of a button and plugin - why do you think not a lot of people got it in their ports to improve quality of really really dull stuff? Jul 17 12 07:29 am Link I too am confused as I don't see anything cartoonish going on. Cartoon filters generally make a pastel painted look with less transition colors and heavy bolded lines.  This is a cartoon layer overlayed the original photo. Jul 17 12 09:15 am Link KonstantKarma wrote: Me neither but I can see the image he posted too and that clears it for me. I cant understand how you guys cant heh Jul 17 12 09:19 am Link Cartoonish? No, it's more like a painted effect look. Rosen has been a favorite in my list for me to study. I have tried to emulate such effect but without much success. Though I have not spent 24/7 to do so I must admit. I would like to see someone who has actually and successfully replicate such look before all the talk of techniques. Cuz I would really like to know actual techniques. Jul 17 12 09:48 am Link .... Jul 17 12 12:05 pm Link I can't find anything in Michael Rosens portfolio that remotely looks like Ren and Stimpy, or even Johnny Quest. Where are you watching your cartoons at??? Jul 17 12 12:26 pm Link Chuckarelei wrote: there are 2 images in your portfolio that are a bit there with Rosen's value wise but you made different artistic choices and overall worse processing. Jul 17 12 02:49 pm Link OP, do you mean that you want an image to have a painting like effect? Liker this or? I'm sorta confused by the example as well but, while not a cartoon, i'm wondering if this is what OP is after or?: https://www.modelmayhem.com/portfolio/p … 3#21396139 Jul 17 12 03:15 pm Link Thenk you for replies, sorry for my delay, but very busy this period. Saying the truth I contacted Michael Rosen in the past, also I was ready to pay for lessons, but really no replies from him. Maybe coz I live in Europe? Jul 21 12 12:22 am Link Hmm intresting that a question about "howto" .... will become a discussion about the topic *confused* http://vigar.deviantart.com/gallery/#/d4fjf9v http://vigar.deviantart.com/gallery/32936125#/d4fb3xj To create such effect you have to 1) take a normal Photography ( whatever at you'r stock or mind ) -> but notice the image should got the "look" to get a painted onces! 2) Cut the Mainobject clearly to a new layer 3) Blur the image ( new clear cut layer ) / gaussian blur works best 4) Redo this 3 or 4 Times ( every time a new layer! ) 5) Changing the blends ( so the new clear layers will "soften" the original onces ) 6) change the color apperance ( using histogram or Curves ) 7) Play around until you've got the effect you've looking for  8) At the end using high pass to get sharpness where needed. This is a simple blending change with some lineart done to get the painted effect onto the picture. You've got to play a little but to understand how blending + curves works together and be really clear @ you'r works ... i've taken a look at michaels gallery and saw a lot of images there Artifacts of background has been not cut away - so you have grey lines at a red background. You could get diffrent styles if you want but this are also some filtering tricks. So everything you need as technique is clearly written here : http://photoshoptutorials.ws/photoshop- … fects.html Download the PSD file this will help you to understand the task! Jul 27 12 11:41 am Link that "almost-like painterly effect", after thousand experiments, topics i created, answers from everyone, it's 50% done by a simple thing: noise reduction. with large files, do a strong noise reduction but with a low level of preserve details too (depends on what you want). after that do your favourite sharpening and next add a 3% (or more) of gaussian monochromatic noise. Add this as the last thing to do in your workflow. the more shadows/lights are in (natural and/or painted with d&b), and more tonal contrast is active, the better is the result. so play with everything you know, like d&b, curves, tonal mappings, etc. enjoy my english :S Aug 03 12 12:24 pm Link A rather usual response from people looking at this image hanging in our studio is that it looks "painted", "cartoonish" or "how much PS did you use in that one". People have such strange ideas. It´s perfect skin, makeupartist, lightning, fullframesensor and most important D&B in post using curves for highlights/shadow/midtone etc. http://fhfoto.se/content/Copyright_Foto … large.html Aug 03 12 12:42 pm Link freddah wrote: That is in no way even close to what the OP posted or even comparable to the same level of quality! Aug 04 12 02:06 pm Link AshleyDay wrote: One day I'm going to get brigged cause of one of those and I think you are the only one who can understand me around here Aug 04 12 02:08 pm Link |