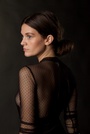
Jun 24 12 10:17 pm Link This should have been posted here so don't be suprised if it gets moved there. https://www.modelmayhem.com/t.php?forum_id=77 For me, the first thing that immediately catches my eye is that the poor girl looks like she got punched pretty hard. I don't know if that was the MUA or PP but her cheek looks horribly swollen, particularly in the bottom image. The other major detractor is her hair looks like it had little to no attention paid to it. Fly aways are to be expected but its all over the place! More attention should have been paid attention to it at the time of capture and then cleaned-up a little in post, not fixed or neglected. Those are the major issues. A few other quibbles that I have is that the red channel is blown out on her forehead and I think the model is a little too saturated. I would recommend toning that down some. Also, the center of her chest (in the bottom image), is a little red giving the impression she has a rash. The background in the bottom image is fairly neutral throughout but the top image seems to have a green to red gradient running across it. Nothing really wrong with that per se, but if you want to keep the two images cohesive, it should be one or the other. Personally, I'd go with the neutral background myself. Jun 24 12 10:49 pm Link Honestly...not so good. If you are just starting out, it's a fair first effort but as the post above states there are quite a few issues. Keep working at it...and makeup work is very key before you ever trip the shutter. Jun 25 12 11:12 am Link I agree with the cheek thing, try and work on the dodge and burn tool, also create a new layer filled grey at 50 percent, set blending mode to overlay and then paint on the image with black and white colour at around 15 percent opacity to highlight and darken the image just playing with the light (if that makes any sense) probably doesnt Keep trying, check out lots of tutorials  Jun 25 12 11:21 am Link She looks like someone punched her in the face !!! Jun 25 12 05:43 pm Link to be honest... im not even sure what was or what wasn't touched was this even retouched? Jun 25 12 06:13 pm Link I'm assuming you didn't do the bad makeup in photoshop - but maybe you did. Unfortunately, I couldn't get past it. You'd have an improved image right away, if you even completely got rid of the cheekbone mess. Jun 25 12 06:21 pm Link I'll move this to DAR Critiques. Jun 25 12 06:40 pm Link Take your lasso and select the portions of her skin that read to much red. The cheek, and various parts of her neck mostly. Then create a new adjustment layer and set it to selective color. On your red channel, reduce the magentas and yellows until those sections of skin look more like the rest of her skin. Do the same on the yellow channel. Once that is done, go to your layer mask (which is automatically created when you start a adjustment layer with a selection) and take your paint brush set to 100%, very soft edge (color white) and paint around the edges of the affected areas. Because you only modified the red and yellow channel, you will only paint on her skin. Doing this will soften the edges of your selects making them blend in with the rest of the image. Flip the brush to black to remove any areas accidentally colored. This is color correction. Also, her skin is reading a bit TOO much texture so you might want to smooth it out just a bit. Jul 25 12 01:11 pm Link disregard pretty much everything the guy above me said.  Aug 11 12 04:16 pm Link |