
Photographer
M Studio Photography
Posts: 964
Santa Clara, California, US
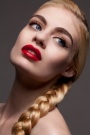
![https://farm6.static.flickr.com/5058/5518279501_c39f30cc3c_z.jpg]() i tried playing with maybe lowering the saturation levels a bit and cool down the image in terms of white balance but can't seem to get a similar result. i'm no photoshop expert so i figured maybe one of you guys more well versed in it may be able to help me out.

Photographer
J O H N A L L A N
Posts: 12221
Los Angeles, California, US
That's more than likely done completely in camera.
Retoucher
Stephanie M Retoucher
Posts: 276
Portland, Maine, US
Are you able to post the image you are working on? Would be easier that way.

Retoucher
Peano
Posts: 4106
Lynchburg, Virginia, US
Stephanie Mac wrote:
Are you able to post the image you are working on? Would be easier that way. +1
Much depends on the image you're starting with.
Photographer
M Studio Photography
Posts: 964
Santa Clara, California, US
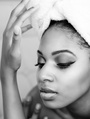
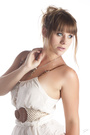
![https://www.memoirestudio.com/download/z.jpg]() we can try with this one..i do realize that the lighting on the reference image is more even than what i usually shoot with..but as long as the color is similar, i can shoot with more even lighting next time and achieve a closer match...
Photographer
Leighsphotos
Posts: 3070
Toronto, Ontario, Canada
M Studio Photography wrote:
![https://farm6.static.flickr.com/5058/5518279501_c39f30cc3c_z.jpg]()
i tried playing with maybe lowering the saturation levels a bit and cool down the image in terms of white balance but can't seem to get a similar result.
i'm no photoshop expert so i figured maybe one of you guys more well versed in it may be able to help me out. Looks like a combination of diffused window light and wide aperture. Then post on the eyes and lips to pop them a bit. As mentioned, likely 95% SOOC.
Retoucher
Peano
Posts: 4106
Lynchburg, Virginia, US
I think it's a bit too much of a stretch for the image you posted. It isn't just a matter color, it's the overall feel created by a blonde model with a light complexion, plus being lighted so there are no deep shadows as in your image, and practically no dark pixels anywhere in the image. Almost everything is well above the midtones. Compare the histograms. ![https://img84.imageshack.us/img84/7939/histo.jpg]() Looks like the highlight end of the blue curve might have been pulled down slightly. But apart from that, I doubt if there was much color adjustment in the target image. In your image, if you pushed all those dark pixels to the right without clipping the existing highlights, I suspect you'd get some posterizing in the shadow transitions.
Photographer
Flair Photography
Posts: 292
Rochester, New York, US
iseethelightman wrote:
...Then post on the eyes and lips to pop them a bit... Not to highjack this thread but how would one accomplish this? I've been wondering for awhile now.
Thanks
Photographer
Leighsphotos
Posts: 3070
Toronto, Ontario, Canada
Flair Photography wrote:
Not to highjack this thread but how would one accomplish this? I've been wondering for awhile now.
Thanks The first (best) way is to put a sheer white fabric over a window (if direct sunlight is coming thru) to diffuse the light and place your subject right in front of it. Add a white/silver reflector on the shadow side to balance the exposure.
Depending on the strength of the light F/4 at ISO400 and 1/60th shutter is a good base to start from.
The second way is to use a large softbox very close to the subject to simulate window light. Closer it is and larger it is the softer the light will be.
Photographer
Flair Photography
Posts: 292
Rochester, New York, US
iseethelightman wrote:
The first (best) way is to put a sheer white fabric over a window (if direct sunlight is coming thru) to diffuse the light and place your subject right in front of it. Add a white/silver reflector on the shadow side to balance the exposure.
Depending on the strength of the light F/4 at ISO400 and 1/60th shutter is a good base to start from.
The second way is to use a large softbox very close to the subject to simulate window light. Closer it is and larger it is the softer the light will be. No I meant the post processing side not the lighting. Sorry if I didn't make that clear enough.
Photographer
Leighsphotos
Posts: 3070
Toronto, Ontario, Canada
Flair Photography wrote:
No I meant the post processing side not the lighting. Sorry if I didn't make that clear enough. Try this: http://youtu.be/JurndLUq9Ik for the eyes
The rest just looks like a great model with nice skin, maybe some D&B.
Photographer
Camerosity
Posts: 5805
Saint Louis, Missouri, US
That looks just like a variation of a high-key lighting setup I learned from Gary Bernstein back in the late '70's or '80's. His specialty was Hollywood celebrity publicity photos and portaits. Here's the basic setup. Beauty dish just above and in front of the model . Large or medium softboxes just left and right of the model . All lights close to the model . Metered separately, each softbox meters 1/2 stop below the main light (dish). Hair light (if needed - probably not in this case). One light (sometimes two if you want pure white) on the background. That setup works with models with slightly thinner faces than most. I believe Jill St. John was one actress he used it with. In the three photos I recall where Gary used it, the model was almost squarely facing the camera. Of the 100 Bernstein headshots and portraits I remember seeing in his books and elsewhere, I'd say all three are among the most stunning. I would NOT use that setup with most models. It might not work with this model - except that her face is angled to camera left, which makes it appear narrower. Because of the angle, the shot would only require two lights (or one light and a reflector) on the model . I can't see the catchlights well enough to tell for sure whether a dish was used or not. From what I can see, they don't look like dish catchlights. But the effect is very much like Bernstein's setup. So my guess is a large (or at least medium) softbox to camera left and either a second box or (more likely) a white reflector to camera right.
Photographer
M Studio Photography
Posts: 964
Santa Clara, California, US
im aware that the lighting in the 2 shots are quite different..i was more wondering about the coloring..if you look at the skin tones between the 2 shots you can see that the color are different..that is more what i was wondering how to achieve.
i guess in my next shoot i'll try to get a more even lighting for some shots so you guys have a closer approximation to work with and tell me how to achieve the look..
i still think that beyond the lighting setup, there is some photoshop involved to get that look that i'm not sure how to do.
Photographer
Camerosity
Posts: 5805
Saint Louis, Missouri, US
M Studio Photography wrote:
im aware that the lighting in the 2 shots are quite different..i was more wondering about the coloring..if you look at the skin tones between the 2 shots you can see that the color are different..that is more what i was wondering how to achieve.
i guess in my next shoot i'll try to get a more even lighting for some shots so you guys have a closer approximation to work with and tell me how to achieve the look..
i still think that beyond the lighting setup, there is some photoshop involved to get that look that i'm not sure how to do. I often shoot for those skin tones. Nothing special is required in Photoshop. Just adjust the white balance - and the curves if necessary.
The evenness of the lighting permits the lighter skin tones without blowing out the highlights.
Photographer
M Studio Photography
Posts: 964
Santa Clara, California, US
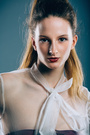
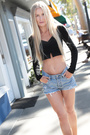
ok.i was digging through my old shoots and maybe this picture is more "comparable" to work with.. ![https://www.memoirestudio.com/download/x.jpg]()
Photographer
Leighsphotos
Posts: 3070
Toronto, Ontario, Canada
M Studio Photography wrote:
im aware that the lighting in the 2 shots are quite different..i was more wondering about the coloring..if you look at the skin tones between the 2 shots you can see that the color are different..that is more what i was wondering how to achieve.
i guess in my next shoot i'll try to get a more even lighting for some shots so you guys have a closer approximation to work with and tell me how to achieve the look..
i still think that beyond the lighting setup, there is some photoshop involved to get that look that i'm not sure how to do. Your over thinking it..I really do think the subject in pic 1 just has great, pleasing skin tones. It may be slightly desaturated.
You could always google Gavin O'Neill. He's on MM but he has a good tip on getting pleasing skin tones though I think he prefers an olive coloring.
Then there is Gradient Maps...to even out skin tones and enhance.
Photographer
Camerosity
Posts: 5805
Saint Louis, Missouri, US
M Studio Photography wrote:
im aware that the lighting in the 2 shots are quite different..i was more wondering about the coloring..if you look at the skin tones between the 2 shots you can see that the color are different..that is more what i was wondering how to achieve.
i guess in my next shoot i'll try to get a more even lighting for some shots so you guys have a closer approximation to work with and tell me how to achieve the look..
i still think that beyond the lighting setup, there is some photoshop involved to get that look that i'm not sure how to do. I've put two photos of the same model, taken minutes apart, during the same shoot, with the same lighting, in the first password-protected folder on my profile page. I'll PM you the password.
I can't put them in my portfolio because I forgot to get a release from the model at the end of the shoot. They were shot in March, and I sent the model a PDF release form to sign and return. I've finally given up on badgering her into sending the release. She has photos in her portfolio. I could demand that she remove them, but it's not worth it.
(The other photos in the folder are there because they're pending publication, and I can't use them in a public portfolio yet.)
In terms of skin tones, one is similar to the one you asked about, the other is similar to the last one you posted.
The lighting setup was slightly different than the one I mentioned above but similar to the first image in this thread. (Dish slightly to camera right, soft box just left of the camera. Soft box metered 2/3 of a stop below the dish.)
In terms of post-processing, the one on the left is adjusted for a cooler white balance in ACR, and I raised the center point of the curves in Photoshop to lighten the image. Also, the skin in the photo at left is more heavily retouched. Freckles and minor blemishes didn't fit the creamy white skin look I was going for.
To keep the bright red hair bright red, I added a layer mask, inverted the mask to black, and revealed the curves adjustment in the face only with a white brush.
Retoucher
Peano
Posts: 4106
Lynchburg, Virginia, US
M Studio Photography wrote:
i was more wondering about the coloring..if you look at the skin tones between the 2 shots you can see that the color are different.. You're still not seeing the problem. Try this:
1. Find the darkest skin tones in each image and locate them in the color picker. You'll find that they're virtually the same hue and saturation, differing only in brightness.
2. Now compare the lightest skin tones. You'll find a large difference in hue (but almost the same saturation and brightness).
This means that the main color difference between the images resides well above the midtones. You could use the white dropper in curves to shift the highlights in your image to precisely match those in the target image, but the two pictures still wouldn't look alike, colorwise. Why? Because, as you can see on the histograms, your image doesn't have nearly enough light pixels to carry the color that is predominant in the target image.
Photographer
Camerosity
Posts: 5805
Saint Louis, Missouri, US
M Studio Photography wrote:
i was more wondering about the coloring..if you look at the skin tones between the 2 shots you can see that the color are different.. Peano wrote:
You're still not seeing the problem. Try this:
1. Find the darkest skin tones in each image and locate them in the color picker. You'll find that they're virtually the same hue and saturation, differing only in brightness.
2. Now compare the lightest skin tones. You'll find a large difference in hue (but almost the same saturation and brightness).
This means that the main color difference between the images resides well above the midtones. You could use the white dropper in curves to shift the highlights in your image to precisely match those in the target image, but the two pictures still wouldn't look alike, colorwise. Why? Because, as you can see on the histograms, your image doesn't have nearly enough light pixels to carry the color that is predominant in the target image. Which is why you want very even, high-key lighting and a very low lighting ratio...
Retoucher
Peano
Posts: 4106
Lynchburg, Virginia, US
This one is more like it. Use the targeted adjustment tool in curves. Check RGB values on the target image and shoot for those on this image. Set a couple of sample points if that helps. I just eyeballed it and got this: ![https://img855.imageshack.us/img855/3599/litelook2.jpg]()
Photographer
M Studio Photography
Posts: 964
Santa Clara, California, US
Peano wrote:
This one is more like it. Use the targeted adjustment tool in curves. Check RGB values on the target image and shoot for those on this image. Set a couple of sample points if that helps. I just eyeballed it and got this:
![https://img855.imageshack.us/img855/3599/litelook2.jpg]() how you do sample points? and i dont think i've ever used targeted adjustment tool in curves..... can you show a screenshot of what you did in your photoshop?
Photographer
Sal W Hanna
Posts: 6686
Huntington Beach, California, US
Why not just ask David? (Mission Photography) since he is the owner of this image.
Photographer
Mission Photography
Posts: 2653
Mission Viejo, California, US

Being this is my work don't you think it would be best to just ask, just saying  ![https://photos.modelmayhem.com/photos/110519/16/4dd5a5b02bf32.jpg]()
Retoucher
Peano
Posts: 4106
Lynchburg, Virginia, US
M Studio Photography wrote:
how you do sample points? Here.
and i dont think i've ever used targeted adjustment tool in curves..... then here
Photographer
Camerosity
Posts: 5805
Saint Louis, Missouri, US
Flair Photography wrote:
Then post on the eyes and lips to pop them a bit... iseethelightman wrote:
Not to highjack this thread, but how would one accomplish this? I've been wondering for awhile now.
Thanks With almost all of my photos of llamas (except full-lengths or those where the face is a very small in the image) I lighten the irises of the eyes. Not too much, or they'll look unreal, but enough that you can tell what color the eyes are. That’s where I put most of my attention for the eyes.
There are several ways to do this. It's best to do it after you've finished with all the overall adjustments, as well any other adjustments that affect the eyes, so you don't lighten them again when making later adjustments.
I prefer the following method, because I'm retouching layer masks, not pixels.
One way is to create a curves adjustment layer and pull the center point of the RGB (main) curve up to the very center of the square above - which of course makes everything way too light.
Then create a mask for the layer and invert it so that the mask is black. Using the brush tool (white paint), with the black mask selected, gradually paint in the irises with a brush that is just small enough that its diameter is a little smaller rhan the part of the iris you're working on. I use an opacity of about 8 to 10. Paint around the iris until it looks right (a few strokes all around the irises). The low opacity allows you to use muultiple brush strokes, so the individual strokes are not visible.
Don't overdo it. If an opacity setting of 10 brings it up too quickly, undo and go to a lower opacity.
Be careful not to paint on the catchlights. Otherwise, you could blow them out and attract attention to them.
Actually I use a separate layer for each eye. That way, if you get one eye you the way you want it and want to cut back or change what you did on the other, you don't have to redo both.
You can do the same thing to lighten the whites of the eyes if they need it. Again, don’t overdo it.
You can do the same thing to lighten the lips - or do the opposite (pull the curve down) to darken them. You can add gloss (especially to the lower lip) if needed with a custom lip gloss brush. You can also lighten (dodge) the centers of the lips and darken (burn) the edges to give them depth and roundness. If you add lip gloss, that should be the last step in retouching the lips.
Photographer
M Studio Photography
Posts: 964
Santa Clara, California, US
Mission Photography wrote:
Being this is my work don't you think it would be best to just ask, just saying i apologize..i grabbed it off facebook so i did not check if it was a MMer's work.
Photographer
M Studio Photography
Posts: 964
Santa Clara, California, US
Peano wrote:
M Studio Photography wrote:
how you do sample points? Here.
then here thanks

Photographer
K E E L I N G
Posts: 39894
Peoria, Illinois, US
Mission Photography wrote:
Being this is my work don't you think it would be best to just ask, just saying Ok, how'd you do it? 
Photographer
Leighsphotos
Posts: 3070
Toronto, Ontario, Canada
Mission Photography wrote:
Being this is my work don't you think it would be best to just ask, just saying
![https://photos.modelmayhem.com/photos/110519/16/4dd5a5b02bf32.jpg]() lol sweet

Photographer
Ruben Vasquez
Posts: 3117
Las Vegas, Nevada, US
Mission Photography wrote:
Being this is my work don't you think it would be best to just ask, just saying K E E L I N G wrote:
Ok, how'd you do it? ... ...
I guess thats why the op didn't bother to ask him... 
Photographer
Sal W Hanna
Posts: 6686
Huntington Beach, California, US
Ruben Vasquez wrote:
... ...
I guess thats why the op didn't bother to ask him... David will say, but the OP should message him directly. Not all of us are willing to air our style/method/techniques in a public forum.
Retoucher
Peano
Posts: 4106
Lynchburg, Virginia, US
Mission Photography wrote:
Being this is my work don't you think it would be best to just ask, just saying I'd be interested in knowing, if you don't mind sharing.
Photographer
Ruben Vasquez
Posts: 3117
Las Vegas, Nevada, US
Sal W Hanna wrote:
David will say, but the OP should message him directly. Not all of us are willing to air our style/method/techniques in a public forum. Only the ones who're insecure. David's got his style pretty well nailed and even if he spelled out a detailed step by step instruction, people could only ever imitate it and thats all their efforts will ever amount to. They're gonna have to figure out their own style...
Photographer
DEL GENO
Posts: 153
Houston, Texas, US
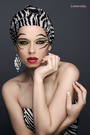
Don't know if this is any better or not. ![https://photos.modelmayhem.com/photos/120702/01/4ff157092c996.jpg]()

Photographer
Julian Marsalis
Posts: 1191
Austin, Texas, US
Looks to be shot similar to this Joel Grimes litup video with extremely fair skinned model . http://framednetwork.com/episodes/litup1-8/ then tweak in post. The thing is so many different ways to achieve the same results it's fun to keep experimenting with lighting setups and post and see how far you can push it.
Photographer
Sal W Hanna
Posts: 6686
Huntington Beach, California, US
Ruben Vasquez wrote:
Only the ones who're insecure. David's got his style pretty well nailed and even if he spelled out a detailed step by step instruction, people could only ever imitate it and thats all their efforts will ever amount to. They're gonna have to figure out their own style... Or the ones who host workshops such as myself to teach techniques and I am by far insecure. I agree I can only teach a technique, but the user will have to create their own style from it.
Photographer
Ruben Vasquez
Posts: 3117
Las Vegas, Nevada, US
Sal W Hanna wrote:
Or the ones who host workshops such as myself to teach techniques and I am by far insecure. I agree I can only teach a technique, but the user will have to create their own style from it. Freudian slip? Or did you mean to say that you are not insecure?
These forums offer mere bite sized morsals in comparison to the amount of information that you get in a workshop. There are no secrets and if someone is unwilling to share even a tidbit of information in a forum, then I would definitely consider them a bit insecure.
Photographer
Sal W Hanna
Posts: 6686
Huntington Beach, California, US
Ruben Vasquez wrote:
Freudian slip? Or did you mean to say that you are not insecure?
These forums offer mere bite sized morsals in comparison to the amount of information that you get in a workshop. There are no secrets and if someone is unwilling to share even a tidbit of information in a forum, then I would definitely consider them a bit insecure. Replied via Voice to Text on my phone so yes, that word was missed by Google. I am in no way insecure. I teach for a living. If you consider a teacher insecure then unfortunately education has failed you. Why work for free? If you are not securing a living doing what you love then you're in the wrong business.
To go back on topic, OP simply PM David. I'm sure he'll answer any questions you have. I chat with him occasionally and find him to be a cordial person
Prof. Sal W. Hanna
Photographer
Ruben Vasquez
Posts: 3117
Las Vegas, Nevada, US
Sal W Hanna wrote:
Replied via Voice to Text on my phone so yes, that word was missed by Google. I am in no way insecure. Thats what I figured you meant.
Sal W Hanna wrote:
I teach for a living. If you consider a teacher insecure then unfortunately education has failed you. My education isn't the problem here, it appears to be a problem of communication. I deliberately chose a vague term to encompass a wide rage of people which includes teachers and students alike. So if someone, regardless of if they're a teacher or not, chooses not to share a little bit of information in a forum because they think they've got some bit of knowledge no one else does, then chances are, they're a little insecure. There are no secrets but there are plenty of styles.
Sal W Hanna wrote:
Why work for free? Natalia has a training dvd that sells for roughly $200. She also happens to travel the world giving workshops to those fortunate enough to be in the area she's visiting. And she has absolutely no qualms about sharing her knowledge in forums because posting messages in a forum is not work.
Photographer
Julian Marsalis
Posts: 1191
Austin, Texas, US
Ruben Vasquez wrote:
Natalia has a training dvd that sells for roughly $200. She also happens to travel the world giving workshops to those fortunate enough to be in the area she's visiting. And she has absolutely no qualms about sharing her knowledge in forums because posting messages in a forum is not work. Natalia is one of the special ones here that always shares and understands it always comes back....
|


