Retoucher
Aleksandr Lvov
Posts: 10
Moscow, Moscow, Russia
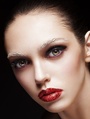
hi all! can anybody tell me how to create skin texture like this? this photo made by Dean Bradshaw ![https://s14.radikal.ru/i187/1212/77/1ab7f3c0e2d1.jpg]() ![https://s45.radikal.ru/i110/1212/3f/5d8f3fc75ce1.jpg]() It looks maybe like noise overall photography + maybe he playing with channels or with red and yellow colors + maybe low contrast + maybe cool sharpening like Calvin Hollywood FAD i try different ways to get this look, but i didn't get this one

Retoucher
Krunoslav Stifter
Posts: 3884
Santa Cruz, California, US
Aleks Mind wrote:
hi all!
can anybody tell me how to create skin texture like this?
this photo made by Dean Bradshaw
It looks maybe like noise overall photography
+ maybe he playing with channels or with red and yellow colors
+ maybe low contrast
+ maybe cool sharpening like Calvin Hollywood FAD
i try different ways to get this look, but i didn't get this one You mean skin texture not skin color, right?
Well, I would say that first of all - there is more than one way to skin the cat, but with proper lighting that is very important and proper photography along with the model or at least retouch model, you would probably need to apply some kind of sharpening technique. There are various plugins that do a good job at enhancing the details like that, Topaz, Nik Software maybe, and you can do it also with sharpening tools in Ps but it's probably easier to do with a plug-in.
Mostly it seems like a very good photography with the rest of it being mostly about setting the mood of the image and than for the skin texture you asked, there is probably some detail sharpening enhancement and maybe a little bit of skin clean up with standard tools like clone and heal to get rid of any obvious problems. But that is pretty much it as far as I can tell.

Photographer
Zack Zoll
Posts: 6895
Glens Falls, New York, US
It's the opposite of low contrast. It's high contrast, but only in the midtones. If you're using Lightroom 4 or Photoshop CS 4, 5, or 6, jack the Clarity up. Also, most of that 'texture' comes from freckles that he actually has.
Retoucher
Aleksandr Lvov
Posts: 10
Moscow, Moscow, Russia
Krunoslav-Stifter wrote:
You mean skin texture not skin color, right? Right, but when you playing with red color
for example in "Black&White adjustments layer"
you can turn luminosity red to black and skin texture become more readable
thanks for the answer, i will try topaz
i know that i can get great result when i make photo
but i want more than great)) and here retouching comes)
Retoucher
Krunoslav Stifter
Posts: 3884
Santa Cruz, California, US
Aleks Mind wrote:
Right, but when you playing with red color
for example in "Black&White adjustments layer"
you can turn luminosity red to black and skin texture become more readable
thanks for the answer, i will try topaz
i know that i can get great result when i make photo
but i want more than great)) and here retouching comes) Yes, that is true what you say and in B&W conversions I use it sometimes but here is just good lighting it would seem. A lot of it is in the image you start with, so with the right image it should not be a problem.
Photographer
Blue Mini Photography
Posts: 1703
Tempe, Arizona, US
Trying pushing the clarity in raw up a quite a bit.
Retoucher
Aleksandr Lvov
Posts: 10
Moscow, Moscow, Russia
Zack Zoll wrote:
It's the opposite of low contrast. It's high contrast, but only in the midtones. If you're using Lightroom 4 or Photoshop CS 4, 5, or 6, jack the Clarity up. Also, most of that 'texture' comes from freckles that he actually has. yes, you're right about freckles
Orcatek Photography wrote:
Trying pushing the clarity in raw up a quite a bit. I don't like make some sharp or clarity enhance on this step of raw conversion
to prevent difficulties in healing and another steps of retouching
Retoucher
Krunoslav Stifter
Posts: 3884
Santa Cruz, California, US
Orcatek Photography wrote:
Trying pushing the clarity in raw up a quite a bit. Two things to watch out for.
1.) Before process version 2012 in ACR 7 and Lr 4 clarity slider when pushed a lot would regularly introduce a lot of o halos in the edges and that is something to be avoided. Either by using masking or simply another method.
2.) There is no control over what frequency of detail is effected so it works on some image but not on others, it simply lacks precise control that some of the other plugins can offer.
...other than that I love clarity for certain situations, especially new version.
Photographer
Sekkides
Posts: 70
London, England, United Kingdom
Yes if you drop the luminance of the reds in Lightroom you can achieve something similar. I don't use clarity AT ALL. If you want to increase clarity, use an unsharp mask with a high radius in photoshop on a duplicate or smart layer, that way you can mask off the halos. As with all programs.. make your adjustments in tiny increments! 

Retoucher
Peano
Posts: 4106
Lynchburg, Virginia, US
Aleks Mind wrote:
thanks for the answer, i will try topaz Topaz Detail is excellent for enhancing skin texture because it allows you to sharpen small details without affecting medium and large details.
I overdid this a little just to illustrate ...
![https://img526.imageshack.us/img526/2204/grant2.jpg]()

Retoucher
ST Retouch
Posts: 393
Amsterdam, Noord-Holland, Netherlands
First of all this is amazing studio shot with great settings and great strong focus ( I can see strong focus even on this web size file)
You can not achieve this look with ordinary shots which have soft focus .
The steps which I use sometimes for similar looks and files are :
3 levels of high pass sharpening
Duplicate layer 3 times.
First layer high pass sharpening with linear light mode ( for small details)
Second layer high pass sharpening with overlay mode ( medium details)
Third layer on top high pass sharpening with soft light mode ( for large details)
At the end play with opacity on each layer until you are satisfied .
Hope that helped.
Best Regards!
Retoucher
Peano
Posts: 4106
Lynchburg, Virginia, US
Playing with Topaz Detail. If the lighting (and original skin texture) are right, that's about all you need. The rest is just color and luminance adjustments. ![https://img197.imageshack.us/img197/5933/skintexture3.jpg]()

Photographer
A R S Photography
Posts: 176
Louisville, Kentucky, US
It was probably done with dodge and burning certain areas of the face. The rest was lighting.
Photographer
A R A G O N
Posts: 41
yep +1 Peano wrote:
Playing with Topaz Detail. If the lighting (and original skin texture) are right, that's about all you need. The rest is just color and luminance adjustments.
![https://img197.imageshack.us/img197/5933/skintexture3.jpg]()
|


