Forums > Digital Art and Retouching > Invert selection fringe!!??

Digital Artist

Koray

Posts: 6720

Ankara, Ankara, Turkey

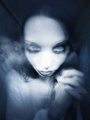
Hey there MM,
I have a question thats been bugging me for quite a while.

When I make a solid selection (by solid I mean there is no feathering at all) of a solid object and invert that selection and make a mask it leaves a sort of fringe where the 'marching ants' were. Even when the marching ants arent there but I invert the mask its still the same.

Is this happening only to me?
Apparently its caused by the anti aliasing but still...

Here is a sample image made with difference blend mode.
https://photos.modelmayhem.com/photos/130417/02/516e6a017eaef.jpg

I know enough ways to get around it...I just wonder why I have to evilgrin

Apr 17 13 02:31 am Link

Photographer

Sean Baker Photo

Posts: 8044

San Antonio, Texas, US

There are a few things which are likely contributing to this, and AA is certainly one of them. It may be easiest to diagnose if you can describe how you created the image above? (Step
by step so we can directly replicate).

Apr 17 13 03:32 am Link

Digital Artist

Koray

Posts: 6720

Ankara, Ankara, Turkey

- new document, white, 300 dpi (16 bit I think)
- solid color adj layer with bright green (no mask yet)
- circular selection AA checked
- on a new layer filled the selection with dark blue
- kept the selection and made a mask for solid color adj layer
- inverted the mask ( I can already see the whites from the bg)
- merged visible on top. set to difference
- disabled the mask for the solid color adj and the halo/fringe became visible as seen.

(I tried inverting the selection and then making the mask but still the same)

will edit if I remember anything else...

Apr 17 13 03:41 am Link

Retoucher

Virtuoso Skins

Posts: 333

Asheville, North Carolina, US

Hey there Koray, been a while!

After you make your selecting, invert the selection (cnt+shit+I), then select>modify>contract, then choose 1px. This should correct the innate contracting from inverting the selection and get rid of the "shaved off" soft edge.

Cheers,
David

Apr 17 13 09:26 am Link

Photographer

PANZERWOLF

Posts: 68

Vienna, Wien, Austria

well, with AA this simply has to happen, as, by definition, it makes parts of the edge of any non-rectangular shape, or any selection based on it, semi transparent ...

Apr 17 13 09:37 am Link

Digital Artist

Koray

Posts: 6720

Ankara, Ankara, Turkey

Found CS2 on my old laptop and its still the same...which means I'm already used to this big_smile

Normally I make paths a few pixels inside the edges so I can feather 1 px and compensate for the invert plus the contract mentioned above or use the masking panel etc. but lately I've been a little lazy and all smile

I just wanted to make sure its not only me and/or there is a clickable little box somewhere that can fix this smile

Apr 17 13 10:07 am Link

Photographer

NothingIsRealButTheGirl

Posts: 35726

Los Angeles, California, US

I'm only half skimming this but my guess is it would work in a linear gamma situation, even with AA, but when it's in another gamma the alpha and the 1-alpha don't add up to 1.

Apr 17 13 11:06 am Link

Photographer

NothingIsRealButTheGirl

Posts: 35726

Los Angeles, California, US

Actually...

Edit > Color Settings > Advanced Controls

UNCHECK blend colors with gamma 1.00 and Koray's setup works okay for me. Which is weird to me.

I think it's a color space gamma interaction thing.

Apr 17 13 11:14 am Link

Photographer

NothingIsRealButTheGirl

Posts: 35726

Los Angeles, California, US

okay -- I think I got it.

Koray's setup works fine but the bottom layer can't be left white. It has to be black for the math to work.

Linear gamma mixing, but make the bottom layer under the masked green layer black.

Apr 17 13 11:18 am Link

Photographer

NothingIsRealButTheGirl

Posts: 35726

Los Angeles, California, US

https://jfrancis.smugmug.com/photos/i-mhjpv7Z/0/O/i-mhjpv7Z.jpg

Bottom layer white

https://jfrancis.smugmug.com/photos/i-rzcHkVv/0/O/i-rzcHkVv.jpg

Bottom layer black

Apr 17 13 11:25 am Link

Digital Artist

Koray

Posts: 6720

Ankara, Ankara, Turkey

well now thats interesting smile

Apr 17 13 11:36 am Link

Retoucher

The Invisible Touch

Posts: 862

Tarragona, Catalonia, Spain

Koray wrote:
well now thats interesting smile

Yeap!! & Weird!!

Apr 17 13 11:41 am Link

Photographer

Internos Photography

Posts: 546

San Jose, California, US

NothingIsRealButTheGirl wrote:
Bottom layer white

Bottom layer black

I've always come across this and usually end up doing the expand selection as a fix.  I was curious about the opacity and it looks like it caps out at 25%.  Maybe it is an issue with rounding and splitting the difference?

https://clients.internosphoto.com/photos/i-hMDZVTq/0/O/i-hMDZVTq.png

Above, the white mask is actually the combined layers beneath with a mask based on transparency.

Apr 17 13 11:52 am Link

Photographer

NothingIsRealButTheGirl

Posts: 35726

Los Angeles, California, US

Internos Photography wrote:
Above, the white mask is actually the combined layers beneath with a mask based on transparency.

https://jfrancis.smugmug.com/photos/i-n2D9NNF/0/O/i-n2D9NNF.jpg

A Photoshop layer mask does a (t)(1 - t) blend with the composite below.

https://jfrancis.smugmug.com/photos/i-x4C2wJL/0/O/i-x4C2wJL.jpg

The second, inverted mask doesn't "look upward" to try and fit the fist mask. It looks downward again. In this case to an unseen layer of transparent background.

Apr 17 13 01:27 pm Link

Photographer

PANZERWOLF

Posts: 68

Vienna, Wien, Austria

edit: useless

Apr 18 13 01:13 am Link

Photographer

NothingIsRealButTheGirl

Posts: 35726

Los Angeles, California, US

A layer mask multiplies itself by the associated layer, its inverse by the underlying composite below, and adds the two.

One mask.

Transparencies fit perfectly.

Apr 18 13 01:41 am Link

Apr 18 13 01:57 am Link

Photographer

NothingIsRealButTheGirl

Posts: 35726

Los Angeles, California, US

https://jfrancis.smugmug.com/photos/i-ksRkPxQ/0/L/i-ksRkPxQ-L.jpg

closer look

http://jfrancis.smugmug.com/photos/i-ks … sRkPxQ.jpg

(Positive masked green over black) + (Negative masked blue over black)

where + is linear dodge (add)

and color blending at gamma 1.0 is set off
(why off and not on I'm not sure)

Apr 18 13 02:12 am Link

Photographer

PANZERWOLF

Posts: 68

Vienna, Wien, Austria

edit: useless

Apr 18 13 03:43 am Link

Photographer

NothingIsRealButTheGirl

Posts: 35726

Los Angeles, California, US

PANZERWOLF wrote:
i don't see what this setup has to do with how a mask works, or with the initial post
since you have the black layer in each group, you're just adding color values, not transparencies!

if you mask a shape with its own inverted opacity (or add a shape with the inverted mask) you end up with a fringe, ranging from opacity 0% to a maximum of exactly 25% (or 100% to 75%), regardless of your gamma curves

that's because the effect i described above is strongest where the edge is 50%:
1/x=1/0.5+1/0.5 -->
x=1/4 = 0,25 = 25%

Well, yes. Masking an already masked thing is a recipe for matte lines. I wrote about it extensively in those decade-old links above, but it's been known since at least the 80s, and much earlier than that in film opticals.

And multiplying a mask by its inverse to get 25% is something I write about in some detail in this 4-year old post
http://www.digitalartform.com/archives/ … n_out.html

Although I used that amplified 25% 'fringe' effect extensively in the 1993 film 'Demolition Man' to capture, amplify, and color the fringe at the border of the frozen/unfrozen mask in the scenes where we wipe from an unfrozen to a frozen set.

https://www.digitalartform.com/archives/images/demoman.jpg

Apr 18 13 09:44 am Link

Photographer

NothingIsRealButTheGirl

Posts: 35726

Los Angeles, California, US

PANZERWOLF wrote:
i don't see what this setup has to do with how a mask works, or with the initial post
since you have the black layer in each group, you're just adding color values, not transparencies!

if you mask a shape with its own inverted opacity (or add a shape with the inverted mask) you end up with a fringe, ranging from opacity 0% to a maximum of exactly 25% (or 100% to 75%), regardless of your gamma curves

that's because the effect i described above is strongest where the edge is 50%:
1/x=1/0.5+1/0.5 -->
x=1/4 = 0,25 = 25%

And there are no 'transparencies.' There are only color values and and extra alpha channel, and what gets done with them generally falls into two categories.

Alpha as a clipping mask (as Photoshop does), and

Alpha as holdback matte, the way CG artists rendering on black generally have worked over the years.

(and sometimes a conversion from the latter to the former using 'unmult' or a divide blend node or what have you to divide all the color channels by the alpha and turn it into an overshot shape that the Photoshop or After Effects mask can clip back again)

and I think to think of this as 'adding transparencies' adds confusion, but what do I know. Although I have been diagnosing people's matte lines for nearly 30 years now -- so long a time that I still call them "matte lines"

https://www.digitalartform.com/assets/fromCG2.jpg

Masking already-masked CG gives gray edges.

Apr 18 13 09:59 am Link

Photographer

NothingIsRealButTheGirl

Posts: 35726

Los Angeles, California, US

And when it comes to the appearance of the cor blending at the mask edges, things like gamma do actually matter.

Apr 18 13 10:06 am Link

Digital Artist

Koray

Posts: 6720

Ankara, Ankara, Turkey

I am totally lost big_smile

Apr 18 13 01:56 pm Link