|
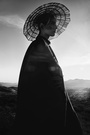
Have fun! So I've been trying to do anything to figure out how to smoothen skin without going overboard. I watched a handful of YT application videos and just tried out everything. Cloned on empty layers, painted, local and global d&b'd, applied some HF, smart sharpened, I don't even remember how much I've tried with this. This was my Experiment-And-See-WTF-Happens-Piece. I'm quite proud with how it turned out. But IDK, if you can deconstruct it, go ahead. I'm trying to make a living out of this so let me have your best input     Jun 20 14 01:53 am Link Firstly I would like to comment on your workflow and approach. It’s not really helpful to throw a handful of techniques at an image that you have just picked up without being able to discern when and why you are choosing them above another technique. It’s a pet peeve of mine when you get ‘I applied some HF’ did you? Why? Why at that stage? Simplify what works and throw the rest away. Workflow could be more like…. Process in RAW, Open as a Smart Object, Clone & Heal on a blank layer (heck even bring on the HF now if you must), D&B, Colour Corrections, Resize & Sharpen for output.  I thought including a marked up image would be easier than mention everything I would alter. But on a more global level, when you process the RAW file, you should be getting the basics right in there, like contrast good black & white points etc then take it to Photoshop. Your image looks painted and the contrast or darkening of the image is leading to a muddy appearance and a loss of detail in the shadows. You have lost shape and definition facially...... it kind of keeps going like that. Jun 20 14 03:37 am Link The very first thing that popped out at me. ANATOMY. You changed the shadow on the side of her face, where her cheek bone is way too much. You took the apple of her cheek and moved it from under the eye, to the side of her face. And now that shape doesn't match the other side of her face. So she looks flattened, like a flounder. Generally speaking, you don't have to change the light that much. On the before image, look at where most of the light is hitting her cheek. All you should need to do is clean up the texture, the lighting is fine. I don't recommend changing the landmarks of the face until you understand the anatomy a little better. Enhancing what already exists in more fail-safe than changing it. You also have inconsistent texture on the face. Some places are way too smooth. There are literally no pores or texture on the transition of the shadow on her face. You used some sort of blurring tool or filter or paintbrush. Yet in the places where you DID keep texture, the texture is uneven. Despite doing so much work on the face, you didn't do much to her neck. The deeper folds on the neck muscle are fine. But the lighter ones should go if you're going to do a detailed edit. As for the colors, I think your shadows are too deep. I'm also not a big fan on how these colors are going together. I see a lot of orange and then magenta. there are ways you can tweak color so that they mesh well while still keeping the image true to the intent. You also have a subtle dark halo around the model which makes me think you blurred the background at some point. and then darkened it. My number one rule I try to keep in mind when retouching is, "Only make changes if they increase the quality of the image." Don't make changes that have no purpose. Also, when working on practice photos like this, I think what you should try to do, is try to copy looks from other photos to see if you can recreate them. I do this a lot because I think it's a good way to experiment achieving different effects and such. It also gives me reference points. "What does the skin look like on this photo? Okay, so I'll make the skin look like that!" After enough practice, you'll learn to do make those judgments on your own. Jun 20 14 03:46 am Link @JStrath - Thanks! Yeah there was this really really overly textured part of the face in the original on her cheek and I had no idea how to tone it down. None. I tried to google for ways to even out a super textured portion and nothing seemed to work. So what I did is that I cloned on an empty layer and it flattened that out because when I was generally retouching that part just stuck out like crazy. Do you know how I can smooth out super textured portions of faces? And thanks! Yeah I need to do that. I forget about the natural shadows of it o.o I'm trying to figure out how to get texture to be consistent. That's why I tried local dodging and burning to learn how to do that because that's what that's supposed to do but doing it with this image was awkward because I'm barely learning it. I'm struggling with learning how to unify texture where it's the same thing all around because I really, genuinely don't know how to do it. Do you have any tips? Someone on Retouch Academy recommended adding a noise layer by duplicating the high frequency layer with a mask at 10% opacity over the skin and adding some burning to get back dimension. I don't know if that's the only method. I always try to mimic photos like you're talking about. I do. I go crazy with it but I'm missing some steps and I can't seem to figure out what they are. I feel lost XD Jun 20 14 06:40 am Link Mike Needham Retouching wrote: Thank you so much! Fantastic. I tried out different methods because I wanted to figure out what I wanted to start incorporating into my workflow with what felt comfortable for me in the midst of using it. Jun 20 14 06:57 am Link Do the cloning first and then set up your d&b layers and have at it. Don't use any other techniques apart from those two for starters and see where that gets you. Don't zoom in and do pores at 400% just zoom out to 33% or a small size and d&b what you can see needs it on first pass. Then by all means get closer but rarely past 100% and keep d&b.  No fancy layers just a clone layer and two curves for d&b (composited on Grey for you) and a couple more curves for the hair. Jun 20 14 10:06 am Link I would recommend to invest in a good tutorial DVD because there are so many bad videos on the internet about retouhing. I'm not sure if it's legal to put the direct link here so I won't do that, but check these names Natalia Taffarel, Krunoslav Stifter, Julia Kuzmenko, Gry Garness I had no budget to buy all of them, but I know they are amazing retouchers, and you can learn from them. Jun 20 14 11:25 am Link You need to restore the highlight on her cheek. She went from having nice, attractive cheekbones, to having none at all. It falls flat. Same goes for the lips. The original her lips/ filtrum catch light because they are plump and are 'out'. But you made them look more retreated by making it the exact same tone as the area around it. As if her mouth is just painted on. Then the chin, it now looks as if the bottom lip sits on the bone of her now, more chunky chin. Also there is no need to put a shadow over her chin in this case, creating that artificial jawline, you can work with the original jawline and darken that. I dont see why you'd reduce her chin, well maybe because with the 'flat painting' of her chin it started to look too big. One last thing, her brow bone highlight is too big, making it look masculine imo. Because males naturally have their browbone sticking out more. Hope you get what I mean. My english isnt perfect. Just work on your darks and highlights. Learn a bit more about how it works with 3d objects, what makes it stick out more, or makes it fall back. Trying to help you. I'm sure my work isn't perfect either to everyones standard hehe. I can see your potential Jun 20 14 06:59 pm Link Yeah, all of this was because I couldn't find a way to smoothen out the high textured area on her cheek so everything's flat in my trying to work my way around it. As for shadows, I see what you mean. What I'm going to do is as one of you suggested, get some retouching DVDs and just follow them. I do best with structure anyway so that'll work. I'm just going to take a break for a bit and hone in on what I need to learn. Got Scott Kelby for retouching from a photographer's perspective, going to look up color theory, and check out this person named Natalie that Natalia recommended. I'm going to change everything. I'll make a new thread with my progress. There's a specific look I want and I'm going to f*cking get it Change is a'comin. If anyone has any other recommendations please let me know. PM me or leave a comment. Thank you so much! Jun 20 14 11:52 pm Link Problem is you flattened out the skin too much and washed out the texture, Sometimes I'll copy a patch of similar lit skin into a new layer to get the texture painted on that i need, I actually did an edit on that thread and did a crucial neck wrinkle job. here's what the neck looked like: (NOT MY EDIT):  Here's my edit with the technique described above:  Jun 22 14 10:56 pm Link |