|
Forums >
Digital Art and Retouching >
Photoshop question #2 : )
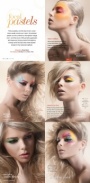
I got great advice about photoshop lingo/color profile when I posted last time. I am hoping that someone can help me with this new question.... I am editing beauty shots right now, and someone gave me a critique that the skin on my neck/back/shoulders looked a bit blotchy. Now, I'd like to find out what's a trick to correcting that without making the skin look fake/plasticy... like, retaining pore/texture but evening out the color/tone a bit? Thanks so much in advance! May 17 09 08:47 pm Link Check out my updated response in your critique thread - I touched up on that topic a bit for you. Cheers May 17 09 08:58 pm Link This isn't neccesarily a technique... but one things I do to keep an eye on my retouching is to swithc back and forth between zoom levels using 25%, 50% and 100% to view the images. Usually if theres blotchiness happening its more noticible at the lower zoom levels. May 17 09 11:01 pm Link Sascha wrote: What sometimes helps is to use the Patch toll. Draw a selection round the blotchy bit then drag that to a clear piece of skin with similar contours. Alternatively, try the "healing" (not the "spot healing") tool, take your sample from a bit of clear skin and paint over the blotches. If the blotchiness is purely colour and not brightness variations, you can sample a clear bit with the eyedropper (set to around 5x5) then paint over the blotchy bits with the paintbrush in either "color" or "hue" mode. May 18 09 01:19 am Link Did you not perhaps push the fill light in RAW up too high? May 18 09 01:26 am Link WMcK wrote: I totally agree! And usually you have to use different solutions from picture to picture of course ... May 18 09 01:26 am Link Narciscus Studio wrote: lol FYI I got all the images in Tiff mode. Photographer did not give me raw so I have no idea what it looked like raw. But considering he doesn't edit his own photos, chances are that these photos are pretty much exactly how they looked when shot. May 18 09 04:08 am Link SujAS wrote: ermmm okay I don't think I am doing this at all at a level of the stuff you are talking about... I know I can do spot healing, healing, patch or stamp... what I don't understand is "the color or hue mode"... where are those modes?!?! How do I set them... I don't see that option anywhere.. is that a CS3/4 thing??? Mine is CS2. May 18 09 04:15 am Link Sascha wrote: CS2 does it too, as do all previous versions of PS that I have used. When you select any painting tool, be it clone, patch, paintbrush, history brush etc, loot at the top left of your screen and you will see a box which probably contains the word "normal." This is a pull down menu where different "blending modes" can be selected. Try selecting "Color" from this. Now any painting toll will only affect the colour, not the brightness of the part you paint, i.e. it will change the colour without changing the detail. For blotchiness try selecting your foreground colour (either with the eye dropper or alt-clicking with your paint tool) and painting over your blotchy area. Only the colour will change, and the redness will change to normal skin colour. Sometimes the colour can become too saturated. In this case try the hue. What I sometimes do is to use "hue," then paint over using "color" then do a "fade paint brush" adjusting the slider to get the most natural colour, but this is a bit more advanced. Try it using first the "color" mode then the "hue" and see what suits. May 18 09 07:11 am Link WMcK wrote: OMFG!!!!!! I was blind to this feature this entire time! I must have accidentally changed it too, I was wondering why lately when I select a lighter area with stamp and stamp over the darker area, it wouldn't reflect the lighter shade at all... lo and behold, mine was somehow set as "darken"!!! You killed 2 birds with one stone with this one... thanks a bunch!! May 18 09 04:41 pm Link |