|
Forums >
Digital Art and Retouching >
Editing Lips...how to?
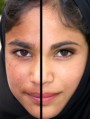
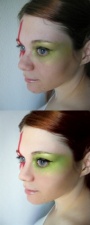
Below is an image that i find AMAZING, i see many photographers and retouchers are able to edit lips to make them look this way, perfectly shaped without jagged edges, as well as VERY shiny, what was are there to do this without making it look cut and pasted?  May 30 09 09:13 pm Link In that example, I think the editor probably enhanced the details that were already present on the lips. When I've added "shine" to the lips, I normally use the pen tool to make white parts at all different transparencies, and sometimes on different layer settings. I use the pen tool so I don't get jagged edges.  This technique doesn't always work, it really depends on the photo. But I'm interested to see what others suggest. May 30 09 09:58 pm Link Oh and I use the clone tool mostly to clean up the lining of the lips, normally on a new layer and not at full opacity. Have you tried dodge and burning to define the highlights and shadows more? May 30 09 10:00 pm Link I'm interested in learning this as well I like the define look of how they are perfectly outlined with out the jagged edges. May 30 09 10:07 pm Link To get the sharp lines in the above, I'm guessing it was just a burn of the highlight area around the lips. To get shininess, there are many techniques. One "quick-n-dirty" that can sometimes give good results is the "plastic wrap" filter! May 30 09 10:12 pm Link I use multiple layers, clone, and brush on a low opacity and basically paint and adjust until it looks right. clone is helpful to get the straight lines, liquify may also be a good option but it didn't give me the control I was familiar with. May 30 09 10:13 pm Link It looks fairly simple. I'd just select the lips using the lasso and alt key, switch the colors and raise the curves and brightness on the shine, then use the brush on a low opacity to spread it. May 30 09 10:18 pm Link MacLeod Designs wrote: I would do this in several layers. First, I'd straighten out the front two teeth, and even their bottoms. On another layer, I'd fill in the gap between the tooth on the left and the one to it's right. On another layer, I would brighten all the teeth, which if you make them all the same brightness, will make them look straight and even. Next layer, I like to use the Clone tool to even out the lips and give them that sharp edge. Next layer, use the Dodge tool to brighten the bright spots, Burn in a few areas, and on another layer, smooth out the skin a little, change the Hue, and I'm done. May 30 09 10:35 pm Link how to edit CHAPPED lips? May 30 09 11:07 pm Link Ernesto Casillas wrote: I use clone or heal, and selective color masks if there's any really red 'raw' looking bits. May 30 09 11:30 pm Link Melissa Little wrote: im impressed im not sure if i could figure out how to use the clone tool to make those perfect outlines...you can bet i will be practicing that... May 30 09 11:57 pm Link MacLeod Designs wrote: Steady hands May 31 09 12:03 am Link MacLeod Designs wrote: highlight around the lips is what defines them. why remove it? i guess i am old school... May 31 09 01:50 am Link you could have asked me It was mainly trial and error, It was the first time i tried retouching lips close up like that, I don't really know why i never filled the gap tooth in, the photo was for a mua so i think i was mainly focusing on the lips without changing the models teeth too much i just liquified for the shape i wanted and cloned edges.. and for the shine I painted white and lifted the curves but the shine was already mainly there For the colours, I obviously just painted the colours i wanted with different blending modes over and over and cloned the chapped lines out but because it was trial/error it wern't that quick while doing it lol May 31 09 02:01 am Link SCRetouching wrote: haha yea i should have never even though about it...i am seriously impressed with the perfect details you amaze me May 31 09 09:22 am Link MacLeod Designs wrote: Awh thankyou May 31 09 09:23 am Link It's touching that the creator of the work the OP was asking about happened to check in and was willing to provide details. May 31 09 07:06 pm Link Victoria Leigh Studios wrote: i know its awesome! Jun 01 09 10:19 am Link |