|
Forums >
Digital Art and Retouching >
Creating Gold Skin? Help!
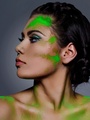
Does anyone know a way to create a gold like maxim magazine skin color. I've been playing around with just about everything and cant seem to get the color i have in mind. http://www.wallpapergate.com/data/media … va_005.jpg The skin in that photo is exactly the color i want Gavin James GavinRetouch Aug 20 09 01:03 pm Link Can we see an example? Aug 20 09 01:05 pm Link how do you upload a pic? im new to this Aug 20 09 01:08 pm Link Seems like a color applied all over the model , even the whites in the eyes are affected. Aug 20 09 01:08 pm Link I think OP's image is more post processing that makup...she might have a tan but i see no shimmer. Aug 20 09 01:10 pm Link It almost looks like they used LOTS of warming filter? Apply it only to the model not the background. But don't forget to NOT apply it to the whites of the eyes. They made her eyes orange in that pic. Aug 20 09 01:37 pm Link Its most likely a Gradient Map Aug 20 09 01:41 pm Link Well I attempted it with the warming filter...but it makes it look oversaturated before it looks "golden" on the image I was using. If anyone finds the "right" way to do it, I'd be curious to know too! Aug 20 09 01:48 pm Link Snap2 wrote: Ill show you guys what i come up with. Aug 20 09 01:51 pm Link Gavin Retouch wrote: try combining a few different layers of the gradient map and/or color filter. Play with mode (probably soft light, luminosity, etc.) and also with the opacities. Aug 20 09 01:54 pm Link Adjusting kelvin temperatures in raw nearly 90% of the time. Aug 20 09 01:55 pm Link Two steps to this result: Imagenomic Portraiture (play with the warmth and tint sliders) followed by a B&W adjustment layer using the tint feature. (Obviously you can use masks to block eyes, etc., from that effect, and also adjust the hue and saturation.)  Aug 20 09 01:58 pm Link I did a golden one today so what I did was drop the model saturation down to theres "just" a tint of colour. Grab the colour adjust tool and play around alot with those settings. Your basically re-colouring the model. I just found it works better on a slightly coloured layer than completely desaturated. You may need 3 or 4 of these laters depending on the source image. Mine were easier as they were "red saturated". Anyway, once you have the basic colour use gradient maps and or photo filters to achieve the look. I just used photo filters. If your adding "shine" with burn and dodge make sure its done before the actual colouring as it goes a bit wierd if you dont do it before hand. Its really plastic if done after and just nasty! Good luck! Aug 20 09 02:21 pm Link Gavin - "I did a gradient on it masked it" - no a Gradient Map is a set of colors that map directly to the luminosity of the underlying layer. Its in your adjustment layers. The image you linked to looks very gradient map. But its retouched before applying the map. Personally I HATE the look of all that orange, but hey what do I know Aug 20 09 03:23 pm Link |


