|
Forums >
Digital Art and Retouching >
Let's Talk About Carving
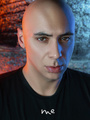
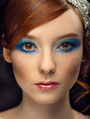
First of all: Great thread. The techniques vary depending on the medium: Oil paint, pencil, charcoal, chalk, silver points, digital brushes in PS, each has its own way of achieving the same modelling effects. Since I have been painting, drawing and sculpting for a long time, I just call this modelling, not specifically carving as retouchers call it, for modelling involves both carving and adding - either in 3D plastic forms or the illusion of modelling in 2D representations. That said, as several people mentioned before, it is absolutely essential that you undertand the underlying anatomical structure first. The more your knowledge in anatomy, the more realistic your modelling will look. Even if you have not done so far, start studying anatomy and start drawing.  I have been drawing for a long time. The knowledge in anatomy and experience in drawing/painting surely will come in handy in modelling your images. May be the following might inspire others to draw too! I have been drawing for a long time. The knowledge in anatomy and experience in drawing/painting surely will come in handy in modelling your images. May be the following might inspire others to draw too! This book is great to learn about the form of the head and its sub forms: Drawing the Human Head by Burne Hogarth. Even if you dont plan on learning to draw, looking through this book will give you enough knowledge to understand the HEAD and thus help you model (carve) better. Here are some of my drawings in various media, all of them original works except one that is a copy of a Degas in red and white chalk in sized & toned paper and another a copy of a Prud'hon in Silver Point on gessoed paper. The concepts of modelling in 2D representations are used in all of these in one way or another to delineate forms and the play of light on the forms.         There are plenty of modelling examples for the face in photographic retouching so far. So, here is one I modelled from the raw - full body modelling. The model already has a beuatiful figure. But with the lighting I choose, I did some modelling to accentuate what was already there.  I wanted to show this exmaple particularly to emphasize the importance of "bump." There are several terms that refer to the same thing, I often use the term "bump." Bump is the darkest of the tones that follows the form in the direction perpendicular to the direction in which that form is turning away from the predominant light. Bump happens at the ridge of the form where it turns away from the light. Bumps happen in all scales - the large body forms, and the subforms inside major forms. The head as a whole will have its own bumps, then the nose will have its own etc... Watch for this in real life, or photographs. Study this phenomenone and learn to replicate it. Instead of just darkening the shadow side of things, if you emphasize the bump and add some reflected light in the shadow area the image will be much mode alive and vibrant.  Here is another with some modelling done:  In the following drawing, you can see the power of the "bump" in rendeing the fullness and roundness of the forms (the following drawing is not mine, go to the URL - in the image properties for its author and source.)  Dec 23 13 01:43 pm Link Love your drawings. The last one in your post is magic. Dec 23 13 03:13 pm Link Ezhini wrote: +1 and not that I'm a great example of drawing or knowing what I should. But knowing what's going on is essential to retouching. Dec 23 13 05:09 pm Link Knowledge of anatomy comes in handy in the first step, THE CELAN-UP. Knowing what to remove, what to reduce and what to leave, in order to enhance it. Once the image is "clean", you just repeat what's already there. You can go from subtle portrait enhancing, to radical commercial over-pumped shadows and highlights by drawing further and further. Dec 24 13 12:32 am Link Ezhini, Dec 24 13 01:02 am Link AKMac wrote: No. The above drawing was NOT DONE BY ME. (Please see my original post, I mention that THIS ONE IS NOT MY DRAWING.) Dec 24 13 06:14 am Link pellepiano wrote: Thanks. Except, that the last drawing in my post was NOT done by me. It is by Anthony J. Ryder. Dec 24 13 06:16 am Link Here are a couple of images, from a shoot about ten days ago, in which I modelled the face. My modelling of faces is rather subtle. Keep in mind I am not one of the Super Retouchers   Dec 24 13 06:27 am Link Jakov Markovic wrote: +1 Dec 24 13 06:29 am Link Here's a simple exercise to help those who want to develop their awareness and understanding of tonal modelling and drawing. It goes like this... Select a simple image to copy. Render it to Greyscale and blur away the fine texture. Extend your canvas size by an extra 100% to the left or right. Then copy the image from scratch. If you find it a bit intimidating to start from a "blank canvas" then trace the basic outlines of the reference image on another layer and drag it over to the blank half. This is about as easy as it gets when it comes to producing a digital image from scratch. You might find it hard at first, but if you persevere, you'll start to see rapid improvements. Dec 24 13 10:38 am Link AKMac wrote: Right. And this is also how you can do your regular carving. Put the original in one window, and the image you're woking on in an active window. You'll always have the reference. Dec 24 13 11:58 am Link Jakov Markovic wrote: In reference to this thread, you're wrong. Read first page of the topic, see what it's actually about. It's not about repeating what's already there. Dec 25 13 08:46 pm Link cwwmbm wrote: Lol. Yes, it is. You're not supposed to make someone look like a different person, just make the features more pronounced, once you've perfected them in the clean up. Dec 26 13 03:01 am Link In addition to "photographic carving" (done with original lighting), and "retouch carving" (enhancing the existing highlights and shadows for depth)... I think there is also such a thing as "cosmetic carving" or "beauty makeup contouring". Makeup contouring adds depth, angularity, definition and polish to a models face or image. If you go to Youtube you can find 200 videos on how makeup artists and beauty models do contouring with makeup techniques... to bring out the full dimensionality of the beauty face. It may be somewhat besides what is being discussed here possibly...but it can make a totally dramatic enhancement to an image... if a makeup artist or retoucher adds makeup contouring to the beauty face. See the videos below to see how to do such contouring... and where makeup artists place the contours. Generally... makeup artists and high end beauty models... often put makeup highlights and shadow colors on the following areas: 1. The sides of the forehead - shadow 2. Down the center of the nose, nose bridge and forehead - highlights 3. The sides of the nose - shadow 4. Under the eyes above the cheeks - highlights 5. The temple area - shadow 6. Blush on the cheek apples - rose color 7. In the hollow of the cheek back to the hairline - Bronzer 8. On the chin - highlight 9. Along the jaw line - shadow What a beauty difference there is in the makeup side of how a model looks... if she has been contoured by a knowledgeable makeup artist. It gives the model and the photographer a rich, attractive, 3 dimensional wow factor on the face. Makes you want to fall in love or at least do a double take. Watch the high end beauty videos on YouTube and you can copy the colors, placement and blending of "makeup contouring" (makeup carving) for yourself. Just create the necessary makeup colors in Photoshop and follow the routine. Several Generic Video Samples of Makeup Based Contouring http://www.youtube.com/watch?v=loSbh3B-1MA http://www.youtube.com/watch?v=LX9q_eH7cqY http://www.youtube.com/watch?v=lZLwiOqpUfQ So, besides "following the internal bone structures exactly", and "emphasizing the highlights and shadows" that already exist...I think there is a "makeup contouring" component that can be effectively added by a makeup artist or especially a retoucher... to really make an image pop with that extra depth and dimensionality and beauty that we all appreciate in the best magazines. If done by a professional MUA its almost invisible... but boy... does it ever make a gorgeous difference in a profile picture! Retouch Methods for Beauty Carving: You can do retouch carving using a gray layer in overlay or softlight blend mode and painting on that layer with black and white soft brushes to do the toning. You can also use subtle color brushes in addition to the light and dark ones on this gray method if you want more dramatic carving. You can do this same effect with using 2 curve layers and pulling up the curve in the center in one...and pulling it down in the other...then painting on the black masks with a soft, low opacity (12%) white brush to apply the shading and highlights. Paint with a white brush to add the highlight or shadow...paint with black... to remove or correct the application in this method. Apr 08 14 05:09 pm Link One of my first retouches on my own photos like 6 months ago, carved with dodge and burn I think, also likely spherize>>pinch and/or liquify  Apr 22 14 04:38 pm Link A 5-hour (free) demonstration from New Masters Academy on sculpting the head. https://www.youtube.com/watch?v=pirv3EzznR8 Aug 07 14 11:26 pm Link Facial approximations (creating a likeness from an unidentified skull) http://www.neatorama.com/2014/11/06/Ask … ic-Artist/ Forensic artist Lisa Bailey's web site http://www.askaforensicartist.com/ Nov 10 14 08:47 am Link NothingIsRealButTheGirl wrote: It would be an interesting exercise, now that we have the technology, to take a series of high resolution MRI scans of people's skulls, 3D print them at very high resolution and at 1:1 scale and then have someone do a facial reconstruction on that skull (without seeing the original person, of course) and then compare the results... Nov 10 14 09:27 am Link Wye wrote: That is a good idea. Nov 10 14 09:49 am Link Great thread to be resurrected. I have a background in traditional art, so my retouching seems to have a different more illustrative feel to it. I've decided to give the image on page 5 a try, as I want to practice painting light on photographs, as well. For this image, I did some basic healing brush work, then more detailed D&B work. There was already some ambient light on the sides of the face, so I have turned that into rim lighting. I did not do any color corrections or any work on the hair, so please excuse any undersaturated "dirty" looking bits.  If the link works as promised, the thumbnail will send you to the full image. Any constructive criticism would be appreciated. Nov 10 14 07:39 pm Link Wye wrote: I asked. Turns out it's been done and apparently worked out pretty well... Nov 10 14 11:39 pm Link |