|
Forums >
Digital Art and Retouching >
Skin color strange help !!!!!
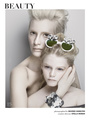
Hi every body, I have a trouble when retouching this img.  Photographer: Evgeniy This is a very beautyful Image I think but there is some strang red color appeared and I wonder that is my mistake when developent or because of lighting and how to fix it so quickly without brush using. Thanks And how to save jpeg file without changing, I'm using save for web and device in Photoshop but after saving I think my skin color change too much (skin look like less Cyan and more Magenta) and Image contrast down can see easily but I don't want plus more contrast before saving. Can you tell me ??? Jan 29 15 08:53 pm Link In different social networks image looks different , that's the most detailed lesson to conserve colors on photos when exporting to the Internet. Michael Woloszynowicz explains the most difficulties to save the image https://www.youtube.com/watch?v=LmrhsXAAg8A Jan 31 15 02:28 am Link "Regular Colors and Skin Colors... change the way they look... based on the amount of luminosity under the color." Color is made up of: Hue = the color itself, Saturation = the amount of color, and Luminance = the brightness value under the color. For Example: If I put up a pure red square on the screen...and then I changed the underlying luminosity... then that same red color square could begin to look very bright pink or even dark maroon... just by changing the Brightness Value. That same red square looks very different... depending on how bright it is. Same thing on skin tones on a human face! I can change Skin Color by adjusting the underlying luminance of that area. By just changing the underlying skin brightness on ruddy, blotchy, dark, gray or muddy skin...you can lighten up the skin... and thereby you can also color correct the skin color too... so that the offending dark skin colors might just come back into proper alignment again... and exhibit their proper tonality and colors again. OP, In your example image above, if you were to change the underlying luminosity on the face in the areas you indicate...then the skin colors would lighten up... and change their tonality... and change their colors. The Photoshop Process: In a layer above the image...add a curves adjustment layer... by going to the (half circle icon) at the bottom of the layers pallet. Choose curves... and then drag the center point of the curve up and to the left so the overall brightness of the image increases dramatically globally. Dont clip (flat top) the curve...keep it nice and smooth. NEXT: hit control or command " I " to invert the mask from a white mask to a black mask. Now all of your brightness will disappear temporarily for a minute. NOW: Choose a Soft, White, 4% Opacity Brush and paint on the darker areas of the face that you show in red. You will have to click drag... and click click click... alot... to slowly build up the brightness in this area. You use a 4% opacity brush so none of your stroke marks will show up. RESULT: You are now painting with light (an interactive version of dodge and burn) in the red areas you show in your image above. This part of the face will now get a bit brighter...and the brightness will begin to match the other areas of the face...and more visual focus will therefore now come to that part of the face... A N D Now Watch This....the Color of the skin will now change to a lighter color!! (and probably a more accurate and true color too!) AFTER THOUGHTS: Click on the layer visibility icon... to instantly see the Before and After result of this process. You can also use the "layer opacity slider" on the layer to interactively change how strong the lightening and resulting color correction effect is!! This opacity slider allows you Complete Visual Control and Total Adjustability of the brightening effect from zero to 50% to full on. Also: If you want to Paint Away the lightening effect in a certain area...just change your brush to a black brush and you can slowly erase the lightening effect in any area you choose... by however much intensity you want!! Paint with white to add the brightening and color correction effect where ever you want it...and however strong you want it...anywhere in the image. Use black to selectively erase or reduce the effect anywhere you want it. Sometimes this darkening effect on the face is due to photographic lighting... or by using high lighting ratios. It is also sometimes caused by a makeup artist beauty contouring the face... where a darker tone of foundation is used to add a more dimentional look to the face. Sometimes darkness in this area is also caused by darker blush being used. If the bad skin colors are caused by luminance issues...this process works great. If they are caused by makeup effects... you might also want to use a curve layer to correct away the makeup color cast too. In the OP image, It might also be good to use a Hue/Saturation adjustment layer and "selectively reduce the saturation" of just the overly red areas. You could also try a Contrast adjustment layer to selectively make the contrasts more to your liking. So remember: If your skin tones look dark, or ruddy, or gray, or blotchy...sometimes it can be blended away and taken care of with just adding back in the proper amount of underlying Luminosity FIRST. This will make the offending muddy skin or other colors become more of what they are supposed to look like. You can do this non-destructively and totally transparently by using a curves adjustment layer. You can selectively "paint on" this " lightening adjustment layer " with a white brush.... so you can artistically control this lightening effect just perfectly the way you want it....and then change it again precisely at will... until you are creatively, artistically, and technically satisfied. Feb 05 15 09:41 am Link |