|
Forums >
Digital Art and Retouching >
How Could I get this look?
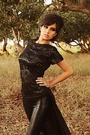
I saw this image on facebook https://scontent-lax3-1.xx.fbcdn.net/hp … e=566FBAD5 and I was wondering how I could go about editing a photo to get these tones. Aug 30 15 09:25 pm Link Beautiful....so, finding that kind of MODEL would be the hardest part. Those are film tones.....but shooting film can be tedious, so the thing that people like to do these days is shoot digital, then make it look like film (the irony). One cheap film emulator that is worth trying out is "Exposure" by Alien Skin. It's a Plug-in program that goes back and forth with Lightroom. http://www.alienskin.com/exposure/exposure-examples/ If you want it all integrated, then Presets Shop offers some great presets. Something like "retrograde" or "faded film" may have that sort of look. https://presetshop.com/product/retrograde/ https://presetshop.com/product/faded-film/ You still have to do a fair bit of adjusting to get it just right (of course) but those programs offer a different starting point, and allow you to see your photo presented in different tones & flavors. The advantage of the Presets option is that you can see the lightroom adjustments and learn from them....shape of the curve, and the "black-contrast-shadows" juggle, etc. Sep 01 15 11:10 pm Link And again - gradiant brown tones - blending soft ligt - copy as one layer - apply vignette - second create a copy of base layer gaussian blur +4.0 pixel blending soft light - done - no filter needed Sep 02 15 12:58 pm Link Jesus Hool wrote: 80-200 zoom set to 80mm at f5.6. Then soft focus and run it through Alien Skin filters, unless you know how to work with Adjustment Layers. That's a very nice image too Sep 02 15 01:20 pm Link It depends on what elements you are asking to duplicate. Is it the nice depth of field on the focus of the foreground and background (Use a lens with a wider open F stop... to get the depth of focus to be shallow. Or, use the Lens Blur Filter to selectively blur the background after the image has been shot). Or, is it the gorgeous green foliage and the saturation that it adds to the image? ( Do a curves adjustment layer and pull up the green curve to get more saturation in the greens...and also maybe on another layer...do a curves adjustment layer and take the bottom left part of the RGB curves and drag it to the right to get those nice dark green patches... use the adjustment layers with a black mask...and paint in the green or darkness spots with a soft white brush) Or is it the magenta gold/olive/brown darker skin tones on the model? (Shoot the original image 3/4 of an F stop lower... Or add a curves adjustment layer after the fact... and paint in the dark brown tones where ever you want them and however strong you want them. To make regular flesh tones go darker and more brownish... you would pull down on the center of the RGB channel curve to make the flesh luminance go darker... then... pull down on the green curve very slightly to make the skin more brownish... then... pull up on the red curve channel just a BIT to add in some warmpth and saturation at the same time. NOW YOU HAVE THE FORMULA FOR BROWNING UP SKIN. You would take this curve adjustment layer and do a control I to invert the mask and then paint in the darkening skin effect with a soft, white, 5% opacity brush... to selectively apply the darkening and browning skin. Paint with a black brush to remove the effect any place you dont want it or to reduce the tanning effect. The 5% opacity requirement makes it so you dont see any brush strokes or brush overlaps in the skin changes.) Cheers Sep 06 15 10:43 am Link |


