|
Forums >
Photography Talk >
My homemade ringflash!
From my local £1 shop, i bought a large bowl, a small bowl and a small storage container (the one with the yellow clips).
Get a soldering iron. You will be using this to burn out the holes (better this way cos any other way and you'll end up cracking the bowl) and it doubles as a re-sealer to join the plastics together at the ends.
Start by slowly burning out the holes. The yellow container circumference was just wide enough to past a decent large lens through. It also fits into both the small and large bowls cutout. The shop had loads of different types, so i took the lens cap (mine is as wide as the front of the lens) there to measure up.
Use the soldering gun like this...
and...
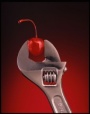
once you've done that, get your flash gun and trace around the top end of it, cos thats the end that will poke through into the large bowl. Burn out that hole to. Make sure you burn on the outside of the red markings cos you want the flash to fit in that hole tight. If not it will poke through too much and restrict the amount of space it needs to send the light plus it will just fall off and might crash on the floor and you'll end up with a £4 ring and no light, lol
you will need to get some double sided tape so you can stick the alumminum foil to the inside of the large bowl and the outside of the small bowl and around the outside of the cylinder.
my apologies i have skipped a few processes cos i got carried away and did not take pictures. I will be making a few of these to get it 100% right. So bear with me. You can see from this image that foil covers the inside completely. Don't need to explain why. The flash gun also fits in really really tight without damaging or spraining the end of the flash unit..
As you can see from this image, you will also need some sort of defusing material to put over the front. No need to explain why on that either.
You are prob wondering how i stuck it all together. i used the soldering iron to seal the rims of the bowls and the defuser and the cylinder together. They are all medium hard plastics so they melted together just nicely and solid.
You can see that its not perfect cos the light goes through the bowl but that will happen cos i overlapped some of the foil cos it was patchy in some places. Please bear in mind that you will not have any of the TTL functions that are either synced or taken from the flash sensor. You will have to set it to manual and adjust the intensity of the burst.
Sparky!!!!
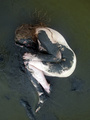
You can see around the edge of this image that the end of the inner cylinder shows. There is an inch of lip on the end of the cylinder that i did not trim off. Also, i shot this image at 18mm. The lens is a 18-70mm.
In this image you can see in Sparky's eyes that the amout of light around the ring is not equal. I knew this would happen but its only a 10% reduction in that area and you will not notice it that much. You'll be shooting at a relatively slow shutter so there will be enough light.
Oct 05 07 07:24 pm Link Craaaazy! Oct 05 07 07:25 pm Link Oh man, I like this. Very well done!! Oct 05 07 07:27 pm Link So when r u going to market this sensational product.... Hee Hee Oct 05 07 07:27 pm Link that i have done the process, it will only take me max 1 hour to make one. Oct 05 07 07:29 pm Link WOW!! That's crazy... but I love it!! Oct 05 07 07:32 pm Link very cool Oct 05 07 07:36 pm Link lol.... cool. nice job. Oct 05 07 09:20 pm Link That looks like too much fun. I am going to try it! Oct 05 07 09:56 pm Link incredible... thanks for sharing Oct 05 07 09:59 pm Link That's really awesome. Nice job. oh...does the cat do TFP? Oct 05 07 10:02 pm Link that's just brilliant!  Oct 05 07 10:03 pm Link Wouldn't using a bundt pan work just as well without all the cutting and glueing back together? It already has the shape, just cut out the middle. Oct 05 07 10:05 pm Link yeah thats all well and good but does that cat work for tfcf.. hilarious post! well done! Oct 05 07 10:07 pm Link best model evar!....so much emotions in each picture. The fall off isn't too bad. Could you use plastic silver spray paint instead of foil? Oct 05 07 10:15 pm Link Need captions for cat pictures. Oct 05 07 10:16 pm Link pretty damn dope - good diy!  Oct 05 07 10:19 pm Link HA! awesome! i saw your post in this thread this morning & was wondering if you were gonna do a tutorial! hahah! good on you, man! are you pleased with the results? Oct 05 07 10:19 pm Link Nice job. Oct 05 07 10:26 pm Link Oh man, I love homemade lighting rigs. Thanks for posting this! Oct 05 07 10:27 pm Link bravo! I KNOW i can rig things like that, but am lazy (and stupid enough to buy brand name stuff- when I know I can go to the hardware store and make it myself) with foamcore and velcro you can make a softbox too! Oct 05 07 10:34 pm Link I made this...  It's 7 feet by 5 feet. It's 7 feet by 5 feet. I made a ringflash similar to that a while back, but I hardly ever used it. Oct 06 07 01:17 am Link AShooter wrote: Thats nice... Whats behind that sheet? how much power do you use? I'd like to see one of your projects... Oct 06 07 01:27 am Link The ringflash is super sweet, I think I,ll try in with an old 200ws monolite, Oct 06 07 01:37 am Link  I thought about various types of pans like that but they all seemed like way too much work. F R Pearce wrote: Oct 06 07 05:53 am Link You prob could but foil is cheaper, no? Trent Chau wrote: Oct 06 07 05:53 am Link very and the cool thing is, there is no need for any extra battery pack that an expensive one will need. moonboots wrote: Oct 06 07 05:54 am Link Get on it! FARLEY MAGADIA wrote: Oct 06 07 05:54 am Link very nice home made gear, but a spill kill works much the same. Oct 06 07 06:00 am Link i am sooo making one of these! Oct 06 07 06:02 am Link only thing is, the Spill Kill costs around £50 and also i really enjoyed spending the few hours making mine. black lab photography wrote: Oct 06 07 06:05 am Link black lab photography wrote: i forgot to mention, i use a bowen spill kill on bowen lighting....around a $100 6 years ago. Oct 06 07 06:05 am Link Zanda Photography wrote: And for those of us who are plain old stupid, how would this be working? Oct 06 07 06:17 am Link Looks great! I want to try it immediately! Remco Oct 06 07 06:19 am Link Ace design, I'm going to try this with the wifes plastic pots, if I get it all wrong I'll point her to this location. Never the take the blame if you can blame others Great idea and thanks. Rob Oct 06 07 06:19 am Link great job on making that unit!! strat Oct 06 07 06:34 am Link i knew you were fun great job tb Oct 06 07 06:55 am Link Trent Chau wrote: I think you could prevent the light from coming through the plastic side by painting it first too. It might even help to cut down on the fall off. Oct 06 07 07:09 am Link yea thats another possiblity but as we know the backward light will not affect anything. Shaped Light wrote: Oct 06 07 11:24 am Link I want one. Oct 06 07 11:33 am Link |