|
Forums >
Photography Talk >
Bronze skin tone in photoshop
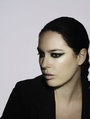
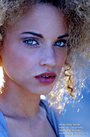
I am trying to get a certain look for the skin. They bronze-tan look. I think it is some kind of overlay or something. I have taken the image to photoshop: 1. Hue saturation -100 then overlay 2. Hue saturation -100 then opacity 50% 3. ? I am not sure what to do next... whatever I have tried doesn't give the look I want This is the example of the skin tone  Oct 19 08 04:14 pm Link Curves. Oct 19 08 04:16 pm Link Dolce Moda Photography wrote: Can you post the picture that you are trying to get this look for? Oct 19 08 04:20 pm Link If I understand you correctly, you're duplicating the layer, making it an Overlay layer, then dropping the saturation to 50%. This will bump up the contrast considerably, so that will make the skin look more bronzy, but it will affect the image as a whole, possibly clipping it here and there, and certainly drop saturation overall. Maybe try masking out the skin first, then experimenting with a Levels or Curves layer. The sample shot you posted was shot in direct sunlight, so it was probably contrasty to begin with. Oct 19 08 04:22 pm Link Would love to kno how this is done!! Alot of charlotte tilsbury's makeup portfolio has this affect on the skin, and is obviously done on photoshop! Please let me know if you figure this out  Oct 19 08 04:25 pm Link The example you posted looks like alterations to hue/saturation and some variation of color shift. Oct 19 08 04:30 pm Link Look at the info palette and try to figure out the color relationships. Then adjust your curves to match. Oct 19 08 04:49 pm Link Bronzing the skin "look" is done in two folds I think. Some minor colors are done at capture with MUA via application of temporary tan sprays and second in post process via the methods aforementioned. Try using selective color adjustment's red channel sliders. Most of the skin color information appears in the R-channel. In the selective color R-channel, there are 4 components you can further edit: C, M, Y, and K. Try playing with the C, M, and K sliders of the R-channel component. Don't forget you can mask unwanted changes. Best, ronald n. tan www.ronaldntan.com Oct 19 08 04:51 pm Link Richard Dubois wrote: from the base layer: Oct 19 08 04:56 pm Link If you post the base image, we'll be able to show you the process and result. Oct 19 08 04:59 pm Link There is a way to transfer the skin color from one image to another. Bring in the image you want to emulate the skin tones of...on a separate layer...then reduce its size down small so you can see both it and the image you are wanting to change. You are going to be using the "Color Sampler Tool" under the icon that looks like an eye dropper. This tool will give you the exact color numbers for the flesh you want... and the flesh you to change the color of. Be sure to also go under Windows>Info and open up the Info Pallete so you can see these numeric RGB values. First, place the eye dropper on the patch of skin you want from this smaller image in the layer you just brought in. You will use the RGB numbers of this color in the next steps. Place another eye dropper (#2) on the skin of the girl you want to change... and notice that her skin numbers also come up in the info pallete. Now the important step: If you use an adjustment layer...you can change the colors...and they will be non destructive...and all the detail under the skin will be preserved...but the colors will transfer as transparent and not block up everything like they would if you painted on the color. So we are going to create a transparent correction color. SO....Here is the magical step. Create a new adjustment layer for curves above these 2 images. It will be its own separate layer and it will have a white layer mask already attached to it. Now make the adjustments. Go into the curves area where it says RGB...and pull down the menu...you will see red green and blue channels. Here is what we want to do...you want to pull up or drag down the center of the curve so the skin numbers on sample point #2 match the color numbers under sample point #1. This will create an exact correction color that is necessary to make the skin in your original image look like the skin of the image you just brought in. (You will make the Right row of numbers of sample point #2 equal the left numbers from sample point #1) You will now see that the skin colors of your original model are now changed into the same color skin as the model you brought in. BUT...now the correction color is ALL OVER all parts of the images...SO...Click on the white layer mask next to the curve thumbnail...and do a control/command I to invert the mask that is right next to the curve thumbnail... and make it become black. This will make the color adjustment you just did instantly disappear (Good). You can delete or unclick the visibility icon on the image you just brought in...its not necessary anymore. Then...Paint on this mask with a 20% soft white brush...what you get is your special transparent correction color...and now you can paint it on your models skin areas...and the existing skin color will turn into exactly the same skin color as the image you brought in...same brightness, same color and saturation. This is a great way to make a library of skin tones you like...and transfer them from model to model. You may have to stroke and diddle a little to get a perfect match...It takes some artistry and judgement to make it look well...but it gets you into the ballpark, you can blend in several colors and shades for the highlights or shadow ares or the cheek colors etc. Ive made up a library of skin colors and saved them...so you can paint them on anytime. This is just a way to transfer one skin look from one picture into an existing picture. I often find myself making several of these transparent curve correction layers to add in additional tones to sculpt the face. The trick here is that this method allows you to get perfect color matches...and you can go back into the curves after you are done...and diddle again with the reds or yellows and make further refinements to the same area and thereby make it exactly the way you want it to look. In the image you have above...I would make one adjustment color for the highlights that are kind of greenish and paint them onto the existing model. Then I notice that there is a darker brownish color for all the sculpted areas of the face and skin...another curve layer for that color...and another color for the reddish warmer colors throughout her skin. This way you are painting in the 3 different kinds of skin colors that are in your new model. There may be an easier way to do this...but your new model has different skin colors in different areas of her skin...tough to duplicate with just one adjustment trick. Oct 19 08 05:45 pm Link Oct 19 08 06:41 pm Link Well this is what I came up with after using a bit of each of the suggested info.  not exactly what i wanted.. i guess i will keep working on it Oct 19 08 07:49 pm Link The tutorial didn't work? Oct 19 08 07:59 pm Link Graphic photo wrote: I did the steps from the tutorial but the result wasn't the same. The man in the tutorial example is dark skinned to begin with. Oct 19 08 08:04 pm Link Dolce Moda Photography wrote: Do I have your permission to attempt it with your photo? Oct 19 08 08:07 pm Link Dolce Moda Photography wrote: Try duplicating the image and changing the blending mode of the new layer to "multiply." From there, you can desaturate the duplicated layer to taste and possibly add a color cast to it- I'd go towards a dull orange/brownish tone. Your colors are brighter and more saturated than the example image you posted. Multiplying by a fully or partially desaturated duplicate of the image should help correct those discrepancies. You can further change the skintone by multiplying the image by itself again and then masking everything but the skin. Oct 19 08 09:48 pm Link This is what I'd do to that image then I will do more to it but basically for the skin tone, this is what I'd do to it.  Oct 19 08 10:03 pm Link This is my second attempt.  Oct 20 08 12:18 am Link Dolce Moda Photography wrote: Looks more like you used the burning tool at a stronger opacity. My suggestion is use the eye drop tool and select the skin color and the color palette will pop up. Select a darker color or something closer to the bronze and adjust the color opacity and paint in the bronze color, but make sure that you use the multiply mode. Oct 20 08 01:12 am Link No burning 1. Hue/saturation: saturation -100 layer:multiply opacity 81% 2.Color balance R +8 G +24 B +7 layer normal opacity 91% 3. Hue/saturation: saturation -95 layer:overlay opacity 14% 4.Brightness/contrast B +15 C -10 layer normal opacity 100% 5.Hue/saturation: saturation +24 masked ... only applied to upper sky Oct 20 08 01:38 am Link You might wanna take a look at Gradient Maps Oct 20 08 09:51 am Link The image looks like it has a sepia tone adjustment layer and has been desaturated a by 30-50%. I like the sepia toning of PREVIEW on a Mac - go to tools then choose image correction; easy sliders let you preview the results and add as much sepia that you want. Oct 20 08 11:34 am Link I just created a new way (for me) to do this : 1- make a duplicate layer of the original 2- make a new empty layer 3- pick a medium skintone from the model (like mid-cheek) 4- paint the new layer with that skintone at 30% 5- merge the skintone layer with the duplicate layer of the original 6- adjust levels so the image is slightly darker 7- make this layer an overlay now you have 2 choices- a- you can either reduce the opacity of this layer till the skin looks good, knowing that the background color is also affected slightly b- make this layer a layer mask and then paint it onto the skin without changing any other part of the photo. and lastly, use the saturation slider to reduce saturation if the color on this layer seems a bit too intense. Oct 23 08 11:49 am Link Smedley Whiplash wrote: Interesting. Do you have an example of the end result we could see? Oct 23 08 05:58 pm Link playing with some of these tips now Oct 24 08 11:19 am Link Orlando Behar wrote: And this isn't available on a PC? LOL! Oct 24 08 12:06 pm Link Smedley Whiplash wrote: Maybe it's what I see bronze as but this isn't working for me. Oct 24 08 12:07 pm Link i've been searching for something like this for a long time. try opening the image with the Photoshop Raw converter, then go to the HSL menu and lower the oranges -saturation- about halfway or a bit less. Good luck! Dec 27 09 07:08 am Link |