|
Forums >
Digital Art and Retouching >
Silky hair
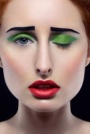
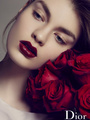
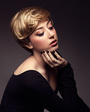
Hello everyone, I was wondering how to achieve the beautiful silky hair or actually, how to know which parts and how much I should highlight and darken. I know that I should definitely get rid of all the flyaway hairs, but how can I get this united flow of hair? http://cdn.streetdeal.sg/images/deals/4 … 281437.jpg http://3.bp.blogspot.com/-jYGBJ_G2rs0/T … 61c_v5.jpg http://www.brides.com/blogs/aisle-say/w … rspray.jpg http://adsoftheworld.com/files/images/Priorin2.jpg http://www.fashonhair.net/wp-content/up … Hair-2.jpg Mar 26 13 03:56 am Link All depends on how well your original image has been done... those examples you posted have been done by professional hairdressers that pay attention to every single detail. In order to get to B we must see A first!! :-) Mar 26 13 04:13 am Link The Invisible Touch wrote: exactly, sometimes I find photographers and art directors want to save a buck and don't start with a good stylist, it makes a huge difference when you start with something good, not something "good enough". can't make chicken soup out of chicken poop. Mar 26 13 05:18 am Link M Klasan wrote: It's a mixture of cloning and copying patches of good hair then transforming them with the warp tool and also drawing in more hair. Mar 27 13 12:27 am Link D A N I E L wrote: Again all depends of A in order to get to B Mar 27 13 02:08 am Link M Klasan wrote: You highlight a)parts where light already hits hair (enhance those), b)parts where hair is closer to camera (kind of) and where light would naturally hit it. Mar 27 13 02:50 am Link The Invisible Touch wrote: He's showing you A and asking how to get results like those. I showed him how to get results like those if he was to have a starting image like that. Mar 27 13 03:16 am Link D A N I E L wrote: With all my respect... He isn't showing A, he is just showing B. Those images/hair are done by professionals and have been retouched already. D A N I E L wrote: If he was starting with an image like that... why on earth would you like to retouch it?? Mar 27 13 04:47 am Link To the OP. As I mentioned before is always easier to see the image you would like to work on, as the samples you have posted are final images and everything has been done to a really high standards, from photography to hair. If you like to achieve those looks its really important for everybody to see your starting point, otherwise is impossible to help you. :-) Mar 27 13 04:59 am Link D A N I E L wrote: THIS is your answer................. Mar 27 13 06:40 am Link The Invisible Touch wrote: D A N I E L wrote: With all my respect... He isn't showing A, he is just showing B. Those images/hair are done by professionals and have been retouched already. I misspoke, what I meant to say is that those are final images and that the base images must have been really good to begin with and that the retouchers would have used a combination of the tools I mentioned above plus D&B, forgot that one, to achieve those results. So by showing you those images you could see what A looked like, sort of, and guess the tools used to produce those results. That's what I tried to say... it was 3am when I wrote that Mar 27 13 07:23 am Link Now it makes sense!! :-) I know all this techniques stated before are great to retouch hair. But in my experience, retouching hair is one of the most difficult things to do...at least to do it professionally it is!! The OP is asking how to get those looks (B) and based on experience, is not a matter of just apply those techniques and that's it, it really depends on the image you starting with (A). Some images if aren't good enough you will never will get those results... never!! Mar 27 13 07:34 am Link I agree with you but still something similar, remember I said similar, can be done it is a lot of reconstruction and time invested if you want to get something like that. Here's an example that I remembered, I said similar  http://nienna1990.deviantart.com/art/De … -144966846 http://nienna1990.deviantart.com/art/St … -189334091 Mar 27 13 07:40 am Link Daniel, one thing is hair retouching, another thing is hair comping. The first example you showed is nicely done but in my opinion it looks fake and that's got not similarity to the samples the OP provided, the second example, that's hair retouching, but if you pay attention to the original image it already has a good starting point. Of course you can turn any hair into whatever you like but in my opinion this isn't hair retouching any more... is just manipulation. Mar 27 13 07:52 am Link You're right, I should have thought of that. Mar 27 13 07:58 am Link D A N I E L wrote: It's all a matter of points of view... no right no wrong!! :-) Mar 27 13 08:11 am Link Obviously the images you chose to list are professional hair images where a hair stylist was used in the original capture...and the stylist was probably chosen because they are good at hair. Its amazing what gorgeous and quality results you can get if you hire a gifted hair stylist for a shoot!!! Their reputation and expertise and contribution to the team is at stake in your shoot...so you end up getting some pretty awesome looks right out of the camera! This is especially true if the stylist is allowed to get back into the shooting process as needed to monitor the quality of the hair style as the shoot progresses...those fly-aways and messed up smooth spots... need continued attention and re-combing at the camera capture stage... to avoid making your retoucher go nuts later on. If you already have some pretty good images... then you can cut and paste snippets of good hair into poor areas and use the warp tool and the puppet warp tool to transform their shape and curves so they fit into the curve and flow of the new area. You can transform their shape to fit the flow... and also to hide the fact that you are re-using the same snippet several times. You are then very likely to use a "Layer Mask" to selectively and perfectly hide and reveal parts of the hair snippet... and to blend it into the good hair, to cover up specific areas... so it looks believable and integrated into the existing and surrounding hair flow. You might also use a curve layer ("Clipped" to the hair snipett layer) to perfectly match the color and luminance of the hair patch so it does not draw any attention to itself and blends in perfectly with the existing hair color. You have to choose your snippets smartly, intelligently and creatively to get the great results obviously. As a retouching resource... I have a couple hundred hair images where the hair is really nice...and I use these extra images to clone in patches into my new images where needed. I often drag a hair section from another image onto a new layer and blend it in as required. I have even created a library of just different colored hair strands... and smooth runs... and waves... and highlights... and curls... and bangs...to pick and choose from. Its amazing the fix-it work and visual magic you can do with hair repair resource images. Search the net for your own hi-res hair repair images... or look here at Mayhem. My main point is: It is important to have a source of good looking hair snippets that you can import, color match, and blend into problem areas you are having. If you cant shoot it perfectly in the studio... then at least have a library of hair repair images on hand to clone from and fix things up when needed. I recently had a very high resolution camera rented for the weekend and I shot some 75 megabyte RAW images of just hair textures, and smooth strands, and hair edges, and waves from hair extensions and wigs and 3 models that came over. Guess what those hi-res hair snipet images will be used for someday? Just some practical ideas hopefully. Cheers, Ray Apr 01 13 06:24 pm Link It honestly took me awhile when I first started out to really accept that a lot of amazing retouched images actually started out pretty great images right out of the camera - at least on a fundamental level. I get images from time to time that are a bit flat or plain, but if the hair is clean, the makeup is good, styling/lighting is good, etc., that's giving me a lot of inspiration and a lot to work with and I can push them creatively to that next level. The images you posted were definitely shot with the hair as a major focal point - so it's clear from the start that a lot of attention and time was put into the hair even before any shooting took place. I'm sure there were a few flyaway's and small problem areas - but for the most part the retoucher's job on these images wasn't so much about correction but more about accentuation. They simply used dodging and burning and brought up those really beautiful highlights and made them radiant while also creating depth and shape with the darker/shadow areas. The JLo images could possibly contain compositional elements, but most likely not for correction necessarily but for volume or length or just to fill in a few gaps, etc. I have a before/after on my website of my profile image that used a bit of all these techniques. Apr 01 13 11:41 pm Link |


