|
Forums >
Digital Art and Retouching >
How to get this shiny look?
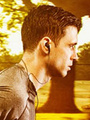
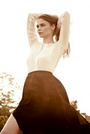
I randomly saw these images online today and really like the look. What did the artist do to their original photos to get a look like this? I'm only focused on the retouching on the men, not interested in the background. https://dl.dropboxusercontent.com/u/272 … /shiny.jpg Jul 08 13 03:40 pm Link Lucis Pro and Topaz Adjust can produce effects like that. And maybe a little D&B as well. Jul 09 13 06:07 am Link Awesome, thanks Peano!!! Jul 09 13 06:24 am Link I know this is the digital retouching thread...but its my opinion that the real wow factor in these images is produced by lighting effects... and not primarily by Photoshops singular contribution. A lot of the visual pop from these images comes from the left and right side kicker lights. Kicker lights are placed slightly behind the model and pointed back at the model from the side or back. It produces that highly attractive highlight on either side of the face. It also shows up on the highlighting on the legs and chest area of the coats. The other light in this image looks to be a softbox in the front of the models and up high... as evidenced by the downward placement and softness of the shadow under the nose. In your sample images...both models have very, very high cheek bones...and so...being lit from above...their cheeks also pick up a strong highlight from the light above. So, I think that the pop factor in these images is primarily the highlight lighting you see on the sides of the face... in the hair edges...and on the top of the cheeks. Photoshop: You could do some of this in Photoshop with a shine brush...or a positive RGB curve adjustment layer...but you would need to carefully position it... and mask it off... so that it fit right and followed some of the contours to look real. If you already have some side lighting Photoshop could strengthen it with a curve adjustment layer to bring up the brightness. Great images are often a blend of great lighting, good models that fit the purpose of the shot, a skilled photographer, and a good retoucher. Get all 4 of these factors contributing their strength to the final image...and you're likely to end up with the best result possible. Note: Your own avitar image displays this exact side lighting technique very well. The hair, the ears, and the side of the face is lit up...and the cheek bones are also highlighted. If you did an RGB adjustment layer curve and inverted the mask by doing a control I...you could then paint with a soft white brush on those highlight spots that are already there...and it would make them pop significantly more brighter than they are now. Jul 09 13 07:27 am Link Depends on material, light etc. but sometimes clarity slider also does work similar. Jul 09 13 07:40 am Link Christiana1990 wrote: Would you mind explaining how would you achieve that with clarity please?? Jul 09 13 08:42 am Link The Invisible Touch wrote: I was looking at mens suites not face or something else so masking would be involved definitely. Jul 09 13 10:11 am Link I agree with TMA... this is good lighting. Your image always starts with good photography. Lighting is huge in getting what you want out of an image. Once you have a great photo then you can clean up all the blemishes, bump the contrast, even out the skin etc. Jul 13 13 11:10 am Link Great  Jul 14 13 09:19 am Link I don't think the "shine" is due to lighting. Looks more like contrast enhancement to me. I used curves, shadows/highlights, and Topaz Detail, in that order.  Jul 14 13 10:55 am Link Silk suits and specular lighting. Silver PLM or beauty dish, umbrellas... Why does everyone think, "I can do this in post" instead of getting the lighting right in the first place? Jul 14 13 11:12 am Link GER Photography wrote: Who said shoot it wrong and then fix it in post? Where was that mentioned here? It wasn't. Jul 14 13 11:22 am Link GER Photography wrote: Not in this case. The guy on the left is wearing denim jeans. And you can see a spot on his shoulder where the masking wasn't done carefully. Notice also on that shoulder, the edge is sharp where the fabric is dark, but suddenly becomes fuzzy where the fabric is lighter. That's because whoever did this neglected to clean up the edge of the mask. Jul 14 13 12:10 pm Link Shine = clearly defined edges of highlights. Jul 14 13 02:35 pm Link |


