|
Forums >
Digital Art and Retouching >
Procedure for eliminating pronounced tan lines?
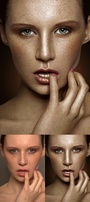
The 1st image in my portfolio is a good example. I'm getting feedback that the tan lines make it a little too real. They are pretty evident. What is the best practice for eliminating (or severely reducing tanlines)? Jul 23 13 08:54 am Link J O H N A L L A N wrote: This is an image that was done specifically to soften and minimize tan lines. Jul 23 13 09:48 am Link For tan lines I use two different techniques, the first is to use the patch tool and then fade the patch until it makes a smooth transition. Second, I will sample the tanned area and paint in the tan line and then fade until it makes a smooth transition and looks natural Jul 23 13 09:58 am Link No need for anything other than curves. Match skin tone and paint in the adjustment with a mask. Jul 23 13 10:53 am Link Jul 23 13 11:53 am Link
Post hidden on Jul 23, 2013 02:29 pm
Reason: other Comments: While helpful, the OP does not wish to have others use his images without permission. Please respect that. Jul 23 13 11:58 am Link Please don't post altered images of mine on the forums. Please remove the pictures from the posts immediately. Although I appreciate your effort - your gimp specific recommendations don't help because I (like most), use Photoshop. Jul 23 13 12:38 pm Link It's luminosity problem. Takes one minute in PS. Just change 147,114,100 to 198,175,169 Jul 23 13 02:13 pm Link Tulack wrote: Well, if I take that simplistic of an approach, I throw off the whole tonal balance of her chest. Jul 23 13 02:24 pm Link You know, there are things called masks. P.S. Took me 43 seconds. I bet you type this post longer. Jul 23 13 02:34 pm Link I usually do a frequency separation, and then dodge/burn. It is a fair way to keep luminosity as well vs. simply sampling color from another portion of the image. good luck Jul 23 13 02:36 pm Link Jas K retouch wrote: Thanks for the link and surprise, the video's by my next door studio neighbor. Jul 23 13 02:45 pm Link J O H N A L L A N wrote: Wow, small world! Jul 23 13 03:30 pm Link i've used the frequency separation technique for tan lines, works great. Jul 23 13 05:51 pm Link Oh, why isn't there a central data base for this kind of thing??? I keep writing same things over and over again.  Oh, well... So you go about this by changing the white point: New curves adjustment layer. Select the layer, not the mask. Select the white point eyedropper tool, double click to go into choosing a default white point, and pick a color in the image that is the tanned part. Confirm that you want to change the default white point. Now click white point eyedropper tool once to choose it, and select the light portion of the skin. Mask as needed. Jul 23 13 09:27 pm Link Jakov Markovic wrote: It can be any point, white, black or midgrey. Or even any color on the curve. Besides, if you going to do it the way you describe, you will need to watch luminosity value and if luminosity of reference and target different you would bring color shift. Jakov Markovic wrote: Why would you do it default? You should not confirm. Say "no" and it would be only for this time. Jakov Markovic wrote: He doesn't know how to use mask. Jul 23 13 10:46 pm Link Since the first photo in your portfolio is relatively easy I would quickly hit the vivid parts of the tan line with the patch tool. Then on a layer, I would adjust the midtones lighter, cover with a mask, and brush through the places I want to lighten. For me, this would be a sketching task with my stylus and pen tablet. Blend to taste. I think this photo does not require anything more complex than a few brush strokes. Other than the line itself, there's not much else to change. Moving light around on my subject and the background is part of my normal editing process anyway. Jul 23 13 11:02 pm Link J O H N A L L A N wrote: A moderator must have beat me to it. I can't even edit the old post anymore. Jul 23 13 11:21 pm Link I find this hard too, especially if the model face the camera and cover her breasts, the tan-lines and normal skin are usually broken up by the arms, making patching, healing and cloning difficult and time-consuming. Is the luminosity-tool really the answer? Remember that you need to end up with a TANNED TONE to the skin in the end, this isn't just simply luminosity, but also a color-shift issue (always imagine that the shot is to be blown up to several feet in dimensions, it needs to be perfect, or else it's trash). I tend to use a mix between healing, clone, color replacement and curves (and I also keep one layer with the skin-texture, to be able to paint that back in the end). Though, it takes (too) much time. Jul 24 13 06:18 am Link Tulack wrote: Jakov Markovic wrote: It can be any point, white, black or midgrey. Or even any color on the curve. Besides, if you going to do it the way you describe, you will need to watch luminosity value and if luminosity of reference and target different you would bring color shift. Jakov Markovic wrote: Why would you do it default? You should not confirm. Say "no" and it would be only for this time. Of course I know how to use masks - what a ridiculous assertion. Jul 24 13 09:16 am Link Ole-Henrik Helin wrote: It doesn't take more than a minute. Jul 24 13 11:33 am Link Joann Empson wrote: The OP has already stated that GIMP specific solutions will not help him, as he is using Photoshop. Jul 24 13 11:42 am Link Good Egg Productions wrote: I don't use the GIMP either. I hope Photoshop catches up in that area soon... Jul 24 13 12:10 pm Link OK, so I've given you the EXACT solution that works on EVERY IMAGE EVERY TIME, and that fixes the color and luminosity at the same time, and you haven't even tried it out. TRY IT, then come back to the topic.  Jul 24 13 06:19 pm Link Tulack wrote: Jakov Markovic wrote: It can be any point, white, black or midgrey. Or even any color on the curve. Besides, if you going to do it the way you describe, you will need to watch luminosity value and if luminosity of reference and target different you would bring color shift. Jakov Markovic wrote: Why would you do it default? You should not confirm. Say "no" and it would be only for this time. No, it can only be the white point, as we're trying to change the exposition, and not change light dynamic within the area. Jul 24 13 06:23 pm Link Jakov Markovic wrote: Masochism does appreciated in certain circles, but you are wrong here. What happened when you take white point. You take 255 255 255 and tell it, to whatever I click should be 198,175,169. What happened when you take black point? You take 0 0 0 and tell it, to whatever I click would be 198,175,169, Same with gray. It doesn't matter what point you take, as long you tell it what it is going to be after you click ok. Jakov Markovic wrote: No, you don't. You don't click on anything. You just plug in your numbers to any point (white, black or gray). If you set it by default, you would need to change it back later, some idiots even asking, what is wrong with there white point. Dude, you set it by default. Open any point, plug in your numbers. Click "no" and after you apply it, it resets to default. Jul 24 13 07:08 pm Link Jakov Markovic wrote: Tried it. One thing I found though is to use opacity, not flow for drawing in the mask (I use flow exclusively for my d&b masks). Using flow just results in these horrible scribbles of brown. I think I need to do more d&b to smooth out the skin (to get it down to primarily two luminosities), before applying this technique, as I sill have some blotchiness. But I think this technique works somewhat. It maybe needs to be combined with something that blurs the edge transition between tanned and untanned skin however. Jul 24 13 07:36 pm Link J O H N A L L A N wrote: You can use mask. Jul 24 13 07:53 pm Link J O H N A L L A N wrote: OMG, that thing you call "smoothing the edge" is MASKING. Jul 24 13 09:25 pm Link Good Egg Productions wrote: The reason I posted is because I'm afraid visitors reading the threads on the site for their own education will get the mistaken impression that Adobe's Photoshop is the only way to do things. Good Egg Productions wrote: GIMP benefits me by providing me with the tools necessary for raster image editing, while respecting my four essential software freedoms. If I did this work with a proprietary program like Adobe's Photoshop, I would have to give up my freedoms. I give back to the GIMP project through donations to the GNOME Foundation, which handles the finances for the project. Jul 24 13 09:31 pm Link Tulack wrote: THERE IS REASON YOU USE A WHITE POINT! You compress the image from the whites, you don't affect the white balance (which is what gray point does), and WHY would you use the black point, when it compresses the blacks??? Maybe if you were trying to lighten something you would do that, but NOT to darken A LIGHT area. Jul 24 13 09:39 pm Link And what was wrong with my technique? Just get curves. Ctrl+Shift+click on desire color. Got the numbers. And then just replace numbers in input output in every color curve. Put mask, paint out and use father in mask properties. We are talking the same thing. I think it takes longer your way. That is it. Jul 24 13 11:17 pm Link I want to thank you all for the confusion. lol... I'm a newB to the masking and reading all of this was confusing at best. And the videos that I have seen were on MAC and I just (probably an idiot move on my part) could not duplicate on CS6 for PC. I have a tan young lady with her breasts that didn't get tan, that I just can't seem to get right. OP I am sure you have figured it out, but wondering if anyone else had any other videos before I pay a retoucher. And I say videos that are 100% step by step... because assuming someone knows how to do the missing "steps" is like... well yeah. Aug 13 13 09:40 am Link |


