Forums > Digital Art and Retouching > blown out window.

Photographer

Select Model Studios

Posts: 818

Tempe, Arizona, US

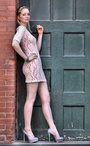
I took a shot earlier. The model is sitting in front of an open window. It was dark in this barn thing we were in, so I have high ISO, had to drag the shutter etc. The model and everything is exposed correctly, but the outside part through the window is completely blown out. It's pure white except a few leafs and whatnot. Any way to fix this? I can post the picture tomorrow if that helps.

Aug 18 13 10:04 pm Link

Photographer

eybdoog

Posts: 2647

New York, New York, US

this depends on how badly the background is blown out. If you shoot in RAW, try saving a copy of the original image, and then take it into Photoshop. In Camera RAW, try under exposing the image with the exposure slider until you see details pop out in the blown out area. If you get anything useful out of it, open the image in Photoshop, and save a copy as a .tif. Open the properly exposed version of the model in the barn, and then copy that layer. Paste it onto the same work space as your other under exposed image, and then mask out the barn area being careful to leave your model and the barn. The result will hopefully have what you are after.

If there is not any detail in the blown out area after attempting to underexpose in camera raw, then unfortunately not much can be done short of bracketing your exposure to take an average of the ambient and interior next time, or simply set up on a tripod and take a shot with proper exposure for outside, and proper exposure for your model and interior to composite. good luck

Aug 18 13 10:19 pm Link

Artist/Painter

Augustine

Posts: 1153

Los Angeles, California, US

Other than invent something or steal it from another shot and comp it in? Probably not.

Aug 18 13 10:24 pm Link

Photographer

mophotoart

Posts: 2118

Wichita, Kansas, US

take 2 shots...expose one with the model, and one with the light, photoshop it..Mo

Aug 18 13 10:24 pm Link

Retoucher

Greg K Retouching

Posts: 407

New Orleans, Louisiana, US

Charlie-CNP wrote:
this depends on how badly the background is blown out. If you shoot in RAW, try saving a copy of the original image, and then take it into Photoshop. In Camera RAW, try under exposing the image with the exposure slider until you see details pop out in the blown out area. If you get anything useful out of it, open the image in Photoshop, and save a copy as a .tif. Open the properly exposed version of the model in the barn, and then copy that layer. Paste it onto the same work space as your other under exposed image, and then mask out the barn area being careful to leave your model and the barn. The result will hopefully have what you are after.

If there is not any detail in the blown out area after attempting to underexpose in camera raw, then unfortunately not much can be done short of bracketing your exposure to take an average of the ambient and interior next time, or simply set up on a tripod and take a shot with proper exposure for outside, and proper exposure for your model and interior to composite. good luck

Instead of having him do more work and add excessive layers, why not just suggest that he quick select/lasso the window and make adjustments with exposure there? Can probably curve it to fit in fairly easy.

Ron, if you want to send me the picture I will see what I can do with it.

Aug 18 13 11:43 pm Link

Photographer

RTE Photography

Posts: 1511

NORTH HOLLYWOOD, California, US

Look at the histogram, if it is all the way to the right in that area, then there is nothing you can do. When you overexpose in digital and go to 255, that is it, everything is lost.

Aug 18 13 11:51 pm Link

Photographer

MC Seoul Photography

Posts: 469

Seoul, Seoul, Korea (South)

Try to market yourself in Korea.. they LOVE blown out windows here.. it's so depressing.

alternatively next time expose for the window and use lights to expose the model.

Aug 19 13 01:00 am Link

Photographer

Kent Art Photography

Posts: 3588

Ashford, England, United Kingdom

mophotoart wrote:
take 2 shots...expose one with the model, and one with the light, photoshop it..Mo

This is actually what I nearly always do, even if I don't use the window shot in the end - and sometimes if I do use it I will white it out a little so it's not too obtrusive.  But that's hindsight for the OP, and doesn't help one bit.

Other than reshooting the window, or another one and fudging it, and adding it in later, I doubt there's anything the OP can do.

Aug 19 13 01:19 am Link

Retoucher

Peano

Posts: 4106

Lynchburg, Virginia, US

ShotbyRon wrote:
I can post the picture tomorrow if that helps.

Yes, please.

Aug 19 13 06:11 am Link

Retoucher

Dragos

Posts: 58

Bucharest, Bucharest, Romania

Charlie-CNP wrote:
If there is not any detail in the blown out area after attempting to underexpose in camera raw...

try Aperture from Apple is much better at exposure. If you don't have Mac or Aperture, send me and I'll try for you.

Aug 19 13 06:26 am Link

Photographer

Studio 12

Posts: 197

Spartanburg, South Carolina, US

The best way to fix this would have been to light your subject with strobes and then balanced the strobe exposure and the ambient outside exposure.........

Aug 19 13 06:43 am Link

Photographer

K E E L I N G

Posts: 39894

Peoria, Illinois, US

Stolen Fate Design wrote:

Instead of having him do more work and add excessive layers, why not just suggest that he quick select/lasso the window and make adjustments with exposure there? Can probably curve it to fit in fairly easy.

Ron, if you want to send me the picture I will see what I can do with it.

Because the jpeg or psd file won't have any info in the blown out window to curve... the info was lost in the conversion from raw... it's just white space.  However if he does it in raw the info is there and underexposing a second version will bring that info back in most cases.

Aug 19 13 06:55 am Link

Photographer

Studio 12

Posts: 197

Spartanburg, South Carolina, US

K E E L I N G wrote:

Because the jpeg or psd file won't have any info in the blown out window to curve... the info was lost in the conversion from raw... it's just white space.  However if he does it in raw the info is there and underexposing a second version will bring that info back in most cases.

My guess would be that even in raw there will not be any information in the window to save.......the dynamic range will just be too great.

Aug 19 13 07:13 am Link

Photographer

K E E L I N G

Posts: 39894

Peoria, Illinois, US

Studio 12 wrote:

My guess would be that even in raw there will not be any information in the window to save.......the dynamic range will just be too great.

In most cases, but in raw there's a better chance.

Aug 19 13 07:18 am Link

Photographer

Marin Photo NYC

Posts: 7348

New York, New York, US

dp

Aug 19 13 07:25 am Link

Photographer

Marin Photo NYC

Posts: 7348

New York, New York, US

mophotoart wrote:
take 2 shots...expose one with the model, and one with the light, photoshop it..Mo

Yep! or HDR, or expose for the window and hit your model with a reflector.

Aug 19 13 07:26 am Link

Photographer

Select Model Studios

Posts: 818

Tempe, Arizona, US

Charlie-CNP wrote:
this depends on how badly the background is blown out. If you shoot in RAW, try saving a copy of the original image, and then take it into Photoshop. In Camera RAW, try under exposing the image with the exposure slider until you see details pop out in the blown out area. If you get anything useful out of it, open the image in Photoshop, and save a copy as a .tif. Open the properly exposed version of the model in the barn, and then copy that layer. Paste it onto the same work space as your other under exposed image, and then mask out the barn area being careful to leave your model and the barn. The result will hopefully have what you are after.

If there is not any detail in the blown out area after attempting to underexpose in camera raw, then unfortunately not much can be done short of bracketing your exposure to take an average of the ambient and interior next time, or simply set up on a tripod and take a shot with proper exposure for outside, and proper exposure for your model and interior to composite. good luck

I will try this thanks.

As far as using a reflector, lighting gear etc. It was a group session, She was one of my last models and I was running out of time. At that point we were just exploring looking for something different. We found a tiny little barn full of junk. Not really enough time to drag all gear over there and not even sure if there was a stable floor to sit it on. We had to climb over things just to get to this spot.

Aug 19 13 07:47 am Link

Artist/Painter

Augustine

Posts: 1153

Los Angeles, California, US

ShotbyRon wrote:
As far as using a reflector, lighting gear etc. It was a group session, She was one of my last models and I was running out of time. At that point we were just exploring looking for something different. We found a tiny little barn full of junk. Not really enough time to drag all gear over there and not even sure if there was a stable floor to sit it on. We had to climb over things just to get to this spot.

Windows into dark spaces also make fantastic off-camera light sources. Pose the model so that at least half of the window is above her face to avoid rising nose shadows.

ShotbyRon wrote:
I can post the picture tomorrow if that helps.

Would like to see it.

Aug 19 13 09:11 am Link

Photographer

Select Model Studios

Posts: 818

Tempe, Arizona, US

https://imageshack.com/a/img4/985/8bxc.jpg

Aug 19 13 10:53 am Link

Photographer

365 Digitals Exposed

Posts: 807

Perris, California, US

Studio 12 wrote:
The best way to fix this would have been to light your subject with strobes and then balanced the strobe exposure and the ambient outside exposure.........

+1

Aug 19 13 11:22 am Link

Photographer

365 Digitals Exposed

Posts: 807

Perris, California, US

If I was you I will change the background, in the window area, and replace it with something more  interesting.  in other words mask out the blown out areas and  add new BG.

Aug 19 13 11:26 am Link

Photographer

E Thompson Photography

Posts: 719

Hyattsville, Maryland, US

What is outside the window that is so important and how would that contribute to the photograph?

Aug 19 13 11:34 am Link

Retoucher

Peano

Posts: 4106

Lynchburg, Virginia, US

You could just patch in some green foliage to cover the blown areas. And maybe also throw a little more light on the model.

https://i1005.photobucket.com/albums/af171/retouch46/Forums/window_zpsf507d50d.gif

Aug 19 13 12:57 pm Link

Model

Williamxzy

Posts: 240

San Francisco, California, US

I don't worry about blown out windows, that is the way the eye sees it. In some cases it adds to the image. Its done in films all the time, its natural.

Aug 19 13 01:53 pm Link

Photographer

365 Digitals Exposed

Posts: 807

Perris, California, US

Peano wrote:
You could just patch in some green foliage to cover the blown areas. And maybe also throw a little more light on the model.

https://i1005.photobucket.com/albums/af171/retouch46/Forums/window_zpsf507d50d.gif

some how what I was trying to say, nice job.

Aug 19 13 06:17 pm Link

Photographer

Brian T Rickey

Posts: 4008

Saint Louis, Missouri, US

I would leave it like it is rather than going with an edit that looks unnatural.

Aug 19 13 09:54 pm Link

Retoucher

Peano

Posts: 4106

Lynchburg, Virginia, US

Brian T Rickey wrote:
I would leave it like it is rather than going with an edit that looks unnatural.

Done carefully on a high-res image, it won't look unnatural. My post was just a quick illustration using a 750px image.

Aug 20 13 06:50 am Link

Photographer

Loki Studio

Posts: 3523

Royal Oak, Michigan, US

I would just edit out the truck tire in the background and leave the rest as is.

Aug 20 13 07:04 am Link

Photographer

ChanStudio - OtherSide

Posts: 5403

Alpharetta, Georgia, US

And here I thought some don't care about DR.. smile

Expose the background and then use strobe to balance out the dark areas.  (i.e. underexpose the scene so that the bright areas are exposed correctly and then use strobes to brighten up the dark areas).

  If it was me, I would use light meter to read the correct exposure of the background (and probably leave it about 1 f-stop over expose) and then use strobes to expose the dark areas to match the background.

Aug 20 13 07:06 am Link