Photographer

F-1 Photo

Posts: 1164

New York, New York, US

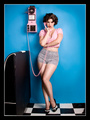
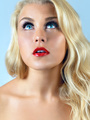
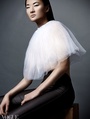
I am not totally incompetent when it comes to basic retouching but there are some very basic things and techniques that seem to elude me.

So, please keep any help offered in basic terms that I can hopefully understand. I've tried searching google for what I'm trying to do but had no luck. I'm sure I'm not describing it right.

So! How you you get this look? The blue tones and feel without an overall blue cast?

Here are some samples - 18+
https://www.modelmayhem.com/portfolio/pic/2985387

https://www.modelmayhem.com/portfolio/pic/3654844

https://www.modelmayhem.com/portfolio/pic/34039496

https://www.modelmayhem.com/portfolio/pic/21457669

https://www.modelmayhem.com/portfolio/pic/36135317

I realize they are all slightly different but I've always loved the cool tones and alabaster skin. I always tend to stay on the warm side so this is very different for me to get a handle on.

Thanks!

Jun 28 14 03:02 pm Link

Photographer

International2014

Posts: 97

Ashburn, Virginia, US

Looks good, only thing I can comment on is the 3rd image, the face seems to be OOF and needs some retouch to get blemishes/stretch marks to a minimum on legs.

Jun 28 14 05:41 pm Link

Photographer

RINALDI

Posts: 2870

Eindhoven, Noord-Brabant, Netherlands

You are correct about using "cool" tones when you mean the blue in the images. I had to Google "alabaster" and it gave me pages about stones/gems and minerals, so you might could choose to use "pale" skin instead wink

Jun 28 14 05:49 pm Link

Model

Alabaster Crowley

Posts: 8283

Tucson, Arizona, US

RINALDI wrote:
You are correct about using "cool" tones when you mean the blue in the images. I had to Google "alabaster" and it gave me pages about stones/gems and minerals, so you might could choose to use "pale" skin instead wink

Alabaster is a fine term for skin indeed.

Jun 28 14 06:21 pm Link

Photographer

Tulack

Posts: 836

Albuquerque, New Mexico, US

Just add blue to shadows.

Jun 28 14 06:47 pm Link

Photographer

F-1 Photo

Posts: 1164

New York, New York, US

International2014 wrote:
Looks good, only thing I can comment on is the 3rd image, the face seems to be OOF and needs some retouch to get blemishes/stretch marks to a minimum on legs.

They aren't mine so I'm not seeking a critique, especially not in the retouchers forum.

I'm looking for hints on how to achieve the effect.

I know it is done in post; I've seen other shots in one or two if the series that had a natural look. So, that rules out gels and lighting. In fact, I've used gels and such to try and get this look to no avail.

Jun 28 14 07:24 pm Link

Photographer

F-1 Photo

Posts: 1164

New York, New York, US

Tulack wrote:
Just add blue to shadows.

Thanks for the tip. I think it is more than that though. I've actually tried adding blue to certain layers and different blend modes but I just keep making a mess.

Jun 28 14 07:28 pm Link

Photographer

Thinking Inside The Box

Posts: 311

Diamond Bar, California, US

Tulack wrote:
Just add blue to shadows.

Wouldn't give the white sheets such a blue tint.

OP: Color temperature.

Since the photographer of some of them has been getting that 'look' since before digital, a basic trick is likely the solution: use a tungsten white balance in daylight, or a tungsten film.

Add an 85 or 81 color filter equivalent in your postproduction tool to either of the first 3 images and notice how it makes the skin tones pretty close to 'normal'. To make a normal image look that cool, simply pick a low K color balance: 3000-4000K.

Jun 28 14 08:32 pm Link

Photographer

FBusch

Posts: 8

Würzburg, Bavaria, Germany

Start with a very raw conversion by setting it on a blueish mood. Try using the selective color tool to get rid of the yellow and the red in the skin without getting the skin grey you can also play heere with the contrast so that the image doesn't look to flaw. When i would use a color mask in lightning mode to set the final mood

Jun 28 14 10:45 pm Link

Retoucher

Natalia_Taffarel

Posts: 7665

Buenos Aires, Buenos Aires, Argentina

Thinking Inside The Box wrote:

Wouldn't give the white sheets such a blue tint.

Yes it would.

All the images have the blue lifted on the left and dropped on the right (light) to compensate.

That's pretty much it

Jun 29 14 05:29 am Link

Retoucher

Tincture

Posts: 126

New York, New York, US

Thinking Inside The Box wrote:
OP: Color temperature.

Since the photographer of some of them has been getting that 'look' since before digital, a basic trick is likely the solution: use a tungsten white balance in daylight, or a tungsten film.

Add an 85 or 81 color filter equivalent in your postproduction tool to either of the first 3 images and notice how it makes the skin tones pretty close to 'normal'. To make a normal image look that cool, simply pick a low K color balance: 3000-4000K.

I agree with this.  You could probably process these at a lower color temperature, 2000 - 2800 Kelvin.  You'll start out much closer to your desired look.

Jun 29 14 01:29 pm Link

Photographer

Tulack

Posts: 836

Albuquerque, New Mexico, US

Thinking Inside The Box wrote:
Wouldn't give the white sheets such a blue tint.

Look for yourself.

https://fbcdn-sphotos-h-a.akamaihd.net/hphotos-ak-xfp1/t1.0-9/10462861_1442052802721433_562328136104084858_n.jpg

F-1 Photo wrote:

Thanks for the tip. I think it is more than that though. I've actually tried adding blue to certain layers and different blend modes but I just keep making a mess.

There is no blending modes or anything advanced. Just basic curves.

Jun 29 14 04:54 pm Link

Photographer

Mask Photo

Posts: 1453

Fremont, California, US

F-1 Photo wrote:
So! How you you get this look?

They're all MM photographers. Why not ask them about their processing?

Jul 05 14 09:25 pm Link