|
Forums >
Photography Talk >
Retouching skin
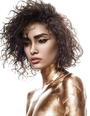
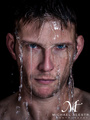
Hi. I'm new. I want to learn to retouch skin. I heal brush away when it's a few spots, and that works just fine, but what about when it's an allover uneven texture and blotchy? I'm a fan of smooth, perfect. Almost unnatural. I know most people hate that, but what I hate is when people say they preserve skin texture, but what it really looks like is that they ADDED texture and you can see every pore. Like I said, I'm new, so go easy on me. I want to learn, but don't expect me to pick up some complicated thing right away. (And this sounds complicated.) I know there's probably infinity YouTube and other tutorials out there, but I want to make this discussion-based. FYI, I have Photoshop CS6. Jul 07 14 03:08 pm Link Frequency Separation in Photoshop. It'll change the way you work completely! http://www.youtube.com/watch?v=dMyaeZmkZD8 Jul 07 14 03:16 pm Link Alabaster Crowley wrote: have you considered the retouching forum? Jul 07 14 03:19 pm Link L A U B E N H E I M E R wrote: No. Jul 07 14 03:19 pm Link MichaelClements wrote: I hear a lot about this. I have zero idea what it is. I'll watch this when I'm able to hear sound (sleeping boy in room). Thanks. Jul 07 14 03:20 pm Link I do a lot of skin retouching and it is important to preserve texture and pores and all that. Blurring anything is out right bad in my opinion and makes the images look fake. Cloning and healing is a great start but about 99 percent of getting amazing skin in retouching is dodging and burning. Hours of it. I think my profile image took me like 5 hours to edit or something like that, others have taken me up to 8 (beauty images though fashion stuff is far more forgiving thankfully). The other technique I use is Frequency Separation but that is only used to clean up pores but I honestly don't know of a video that applies it exactly the way I do (a lot of them use it to blend the skin and I don't like that) but if you watch a tutorial and just use it for cleaning up pores that should work fine Anyways I'm pretty sure Natalia Taffarel has a short tutorial on D&B techniques which is really what you need, it's super basic but like drawing/painting it just takes a while to get good at and naturally you have to be patient enough to spend some time on it. I used to have a short tutorial myself but I think I erased it accidentally, I could make something up if you would like to see how I retouch and can't find any good videos out there. Jul 07 14 03:22 pm Link Laura Bello wrote: Hm. Isn't dodging and burning just brightening/darkening? How does that change texture or color? Jul 07 14 03:28 pm Link Alabaster Crowley wrote: Texture is just a light and dark spot next to each other, so D&B wil do what you are talking about. Sometimes people do a band pass technique, similar to freq sep but not the same. Jul 07 14 03:36 pm Link Alabaster Crowley wrote: Basically because a lot of the problems with peoples skin isn't the actual texture it's the evenness of it. Even if you get rid of all of a models blemish the skin can still be splotchy and uneven even on the best models so you lighten or darken the skin to make it more even toned. Jul 07 14 03:40 pm Link There’s good texture (pores) and bad texture (blemishes and overly large pores). I shoot in RAW, and my first step in skin retouching is done in ACR with the Spot Removal tool, which I use to remove the most obvious blemishes. I know this isn't what the tool is designed for, but it works for me (and a few other photographers I know). In theory it's not much different than the Spot Healing brush (which I don't like and don't use) in PS. I size the "brush" to cover the blemish plus a little unblemished skin at the margins. Center the brush over the blemish and click. The tool picks a nearby patch of skin with similar texture and "clones” it. The B key toggles the tool off and on in ACR. After clicking on a blemish, I hit the B key to see how well the skin texture (and color) matches the area around it. Occasionally the tool selects an area that's very close to an eyebrow, shadow, etc. If I don't like the patch of skin that the tool selected, I hit B again and move the green circle (the area being cloned from). After that, I do most of the skin work in PS with the Healing (not Spot Healing) brush. That’s where most of the skin work takes place. Be sure that Hardness is set to zero. Otherwise you’ll inadvertently blur the texture. As someone noted, Frequency Separation basically separates the color and texture so you can work on them separately. You can even out the color without affecting the texture, and you can work on the texture with the Healing brush without affecting the color. I don’t add texture to photos. However, I often sharpen to bring out the texture that’s already there. The last photo I retouched, which was shot with a beauty dish as the main light, had “too much” texture, and the texture was “too sharp” – even though I masked the skin out when I sharpened the image. That’s something that I haven’t encountered often. I’ll have to go back and de-emphasize the texture. Jul 07 14 04:59 pm Link Lots and lots of practice! You can know the method but without practice - it won't work. Jul 07 14 05:11 pm Link Image from start to end (click on images to enlarge)  Paramount-1 by FullMetalPhotographer, on Flickr  Post Proscessing by FullMetalPhotographer, on Flickr final image  HelenOchoaRaw Burn dodge by FullMetalPhotographer, on Flickr Jul 07 14 05:44 pm Link Golly, this does seem like a lot of work. Jul 07 14 07:47 pm Link Alabaster Crowley wrote: It takes practice a basic edit like one above takes about 15min. Jul 07 14 10:02 pm Link Alabaster Crowley wrote: Honestly retouching takes me longer than the shoot when it comes to beauty images. It's why retouchers can end up being paid more than the photographers on certain images. Jul 08 14 05:07 am Link makeup helps a whole lot too. Jul 08 14 06:09 am Link Michael Alestra wrote:
Jul 08 14 01:40 pm Link Alabaster Crowley wrote: Believe me this process is the biggest pain in the ass you could ever imagine! No single solution works for every skin type, there is no magic brush (i wish!) that will give you that beautiful airbrushed look, and the retouching each image using FS takes forever, layer, after layer, after layer, and on and on and fucking on! Jul 08 14 04:37 pm Link Laura Bello wrote: Yep this...! Jul 08 14 04:39 pm Link Most clients don't have the budget to pay for 5 hours of retouching. There's no way for the average photographer to sustain that level of commitment unless you're working on a commercial ad campaign, and then you'd farm it out to an agency anyway. So… for most photographers it makes little sense to invest time in perfecting these practices - the trick is to getting work that looks good enough, with retouching that feels transparent or non existent, at under 30 minutes per photo. Honestly, 90% of good retouching is: casting the right model, using the right light, shooting at the right FOV, and having a solid MUA on set - not building a workflow around a mentality of needing hours to "perfect" a photo. If you do this, you're more a retoucher with a camera than you are a photographer. Jul 09 14 07:29 am Link First choice would be getting the make up right while shooting  Frequency separation technique works fine. There is a Phlearn tutorial which deals with this topic in detail and they have a free action available for download. Portraiture by imagenomic is another very good filter plugin which comes handy. Jul 17 14 02:00 am Link Well - if you don't like so natural skin and hours of dodge&burn try this photoshop plugin(or something similar): https://www.imagenomic.com/pt.aspx Jul 17 14 07:25 am Link Jim Lafferty wrote: Totally agree Jul 17 14 07:36 am Link I would recommend a graphics tablet. You can find great tutorials from retouchers like Gry Garness http://www.grygarness.com Natalia Taffarel http://nataliataffarel.tumblr.com https://www.modelmayhem.com/1298955 Julia Kuzmenko http://www.juliakuzmenko.com https://www.modelmayhem.com/711429 and others online http://phlearn.com Good luck! Jul 17 14 06:38 pm Link |