|
Forums >
Digital Art and Retouching >
Editorial Retouch From Start To Finish Tutorials
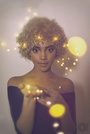
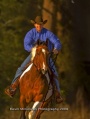
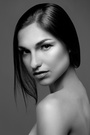
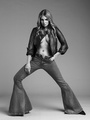
Hey, Guys. People always ask me about different things and tutorials so I decided to make a series of tutorial and try to answer some of these questions. Seeing how there are tutorials that show various techniques but are typically an individual tutorial on to itself I wanted to try to provide a series of tutorials that have some structure to them and are connected to one another, but individually cover various topis as well. I'm still recording them. Currently at episode 10, so you can ask questions about the topic I'm covering and along the way and I will try to incorporate them in the future episodes. Unless they are about a totally different topic off course. That would have to be a more individual tutorial perhaps. This is one of the images that is being featured in the series: Before:  After:  photographer: Marc Beckermann models: Leon Nieuwoudt & Katerina Giannoglou retouching: Krunoslav Stifter If you want to take a look, here are the links to all the episodes so far. Cheers! Editorial Retouch From Start To Finish, Part 1 - Series overview http://youtu.be/eylH7O0DB-g Editorial Retouch From Start To Finish, Part 2 - Analyzing the refernece images http://youtu.be/GUQ4mehwyb8 Editorial Retouch From Start To Finish, Part 3 - Camera raw and smart objects workflow https://www.youtube.com/watch?v=E8nTNcDWvyg Editorial Retouch From Start To Finish, Part 4 - Photoshop workflow overview http://youtu.be/6G160TyaCGc Editorial Retouch From Start To Finish, Part 5 - Masking and selective adjustments https://www.youtube.com/watch?v=nn-SUG7IE38 Editorial Retouch From Start To Finish, Part 6 - Clean up tips & tricks https://www.youtube.com/watch?v=sOrr1-XkD9o Editorial Retouch From Start To Finish, Part 7 - Dodging and Burning https://www.youtube.com/watch?v=KLYE5I_-4tE Editorial Retouch From Start To Finish, Part 8 - Putting it all together http://youtu.be/jc9W5CCfbK8?list=PLGg0M … aEPdElsb8t Editorial Retouch From Start To Finish, Part 9 - Matching the color in camera raw and Photoshop https://www.youtube.com/watch?v=pc4Iy2OWebo Editorial Retouch From Start To Finish, Part 10 - Develop flexible workflow https://www.youtube.com/watch?v=Y6fd9rk3FOw Editorial Retouch From Start To Finish, Part 11 - Sharpening, File types and Color Management https://www.youtube.com/watch?v=vZ925_wRxF8 Editorial Retouch From Start To Finish, Part 12 - Lightroom and Photoshop Workflow https://www.youtube.com/watch?v=6ZLkMqNZU1Y Editorial Retouch From Start To Finish, Part 13 - Capture One Pro and Photoshop Workflow https://www.youtube.com/watch?v=U5cCnz2AdgM Oct 29 14 04:57 pm Link WOW, Christmas came early this year, Thank you for all your hard work and dedication to passing on your knowledge! Oct 29 14 05:32 pm Link Digital Joint wrote: Haha, indeed. Thank you. Oct 29 14 05:43 pm Link that's some awesome work you did there. thx a lot. I'm a beginner so this is really great for me. Oct 30 14 01:50 am Link You are a MASTER. Thank you!  Oct 30 14 03:51 am Link Thanks Guys. Here is the latest episode: Part 11 of Editorial Retouch From Start To Finish series is uploaded. Cheers! I think you will like this one. Retouching of this Editorial is coming to a close and we need to finish up so here is final overview and tips and tricks from sharpening that I do, file types and color management. And like always, adapt what is useful, reject what is useless, and add what is uniquely your own. https://www.youtube.com/watch?v=vZ925_w … t&index=13 Nov 01 14 04:37 am Link Thanks! Nov 01 14 08:23 am Link Very kind and generous of you, thank you Nov 01 14 08:50 am Link Why would you take the grains of sand from the male model's body? And why would you take every single tussle of hair from the female model's hair? The are on a BEACH. You took the things that made the image "real" and eliminated them. Nov 01 14 10:21 am Link Imageri by Tim Davis wrote: Unsolicited critique! Not allowed here!! Nov 01 14 11:38 am Link You are really nice person. THANK YOU! Nov 01 14 04:01 pm Link Thanks everyone. Appreciate the support. Imageri by Tim Davis wrote: I explain that in the videos. If I'm not mistaken, Part 10 is about that very same image. But don't forget this is meant primary as educational material, so in certain times I would remove or add things for the sake of demonstration, and I explain when I do why I did it. People asked me how would I remove the sand, so when I removed it it was partly to explain how. It made more sense to be part of the same series, than to try to find a completely different image and try to show it there. Also removing the sand is showing how to remove something else in the image, since the principle is the same. I used the editorial series, to give structure to the tutorials but also something I can use to explain a particular topic in each episode. If you watch the videos you will also see why I made the choices I did. Nov 01 14 04:17 pm Link Chuckarelei wrote: It wasn't a critique, but an observation. Besides it's knowledge I already know. Nov 01 14 05:43 pm Link Lol, anyone heard of Dunning Kruger syndrome? Thanks Krunoslav, very generous of you....again. Nov 02 14 07:16 am Link Thank you Nov 02 14 09:53 am Link Thanks a lot for sharing. Merry Christmas:) Eric Nov 02 14 12:52 pm Link Thanks a lot eric. Nov 02 14 01:16 pm Link Oh great! There goes my Sunday  Nov 02 14 02:59 pm Link Exactly what I've been struggling/ frustrated with. Thanks so much! Nov 02 14 04:00 pm Link love it. Thanks Nov 03 14 08:36 am Link Quality/useful information for free, that is fantastic! Your generosity is big as your skills!! Thanks you!!! Nov 03 14 08:55 pm Link This is fabulous, the gals checkbones are flawless !! Nov 06 14 10:13 pm Link Kronoslav, I like your tutorials. Thanks Nov 07 14 04:40 am Link Great tutorials! Thank you! Nov 07 14 04:48 am Link that's fantastic! thanks for sharing! Nov 07 14 09:53 am Link Thank you everyone. New episode is now online. In this one we are going to do something a little different. I will show you my workflow using Lightroom and Photoshop. Hope you find something useful and as always, adapt what is useful, reject what is useless, and add what is uniquely your own. photographer: Marc Beckermann models: Leon Nieuwoudt & Katerina Giannoglou Editorial Retouch From Start To Finish, Part 12 - Lightroom and Photoshop Workflow https://www.youtube.com/watch?v=6ZLkMqNZU1Y Nov 07 14 08:25 pm Link Thanks for you work. quick question, is there a simple way to access camera raw from lightroom? Nov 07 14 10:30 pm Link Jean Renard Photography wrote: Depends on what you mean by simple way, hehe? As you can see in that last tutorial, you can open the image from Lightroom as smart object inside Photoshop and than use smart object to access camera raw. Other than that, there is no need. Develop module in Lightroom is essentially Camera Raw. Nov 07 14 10:47 pm Link I am trying to establish a smart workflow for a lot of diverse images. The controls in both interfaces are slightly different and wondered why one would use one or the other. I see how to open the image as a smart object. Until I watched your tutorial I had never used that. I do not use photoshop very much but increasingly am being forced to. The Gucci stuff that I shot ages ago achieved all the stuff you go into with a simple polarizing filter, highlights were with reflectors (scrim jim) or foil and gaffer tape for specular highlights, there was no real retouching in any of the images, but that was film and now digital is a totally different animal. Thank you, I am on part 5 Nov 07 14 11:13 pm Link Jean Renard Photography wrote: For at least some of the reasons why would I use Lightroom over Camera Raw in the last episode (part 12) I cover that in much more detail and you can probably watch it independently of the other parts, so you might want to check that out. Nov 07 14 11:22 pm Link Thank you for these videos! I am slowly but surely looking at every one, and my retouching has already improved as a result. Nov 08 14 01:27 am Link Retouching by Ryan wrote: Thank you Ryan, I'm glad to you are also benefiting from them. Nov 08 14 01:50 am Link Part 13 of Editorial Retouch From Start To Finish series is uploaded. Cheers! Capture One Pro is a professional raw converter with some very powerful features and in this video I will be covering a workflow using Capture One and Photoshop. https://www.youtube.com/watch?v=U5cCnz2AdgM Nov 17 14 02:12 pm Link Okay.. this is Bookmarked.. Thanks!!! Nov 17 14 06:56 pm Link Thank you so much! Nov 19 14 04:07 pm Link You are AWESOME! You deserve many kudos! Nov 19 14 07:16 pm Link hi Krunoslav, thanx a lot for your awesome tut. keep going !!! I am at part 4 and would like to notice you a thing related to composition more than retouch where I wouldn't dare to argue with you !! My eyes are bothered both by the horizon line (almost) cutting the model's left shoulder, and the foam forming a flat line with the left knee. I don't think you would find this on a gucci ad. these kind of lines are avoided in painting or drawing for example. This is not a criticism of your work and once again thank you for all this ! regards. hugo. Dec 14 14 01:36 pm Link Krunoslav Stifter wrote: As much as I like C1 and use it sessions and catalogs do my head in, your explanation is clearer that Phase One C1 tutorials. Dec 14 14 02:44 pm Link |