|
Forums >
Digital Art and Retouching >
Dodge & Burn, Blending Modes, & Painting w/ Light.
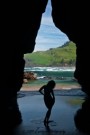
Bob Randall Photography wrote: I am stuck here... I have a CMYK image. Aug 25 07 11:20 am Link great thread, WG some ideas well worth looking at in here. i have never really liked the dodge and burn tools. i have done lots of work on some images by selecting areas and feathering by an amount that does not distort the belend with the surrounding aread and then apply curves and levels, sometimes a little brightness/contrast instead of using the D/B tools. this tends to not alter colors (except the brightness/contrast thing) here is an example that started as a very flat image which took a lot of work to get into the look of the actual scene  Aug 25 07 11:20 am Link Soft Light Dodging and Burning This is spelled out in detail in one of Russel Brown's photoshop tutorials. http://russellbrown.com/tips_tech.html You will find tips and tricks for every level of PS user. Enjoy Aug 25 07 11:27 am Link Beautiful photo!! Aug 25 07 11:27 am Link IMagus Digital Fine Art wrote: My thoughts exactly. Learning PS for me has been from a portrait photographers viewpoint. Dodge and burn on a global basis is frowned upon because of what it can do to colors. I've been more than happy using a curves adjustment to deal with contrast, et al. Aug 25 07 11:50 am Link Bob Randall Photography wrote: Jedediah Speer wrote: Under Color Removal... it is a style of separation based on the old analog method of making seps from original film or prints. Go to the upper level menu in PS "edit/color settings". A small sub menu pops up. Click on "working spaces/CMYK" and drag to "custom". Another pop up menu appears. Check the radio button for "UCR" Type in as low a number as you like for Black ink limit and any number you like for "total ink limit" (under 300 produces questionable results) You have just "generated a custom black channel. Click OK and close out the menus. Jedediah Speer wrote: Take an RGB file and change it's mode to CMYK. You have just made a UCR separation with a black channel at the percentage you typed in on the custom CMYK menu. Click to the channels pallet; in default on CS# it is next to the layers pallet. Click on the black channel to view your work. Pretty thin looking black channel, right? Type command M to bring up a curve and drag the shadow slider until you have a channel looking the way you want it. You shouldn't have to drag the highlight slider to brighten the white area because there is typically no detail in that area on a black channel this thin. You can use this channel to apply image, make a shadow mask, paint through, as a mask in calculations or any thing you can think to use it for. You will find it is much smoother and more detailed than making a magic wand or color range selection. Aug 25 07 12:11 pm Link nevermind mind, Bob beat me. http://en.wikipedia.org/wiki/Under_color_removal and might as well have a look at what GCR does if interested. http://en.wikipedia.org/wiki/Gray_component_replacement Aug 25 07 12:15 pm Link Jeanloup wrote: Put it back, you explained something I missed regarding how UCR works. Aug 25 07 12:26 pm Link Bob Randall Photography wrote: You know what might be interesting... Who uses hard mix and linear burn and pin light and linear light and difference and exclusion and how do they use them. I have never found a reason to use pin light or hard mix in anything. I've use exclusion and difference to make masks. I've seen artists use difference to check if layers are justified properly. Aug 25 07 07:28 pm Link W.G., your mission should you choose to accept it is to learn all this shit to the point you could explain it to a 3rd grader(a dumb one at that) and then come over and show me one day. Otherwise, I'm afraid my head is going to explode reading this stuff(even though I am interested in knowing it). Aug 25 07 08:54 pm Link Frank Mattoni wrote: Bob Randall Photography wrote: You know what might be interesting... Who uses hard mix and linear burn and pin light and linear light and difference and exclusion and how do they use them. I have never found a reason to use pin light or hard mix in anything. I've use exclusion and difference to make masks. I've seen artists use difference to check if layers are justified properly. Yeah, that's the common use for it. But what other creative uses does it have? Aug 26 07 11:06 am Link EL PIC wrote: Lol @ "But too many models this day Dodge and Burn Photographers !!" Aug 26 07 11:15 am Link I sometimes use the history brush set to multiply on a snapshot for burning but for some reason resort to the clone tool on lighten mode for dodging. It's not as screwy on the colors as the dodge and burn tools. Aug 26 07 11:30 am Link My avatar. When I shot that image, the zone system I had in mind and I applied it. I did this because of the small latitude in digital. But I also used this for my vision of what I wanted before the image was taken. I didn't want to go the HDR because I wanted to keep everything on one image vs multiple images put together. Dodge and burn was used. And I chose to alter some of the colors to add to and compliment the mood and make some colors less distracting to give it a balance. Aug 26 07 11:31 am Link Sounds great - I need to get photoshop  Aug 26 07 11:37 am Link I don't know if anyone picks up on it when viewing my work, but dodge and burn is a major player in how I process an image. To me it can make areas of the picture appear to move forward or backward. When you think about it, these tools are naturally inherent to photography, and since I'm old skool in my training, and photography is the recording of light, it just seems to make sense even though I'm no photoshop wizard. Aug 26 07 11:40 am Link For dodging and burning I typically use a curves layer for each and paint on as needed. I'm curious, though, if there are benefits to using the other techniques I've described in this thread over curves layers. For more creative processing I tend to make a channel mixer layer for a color to which I want to add something resembling an interior glow, and then paint that layer on in either overlay, soft light or hardlight. Typically this works best for red: channel mixer, monochrome mode, 100% red, one of the above-mentioned mix modes (whichever looks best for the particular image - generally overlay and hard light tend to give similar, contrasty results with hard light preserving less saturation; while soft light gives a, well, softer effect), and paint onto the red region I want to add that "glow" to. It's what I did here, both with her red cloth and her skin tones:  For other colors use the appropriate mix of monochrome channels, though as I mentioned the effect is never as successful as with red, for some reason (anyone hazard a guess why?). Something else I tend to do is mix down a gradient layer, usually in overlay or multiply mode - though with the latter, you usually have to increase the brightness with a curves layer (which increases overall contrast because you're creating tonal gaps - not always a bad thing). The net effect is to add a subtle (or sometimes not-so) overall color cast to the image which gradually changes from top to bottom (or side-to-side, but I've never done it that way, for some reason), and which reinforces the overall "chromatic integrity" (for lack of a better term) of the image. That's what I did here:  Further, some additional tweaking by way of additional gradient layers and individual color curves sometimes results in an effect which duplicates the color- and contrast-quality of the thick, cheap paper pulp prevalent in magazines in the 70's and 80's. It's what I grew up with, so I imagine that's why I might find this pleasing to the eye. For the color curves I generally crank the blue curve up towards more yellow at the high end and more blue at the lower end, and repeat with the red channel, more red up top and more cyan down blow - simple S curves in both cases (also applied to the above image). Aug 26 07 11:51 am Link KingPaul wrote: I'm old school too. I don't do anything with photoshop that I can't do in an analog fashion. My background in prepress and retouch is pretty extensive, so I have a lot of analog tricks, but I do try to stay within the confines of analog process. It makes me feel traditional in some weird way. Aug 26 07 11:53 am Link Obsidian Blade wrote: Is the net effect of this treatment, lighter but desaturated highlights in the red areas, such as the scarf? Aug 26 07 11:58 am Link Bob Randall Photography wrote: Yes. Aug 26 07 11:59 am Link Obsidian Blade wrote: Very cool new trick, thanks! Aug 26 07 12:02 pm Link Bob Randall Photography wrote: You're more than welcome. I'm honored that I could add to your bag! Aug 26 07 12:05 pm Link Are there classes just for photoshop or is it easier than what I'm expecting? Being broke sucks - anyone have a spare cd of photoshop  Aug 26 07 12:10 pm Link CynTay wrote: I'll give you PS lessons in return for nude modeling or sex. You choose! Whatever you decide, don't tell your husband or my wife, let's keep it between the two of us. Aug 26 07 12:16 pm Link Bob Randall Photography wrote: That's not new. You can go into your 'hue and sat' menu and individually select each color that is there. But mayhaps it's new to you. So I have to take that into consideration. Aug 26 07 03:55 pm Link Legacys 7 wrote: You are behaving like rain on a parade day. What's with all the one upsmanship stuff? Aug 26 07 04:00 pm Link Bob Randall Photography wrote: Guys like you who really know their shit are kinda intimidating to insecure youth, Bob. The smart ones handle their insecurities by trying to learn, and the dumb ones handle their insecurities by trying to hump the couch leg so they can brag about the size of the stain they leave. Which do you think is going on here? Aug 26 07 04:06 pm Link Marcus J. Ranum wrote: Marcus you are too cool for words, you're like the Jack Nicholson of photography! Aug 26 07 04:10 pm Link Obsidian Blade wrote: I've heard people refer to "interior glow" before, but I don't understand what it means. Are you referring to the kind of airbrushed-looking highlights look? Aug 26 07 04:17 pm Link Bob Randall Photography wrote: You are paranoid as usual. Stop being so damn sensitive here. You claim other are sensitive and yet fail to acknowledge your own. I am not attacking you. If you read what I had stated. I pointed out that it's not new, but then again when I think about it, it's new to you. 'I didn't take that inconsideration.' That was my way of correcting myself. Aug 26 07 04:37 pm Link Marcus J. Ranum wrote: Too much assumption on your part. Unless I state that I'm old or young, never assume nor assume that I'm intimidated. I don't have time for that nor am I insecure. Your boy just got too excited and misread what I pointed out. I'm sure that he's 'grown' enough not to need a co-signer. So stop humping his leg. I don't think he likes the idea of having your jock stain on his leg. Aug 26 07 04:39 pm Link W.G. Rowland wrote: Duplicate layers help a lot when doing these techniques....Have you trying dodging and burning that way. I over lay my layers like I used to oil paint. Aug 26 07 04:43 pm Link am I the only one who is messing with Calculations to make selections? Aug 26 07 06:32 pm Link ok...but this thread shouldnt die...was just trying some stuff I remember from here and cool...so here everybody.... you know the techniques...bump for the fun  Aug 27 07 01:39 am Link Aug 27 07 02:23 pm Link Ok Let keep it running then. Can somebody breakdown this one for me. What blending I can use to get this same final result on a picture. (I looks like kind of a painting) Image by Optical Blasphemy  Aug 27 07 02:24 pm Link EL PIC wrote: Classic twist to your comment. Lovely. :>) Aug 27 07 02:30 pm Link 3R GraphX wrote: Seems like a grunge or dirty canvas texture on top of the image with Overlay or Soft Light as blending mode at low opacity ( they seem to have kept a little color from the texure ). Aug 27 07 04:10 pm Link Obsidian Blade wrote: That's similar to what I did to get my skin tones on my pink avatar. I think red channel works better on skin 'cause there is more red in skin, so it lightens it more. Aug 27 07 06:36 pm Link bump Sep 13 07 12:45 am Link |