This thread was locked on 2009-06-02 12:09:16

Photographer
Taryn True
Posts: 1875
Union City, New Jersey, US
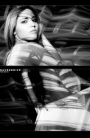
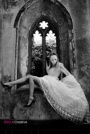
edit: YO PEOPLE! I TOOK THIS PICTURE WITH ONE LIGHT AGAINST MY APARTMENT WALL FOR FUN WITH A FRIEND WHO STAYED OVER. DON'T GET YOUR PANTIES OUTTA WHACK ABOUT MY LIGHTING SETUP, I DIDN'T EVEN ASK FOR HELP WITH THAT BECAUSE I KNOW IT WASN'T SET UP THE WAY IT SHOULD BE. STOP WITH YOUR UNSOLICITED CRITIQUES USED TO ONLY MAKE YOURSELVES LOOK LIKE YOU MIGHT KNOW SOMETHING BY BOASTING ABOUT YOUR [POOR] LIGHTING SKILLS. ![https://modelmayhm-9.vo.llnwd.net/d1/photos/090519/21/4a138500dcdc1_m.jpg]() I did this for fun last night. See the various patches of different skin tone degrees (light orange to a darker red) There's even some greyish/blue left in the crease of her eye near her nose. How do I even that out to be purely one nice color? Channels, Hue/Sat, Replace Color, Curves, Levels?

Photographer
Photons 2 Pixels Images
Posts: 17011
Berwick, Pennsylvania, US
My first thought would be overlay with empty layers and use a low opacity brush to paint in the tones you want. I'm guessing here, but I'd think a soft light blend mode might work for you.
A trick I use when doing things like this is to use the smudge tool around the edges so they blend in a bit better....not so sharp. But whatever works for you.
I can't think of how else I'd do it. Hopefully someone with more experience can tell you.

Photographer
Timothy
Posts: 1618
Madison, Wisconsin, US
TarilynQuinn wrote:
Channels, Hue/Sat, Replace Color, Curves, Levels? Yes.
Any of those would work. I generally use hue/sat. and a PS photo filter layer for skin tones.
-------
www.th-photo.net

Photographer
nwprophoto
Posts: 15005
Tonasket, Washington, US

Open the image with several different exposures & WB then mask to blend.
Photographer
Andrew Thomas Evans
Posts: 24079
Minneapolis, Minnesota, US
airbrush, dodge/burn, color layer, rubber stamp, clone stamp, blur (if you wanted to go here).
A bunch of different ways.

Photographer
Sean Baker Photo
Posts: 8044
San Antonio, Texas, US
A Solid Color adjustment layer set to hue / sat / color of your preferred skin tone is another option not yet mentioned. Start with it masked away and bring it back where you feel it needs it.
Editing (healing, cloning, patching, blurring) of the H&S layers in HSB mode is another option for directly evening the colors.
For that matter, you could select color for the skin tones, surface blur the bejeesus out of it, and set it to hue / sat / color blend mode.
FWIW, in all cases you're also going to want to level the lightness / brightness / luminosity to keep it looking 'right'.
Beautiful image, btw.
Photographer
Taryn True
Posts: 1875
Union City, New Jersey, US
nwprophoto wrote:
Open the image with several different exposures & WB then mask to blend. sweet
Photographer
R A V E N D R I V E
Posts: 15867
New York, New York, US
ooohh this makes me want to manip now. wish I had some models 'on call'
Photographer
Andrew Thomas Evans
Posts: 24079
Minneapolis, Minnesota, US
Sean Baker wrote:
A Solid Color adjustment layer set to hue / sat / color of your preferred skin tone is another option not yet mentioned. Start with it masked away and bring it back where you feel it needs it. I haven't done this in a while, but couldn't a person go into LAB and dodge/burn the L channel (or set a luminocity layer and work on that), then above it use a color layer to get the hue all the same?

Photographer
A_Nova_Photography
Posts: 8652
Winston-Salem, North Carolina, US
Hue/Saturation adjustment layer... Use the eye dropper tool to chose the color, the +/- eye droppers, plus the brackets to isolate the color and adjust to your liking... If you're going to work on reds there's a good chance you're going to end up with multiple adjustments (reds2, reds2, etc...) A good way to really see what color and hue you are affecting is to temporarily push the hue slider all the way to the left and adjust the brackets to isolate the patches... Sounds confusing, but once you get the hang of it you can fix blotchy skin very quickly... Although you may end up masking lips and other parts you don't want to change...
Photographer
Sean Baker Photo
Posts: 8044
San Antonio, Texas, US
Andrew Thomas Designs wrote:
I haven't done this in a while, but couldn't a person go into LAB and dodge/burn the L channel (or set a luminocity layer and work on that), then above it use a color layer to get the hue all the same? You should be able to, at least as well as I understand it. I'm terrible with the 'true' D&B tools, so I won't say it's absolutely the case  . I would expect the only difficultly to be in making sure the saturation works with the resulting lum, though another Solid Color layer (sat) or a sat mask could probably solve that. . I would expect the only difficultly to be in making sure the saturation works with the resulting lum, though another Solid Color layer (sat) or a sat mask could probably solve that.

Photographer
Philipe
Posts: 5302
Pomona, California, US
TarilynQuinn wrote:
![https://modelmayhm-9.vo.llnwd.net/d1/photos/090519/21/4a138500dcdc1_m.jpg]()
I did this for fun last night. See the various patches of different skin tone degrees (light orange to a darker red) There's even some greyish/blue left in the crease of her eye near her nose.
How do I even that out to be purely one nice color?
Channels, Hue/Sat, Replace Color, Curves, Levels? Every one is talking about photoshop..
But one has mentioned that there is a hot spot on her face..
Things like adjusting it in photoshop can be avoided with proper make up and lighting..
Adjust your lighting, even trying to adjust the skin tone when the face is blown out..
Won't get the same effect as with good lighting to start with..
Remember photoshop only photoshops what you give it...
You have to have a good picture to start with...
Photographer
Taryn True
Posts: 1875
Union City, New Jersey, US
Philipe wrote:
Every one is talking about photoshop..
But one has mentioned that there is a hot spot on her face..
Things like adjusting it in photoshop can be avoided with proper make up and lighting..
Adjust your lighting, even trying to adjust the skin tone when the face is blown out..
Won't get the same effect as with good lighting to start with..
Remember photoshop only photoshops what you give it...
You have to have a good picture to start with... well as stated before, i shot this for fun on my apartment wall. i wasnt asking about the hotspot, i was asking about the red/orange/grey.
Photographer
Sentimental-SINtimental
Posts: 1314
Longview, Washington, US
Thought the name was familiar... didn't know you were on MM... we don't know each other personally, but I've always admired your work. I used to live across the bridge from ya in Newark.... glad to see you still hard at work.
Retoucher
Vega Retouching
Posts: 260
MILILANI, Hawaii, US
this need to be done in the beginning change the mode to from rgb to lab then with the selection tool select the area that you wanna blend (remember just the area) then in the channel blur the A and B Channel that should get you started off.
Photographer
KevinMichaelReed
Posts: 1554
New York, New York, US
Philipe wrote:
Every one is talking about photoshop..
But one has mentioned that there is a hot spot on her face..
Things like adjusting it in photoshop can be avoided with proper make up and lighting..
Adjust your lighting, even trying to adjust the skin tone when the face is blown out..
Won't get the same effect as with good lighting to start with..
Remember photoshop only photoshops what you give it...
You have to have a good picture to start with... I actually like the hot spot. Flat skin is ugly and boring.
Photographer
Saadiq Photography
Posts: 1368
Los Angeles, California, US
Philipe wrote:
Things like adjusting it in photoshop can be avoided with proper make up and lighting..
Adjust your lighting, even trying to adjust the skin tone when the face is blown out..
Won't get the same effect as with good lighting to start with..
Remember photoshop only photoshops what you give it...
You have to have a good picture to start with... KevinMichaelReed wrote:
I actually like the hot spot. Flat skin is ugly and boring. x2
Good MUA + Good Model(skin) + Correct lighting + Creative Vision = Great Images
Photographer
Taryn True
Posts: 1875
Union City, New Jersey, US
Vega Retouching wrote:
this need to be done in the beginning change the mode to from rgb to lab then with the selection tool select the area that you wanna blend (remember just the area) then in the channel blur the A and B Channel that should get you started off. thank you!

Photographer
Robert Randall
Posts: 13890
Chicago, Illinois, US
Philipe wrote:
Every one is talking about photoshop..
But one has mentioned that there is a hot spot on her face..
Things like adjusting it in photoshop can be avoided with proper make up and lighting..
Adjust your lighting, even trying to adjust the skin tone when the face is blown out..
Won't get the same effect as with good lighting to start with..
Remember photoshop only photoshops what you give it...
You have to have a good picture to start with... Everytime I see an unsolicited attack, I go check out the portfolio of the head case that did the attacking. Almost all of the time, I come up with the same question; Have you looked at your own work before making such a stupid comment? Would you like me to point to all the boys and girls where you didn't heed your own advice? Of course you wouldn't, you didn't ask for a critique, and neither did the OP.
OP, I have time to burn later today. If you like, I can work up a layer file and show you some fixes that haven't been mentioned yet. Do you have a larger version of the file that you can crop just the face for me to work on? That is, if you would like me to, I don't mean to presume.
Photographer
Bliss Creative
Posts: 97
London, England, United Kingdom
Lightroom 2 has a soft skin brush, very useful, in fact it's an amazing piece of software

Photographer
Emily Fine
Posts: 1681
Baltimore, Maryland, US
Philipe wrote:
Every one is talking about photoshop..
But one has mentioned that there is a hot spot on her face..
Things like adjusting it in photoshop can be avoided with proper make up and lighting..
Adjust your lighting, even trying to adjust the skin tone when the face is blown out..
Won't get the same effect as with good lighting to start with..
Remember photoshop only photoshops what you give it...
You have to have a good picture to start with... Some people like whites and blacks sometimes in their images. And some people even like highlights and shadows, too!
Seriously, this person needs advice on the skin tone, not an attack.
Photographer
Robert Randall
Posts: 13890
Chicago, Illinois, US
SAADIQ PHOTOGRAPHY wrote:
Philipe wrote:
Things like adjusting it in photoshop can be avoided with proper make up and lighting..
Adjust your lighting, even trying to adjust the skin tone when the face is blown out..
Won't get the same effect as with good lighting to start with..
Remember photoshop only photoshops what you give it...
You have to have a good picture to start with... x2
Good MUA + Good Model(skin) + Correct lighting + Creative Vision = Great Images Your formula works for one very narrow application, yours. Take your stupid X2 and hide it where your thought came from, then try to answer the op's question.
Kevin, if you're watching, will you please start giving these people some vacation time. They're ruining what could be a very valuable asset.
Photographer
LeDeux Art
Posts: 50123
San Ramon, California, US
TarilynQuinn wrote:
![https://modelmayhm-9.vo.llnwd.net/d1/photos/090519/21/4a138500dcdc1_m.jpg]()
I did this for fun last night. See the various patches of different skin tone degrees (light orange to a darker red) There's even some greyish/blue left in the crease of her eye near her nose.
How do I even that out to be purely one nice color?
Channels, Hue/Sat, Replace Color, Curves, Levels? by lighting the subject corectly in the first place is a great place to start
Photographer
LeDeux Art
Posts: 50123
San Ramon, California, US
its all about the lighting, im pretty sure thats the best way to even the skin out, light it corectly in the first place
Photographer
WIP
Posts: 15973
Cheltenham, England, United Kingdom
It's easier to row with the current than against it.
Start with a good model/MUA/skin tones/lighting ect. Make life so much easier. Then you can concentrate on the effects.
Photographer
LeDeux Art
Posts: 50123
San Ramon, California, US
Robert Randall wrote:
Your formula works for one very narrow application, yours. Take your stupid X2 and hide it where your thought came from, then try to answer the op's question.
Kevin, if you're watching, will you please start giving these people some vacation time. They're ruining what could be a very valuable asset. thats a decent formula that works for a very broad aplication, mine! feel me, dog.
Photographer
Robert Randall
Posts: 13890
Chicago, Illinois, US
LeDeux Art wrote:
by lighting the subject corectly in the first place is a great place to start When last I saw you, you lit everything you did with an on camera flash using an automatic setting. Is that what you are referring to as correct lighting?
Photographer
LeDeux Art
Posts: 50123
San Ramon, California, US
Robert Randall wrote:
When last I saw you, you lit everything you did with an on camera flash using an automatic setting. Is that what you are referring to as correct lighting? mr pop up flash, having shot 3 months and being very honest about it, remembeber bob, it was you that wanted to meet me, not the other way around
Photographer
Jerry Nemeth
Posts: 33355
Dearborn, Michigan, US
Robert Randall wrote:
When last I saw you, you lit everything you did with an on camera flash using an automatic setting. Is that what you are referring to as correct lighting? 
Photographer
LeDeux Art
Posts: 50123
San Ramon, California, US
Robert Randall wrote:
When last I saw you, you lit everything you did with an on camera flash using an automatic setting. Is that what you are referring to as correct lighting? there were no automatic settings, by the way, ive always used manual settings, so you got that part wrong, you taught me somthing and it wasnt about lighting
Photographer
LeDeux Art
Posts: 50123
San Ramon, California, US
Jerry Nemeth wrote:
whats your trip, you got somthing to say , do i even know you
Photographer
Robert Randall
Posts: 13890
Chicago, Illinois, US
LeDeux Art wrote:
thats a decent formula that works for a very broad aplication, mine! feel me, dog. The op asked how to do something in photoshop, he did not ask what a bunch of unqualified weekend warriors thought about his lighting. If you actually knew how to use that formula, someone besides an MM glam shooter might pay more attention to you.
Photographer
LeDeux Art
Posts: 50123
San Ramon, California, US
Robert Randall wrote:
The op asked how to do something in photoshop, he did not ask what a bunch of unqualified weekend warriors thought about his lighting. If you actually knew how to use that formula, someone besides an MM glam shooter might pay more attention to you. and my opinion was, it starts with the lighting, not the make up, not the skin, but with the lighting. my answer is the correct answer, whats your trip anyways
Photographer
Robert Randall
Posts: 13890
Chicago, Illinois, US
People, quit with the critiques and either answer the guys question or stay away.
Photographer
WIP
Posts: 15973
Cheltenham, England, United Kingdom
Robert Randall wrote:
People, quit with the critiques and either answer the guys question or stay away. Then could you put up an example of a before and after image to answer the op's question.
It will save a lot of time on speculation.
Photographer
Robert Randall
Posts: 13890
Chicago, Illinois, US
c_h_r_i_s wrote:
Then could you put up an example of a before and after image to answer the op's question.
It will save a lot of time on speculation. If you read above you will note I asked for a file and permission to work it. When done, I will upload a layered file everyone can download, including ledeux, if he can figure out how to click the link.
Photographer
LeDeux Art
Posts: 50123
San Ramon, California, US
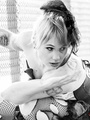
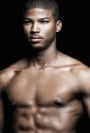
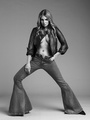
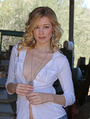
a demonstration lighting set up no. 1 ![https://modelmayhm-8.vo.llnwd.net/d1/photos/090509/07/4a0593d91d980_m.jpg]() lighting set up no. 2 ![https://modelmayhm-4.vo.llnwd.net/d1/photos/090602/05/4a251f53d0a1d_m.jpg]() same model, same skin, same make up but by switching places with the subject, you can see how it is lighting that changed this image.
Photographer
Robert Randall
Posts: 13890
Chicago, Illinois, US
LeDeux Art wrote:
and my opinion was, it starts with the lighting, not the make up, not the skin, but with the lighting. my answer is the correct answer, whats your trip anyways My trip, as you seem fond of asking, is that this is a digital forum and the op asked for a digital solution. My return trip is that you, of all people to suggest lighting is the answer, gives me pause.
Photographer
WIP
Posts: 15973
Cheltenham, England, United Kingdom
Robert Randall wrote:
If you read above you will note I asked for a file and permission to work it. When done, I will upload a layered file everyone can download, including ledeux, if he can figure out how to click the link. I need to keep in touch with this forum as I almost totally rely on lighting...Call me old fashioned.
Photographer
Robert Randall
Posts: 13890
Chicago, Illinois, US
LeDeux Art wrote:
a demonstration
lighting set up no. 1
![https://modelmayhm-8.vo.llnwd.net/d1/photos/090509/07/4a0593d91d980_m.jpg]()
lighting set up no. 2
![https://modelmayhm-4.vo.llnwd.net/d1/photos/090602/05/4a251f53d0a1d_m.jpg]()
same model, same skin, same make up but by switching places with the subject, you can see how it is lighting that changed this image. I am speechless, and I think everyone will agree I need say no more.
|


 . I would expect the only difficultly to be in making sure the saturation works with the resulting lum, though another Solid Color layer (sat) or a sat mask could probably solve that.