Forums > Digital Art and Retouching > I challenge you Andrew Chorley

Photographer

Gibson Photo Art

Posts: 7990

Phoenix, Arizona, US

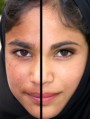
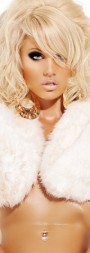
I challenge you to retouch this image:
http://www.sxc.hu/photo/1183984
Thank you Liannelaan for such a great image. http://www.sxc.hu/profile/Liannelaan

Rules:
-Only Photoshop or PS Elements allowed. No TP plugins.
-Image should be a max of 800 pixels on the long side
-Posters to this thread will decide who wins the contest
-Keep PSD available if someone calls shenanigans. smile
-You have two days to do your retouch and post up. I get 24 hours.

You can decline if you like. Post up if you accept.

Let's have some fun. smile

Edit to add photographer credit.

May 30 09 01:15 pm Link

Photographer

Andrew77uk

Posts: 320

Salisbury, England, United Kingdom

I accept, even before I looked at the photo  wink

May 30 09 01:23 pm Link

Photographer

Liz Caldwell

Posts: 287

Riverside, California, US

Ding Ding! Round 1 has begun. 

I'll be taking bets in the back room tongue

May 30 09 02:41 pm Link

Photographer

Gibson Photo Art

Posts: 7990

Phoenix, Arizona, US

https://i427.photobucket.com/albums/pp357/GibsonPhotoArt/MMBR1053009.jpg

Edit one! Very tough edit for me. I have the hardest time with patchy skin. I never seem to get it perfect. No blurs used!

May 30 09 08:01 pm Link

Photographer

Andrew77uk

Posts: 320

Salisbury, England, United Kingdom

May 31 09 01:53 am Link

Photographer

SuperCrash1

Posts: 171

West Hollywood, California, US

https://img.photobucket.com/albums/v607/overhyp3d09/sb_attempt.jpg

I wanted to play too. Full size file available.

May 31 09 04:47 am Link

Retoucher

Melissa Little

Posts: 348

Port Macquarie, New South Wales, Australia

Out of these 3 I like Stephen Bradford's the best, the eyes are not over done and the skin doesn't look overly or underly shopped. smile Good job all

May 31 09 05:25 am Link

Photographer

Kenneth Rodriguez Photo

Posts: 5

Manhattan, Kansas, US

Tough I'm a photographer I also do my own photoshop editing. heres something simple. I've found out that people actually love to see themselves as sketches...

https://farm4.static.flickr.com/3329/3581604960_1946fb8138_o.jpg

May 31 09 05:39 am Link

Photographer

Vamp Boudoir

Posts: 11446

Florence, South Carolina, US

Stephen 1st place (disqualified for late entry)
Gibson 1st place
Bradford 2nd place

May 31 09 05:45 am Link

Photographer

B and G Photo

Posts: 280

Vancouver, British Columbia, Canada

May 31 09 05:58 am Link

Photographer

Gibson Photo Art

Posts: 7990

Phoenix, Arizona, US

Alright. Now we get to learn from each other.

Here is the PSD file at 800 pixels: www.gibsonphotoart/download/MM/MMBR053009.psd

Any suggestions on how to do this better? The red tone in the cheeks was extremely tough to deal with and required a lot of work. It's still not perfect though.

I intentionally selected this image because of the redness and the hair in the face. With the hair normal blurring techniques are not going to work very well.

My masking was also very loose and no work in the actual channels. Which is odd for me. I knew I should have fixed the nose! I went back and forth on it, but decided to leave it.

May 31 09 08:41 am Link

Photographer

Robert Randall

Posts: 13890

Chicago, Illinois, US

Gibson Photo Art wrote:
Alright. Now we get to learn from each other.

Here is the PSD file at 800 pixels: www.gibsonphotoart/download/MM/MMBR053009.psd

Any suggestions on how to do this better? The red tone in the cheeks was extremely tough to deal with and required a lot of work. It's still not perfect though.

I intentionally selected this image because of the redness and the hair in the face. With the hair normal blurring techniques are not going to work very well.

My masking was also very loose and no work in the actual channels. Which is odd for me. I knew I should have fixed the nose! I went back and forth on it, but decided to leave it.

A fairly quick way around this is to swap channels. Ask for a duplicate layer, find the channel with the least amount of problems, and apply that channel into the channels that have the most problems. Put the layer in color mode and adjust the color with the HS layer tool, until it matches the surrounding areas. Mask out what you don't need, this usually gets you very close.

Edit.. for some reason I'm either blocked out from the links provided or I have to join a web site, so I can't access the images to show what I'm talking about.

May 31 09 09:05 am Link

Retoucher

StaciC

Posts: 3128

Swansea, Illinois, US

link page can't be displayed for me either tongue

May 31 09 09:33 am Link

Photographer

SuperCrash1

Posts: 171

West Hollywood, California, US

The red tone in the cheeks was extremely tough to deal with and required a lot of work. It's still not perfect though.


The blotchy red cheeks can be managed in almost one move, if you briefly convert the file to CMYK, mask the skin and then use selective color. In the pull down menu go to the Magentas and then greatly reduce them while also adding yellow. It takes the blotchy pink out almost immediately.

May 31 09 10:12 am Link

Photographer

fm_photographie

Posts: 85

Los Angeles, California, US

Can you guys do another challenge? I just caught this thread and was too late to submit anything..

sad

May 31 09 10:33 am Link

Photographer

Gibson Photo Art

Posts: 7990

Phoenix, Arizona, US

Check your PMs Bob.

May 31 09 10:35 am Link

Photographer

Gibson Photo Art

Posts: 7990

Phoenix, Arizona, US

fm_photographie wrote:
Can you guys do another challenge? I just caught this thread and was too late to submit anything..

sad

The challenges are only for two people at a time. You can challenge anyone in another thread that you choose. I would recommend contacting the person to see if they are interested before you issue a public challenge though.

Most important thing is to make this fun and something we can all learn from. No bitching!

May 31 09 10:37 am Link

Photographer

Robert Randall

Posts: 13890

Chicago, Illinois, US

This link should download a zip file, let me know if it doesn't work. Its a layered file that shows the results of channel swapping. The entire exercise took less than two minutes, and I wasn't interested in minutia or skill, I just wanted you to see how quickly you can make a correction and how effective it can be.

http://www.robert-randall.com/MM/Gibson … rs.psd.zip

May 31 09 10:58 am Link

Photographer

toan thai photography

Posts: 697

Montgomery Village, Maryland, US

Robert Randall wrote:
This link should download a zip file, let me know if it doesn't work. Its a layered file that shows the results of channel swapping. The entire exercise took less than two minutes, and I wasn't interested in minutia or skill, I just wanted you to see how quickly you can make a correction and how effective it can be.

http://www.robert-randall.com/MM/Gibson … rs.psd.zip

very nice, bob. i like it a lot!

May 31 09 11:13 am Link

Photographer

Andrew77uk

Posts: 320

Salisbury, England, United Kingdom

I'll play again smile

May 31 09 11:14 am Link

Retoucher

Glamour Retouch

Posts: 900

Columbia, South Carolina, US

SCRetouching wrote:
link page can't be displayed for me either tongue

Same here.....

May 31 09 11:14 am Link

Retoucher

Glamour Retouch

Posts: 900

Columbia, South Carolina, US

Robert Randall wrote:
This link should download a zip file, let me know if it doesn't work. Its a layered file that shows the results of channel swapping. The entire exercise took less than two minutes, and I wasn't interested in minutia or skill, I just wanted you to see how quickly you can make a correction and how effective it can be.

http://www.robert-randall.com/MM/Gibson … rs.psd.zip

Good job Bob

May 31 09 11:15 am Link

Photographer

Marcus SMF

Posts: 434

New York, New York, US

Robert Randall wrote:
This link should download a zip file, let me know if it doesn't work. Its a layered file that shows the results of channel swapping. The entire exercise took less than two minutes, and I wasn't interested in minutia or skill, I just wanted you to see how quickly you can make a correction and how effective it can be.

http://www.robert-randall.com/MM/Gibson … rs.psd.zip

Thank you! That was helpful to see.

May 31 09 11:19 am Link

Model

Deleteddeleted

Posts: 727

Englishtown, New Jersey, US

Just my 2 cents and for what ever it's worth, I LOVE coming here to see all of your work! I find it fascinating:)
This new forum has been LONG over do !

May 31 09 11:22 am Link

Photographer

Andrew77uk

Posts: 320

Salisbury, England, United Kingdom

K2AM Photography wrote:

Thank you! That was helpful to see.

Very helpful!

May 31 09 11:55 am Link

Photographer

Gibson Photo Art

Posts: 7990

Phoenix, Arizona, US

Stephen Bradford wrote:
The red tone in the cheeks was extremely tough to deal with and required a lot of work. It's still not perfect though.


The blotchy red cheeks can be managed in almost one move, if you briefly convert the file to CMYK, mask the skin and then use selective color. In the pull down menu go to the Magentas and then greatly reduce them while also adding yellow. It takes the blotchy pink out almost immediately.

Whoa. That's pretty slick.

I have to play around with Bob's method as well.

May 31 09 12:38 pm Link

Photographer

Gibson Photo Art

Posts: 7990

Phoenix, Arizona, US

Robert Randall wrote:
This link should download a zip file, let me know if it doesn't work. Its a layered file that shows the results of channel swapping. The entire exercise took less than two minutes, and I wasn't interested in minutia or skill, I just wanted you to see how quickly you can make a correction and how effective it can be.

http://www.robert-randall.com/MM/Gibson … rs.psd.zip

Wow again. That's pretty amazing. Took seconds to do and really worked well. In all the books and tutorials I have been through I have never seen this. I must have missed that chapter somewhere. sad

May 31 09 01:06 pm Link

Photographer

Gibson Photo Art

Posts: 7990

Phoenix, Arizona, US

https://i427.photobucket.com/albums/pp357/GibsonPhotoArt/MMBR053009-1bob.jpg

Here is a reedit using the method Bob mentioned. I have to say that is amazing. I tinkered with for only 5-10 mins and the results are far superior to me trying to remove the redness by hand. I spent two hours doing it too.

I so knew this would be worth it! I just cut my workflow to 10% of what it was yesterday!

Someone needs to start another battle soon. We can't let this fall into the abyss of lost MM threads.

May 31 09 01:37 pm Link