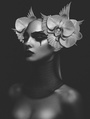
 Please Read All The Rules before continuing. What is this thread about? This is a thread to help people recognize and become aware of what is good retouching vs bad retouching., To that end, we hope to further peoples' knowledge of how to retouch in a way they view as good, by learning from those members who share their retouching efforts here. To facilitate this, Do not post your own images, there are raw files for people to download and participate with in the Raw files for Retouching Discussion thread. These are provided so that they can be freely discussed and people can alter and work on the same images to show their interpretation and variations. Feel free to download them and participate in this thread. Also, if you would like to donate an image, read that page and the rules, and feel free to donate to the moderators and we will add it to that thread. Rules for this thread This thread has a slightly different ruleset for critiques than most other industry forums. Only in this thread can you critique peoples retouching (and only their retouching) for an example and explanation of what that means view this thread. https://www.modelmayhem.com/po.php?thre … st10266317 In this thread you may discuss what is being offered up in terms of what post production was done, how it was done and why it was done. By participating and offering up a retouched version of one of the available images you are agreeing to be complimented or criticized on your retouching work and reasoning for it, and you are also expected to offer up some of the techniques you used to create the retouched image. Small layered psd's would be great, but are not required. Critique Post-Production Only Critiques are limited to post-production only. No critiques beyond that are permitted. You may NOT critique models, images, photographers, lighting, makeup, styling, location, or other aspects of the image. When commenting, act as though the image was presented to be finished after-the-fact, where no reshoot is possible; you only have the supplied image(s). For an added explanation of that read this: https://www.modelmayhem.com/po.php?thre … st10266317[ Critique Submitted Images Only Other images of a poster are NOT free targets. Do Not Use Your Own Files To avoid copyright and likeness issues, use only the original images provided in the Raw Files for Retouching thread. Posts using other images are subject to being hidden. If you would like a critique of your retouching on one of your own files, please use the Critique forum. (Or submit the original file to the pool of Raw Files for Retouching, and grant use of it according to the rules there.) Do Not Bash This thread is not a venue to bash retouching. If you are to be critical of work, you are fully expected to be constructive and offer advice and or reasoning for your critique. Its not that hard. (See the example thread cited earlier.) If that isn't clear, feel free to ask questions before your critique something no open for critique. Posts that fail to follow the rules are subject to being hidden and possible briggings. Be Civil and Constructive In this discussion, it must first be civil! it will be highly moderated and uncivil attacks or critiques with no merit will not be tolerated. That does not mean critiques must be positive, but they must be constructive. Do Not Post Large Files Keep embedded examples to no wider than 800 pixels. Links to larger files are encouraged, however, as are close-ups of pertinent sections of an image. Images wider than 800 pixels are subject to having that post hidden. In Summary By posting in this thread you agree to: 1) having the work you post here complimented, criticized, questioned, discussed and debated and 2) discuss what you did and the steps you took to get there. If that is not acceptable, just do not post your version of image in the thread. Jul 06 09 07:13 am Link Below are two examples of what kind of critiques and discussion is and is not allowed. Above here and below is a link to a long explanation with several examples and reasoning and logic, please read it to familiarize yourself with what is acceptable. https://www.modelmayhem.com/po.php?thre … st10266317 Thanks. Jul 06 09 07:13 am Link as an example of an allowed critique,: The image looks a tad too dark and oversaturated, plus it seems like you used too much blur to just blur the skin or maybe you just ran a noise reduction on it at a high setting, or even used a median filter at a very high setting, and then over contrasted the image and erased all the blurred area but the skin, it left it without any texture, looking somewhat fake or at the least out of focus, but then the eyes, lips and hair appear over sharpened making it impossibly not to notice that it has been retouched. Perhaps it would be better to use the healing brush and clone tool to fix blemishes on the skin, and tone down the skin tone and contrast to one that is less yellow and less overall contrast. Also the eyes have been brightened more than they should appear. in regards to the image that follows. A Not allowed critique: The model has really bad skin, it would have been better to shoot a model with better skin and a nicer looking face, and maybe eyes that are less sunken in. Also that lighting did nothing to help accentuate the face structure or eliminate the bad skin. You would have been better off using another model and lighting with an umbrella and a reflector for fill. Poorly retouched image:  and a better retouched version can be seen here for a comparison. http://www.stepheneastwood.com/mm/rtf/1 … warmok.jpg Jul 06 09 07:13 am Link reserved Jul 06 09 07:13 am Link reserved Jul 06 09 07:18 am Link Just in case... Jul 06 09 11:43 am Link Hello. What's the difference between this thread (Retouching Review) and the other one (Retouch Critiques)? Jul 06 09 12:05 pm Link CS Toledo wrote: the critique one is to post any image of the person posting, this one has specific images (hopefully more will be donated) you can use to show what different people can do with a common image (that has been an issue if you post your own and do not allow others to alter it) this allows for people to work on the same image, show what and how and discuss what is good and or bad about various post production techniques. It allows for direct comparison and then direct discussion and critiques of the post work involved so that people can learn what to and or not to do based on what they prefer. Jul 06 09 12:21 pm Link Just to clarify, we can use the images with the girl with flowers on her head from the other thread right? The link up top there. Jul 06 09 12:39 pm Link Touched by Yolie wrote: https://www.modelmayhem.com/po.php?thread_id=469168 Jul 06 09 12:47 pm Link
Post hidden on Jul 06, 2009 01:14 pm
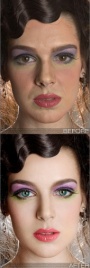
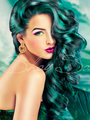
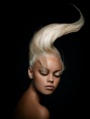
Reason: not helpful Jul 06 09 12:50 pm Link right, I understand we have to use them sample provided I just want to make sure I have the right sample. I'm not wanting to use it or anything I actually would like to know what I could do to improve my skills and if I have to do work on that file first to get it I'm ok with that  Jul 06 09 12:53 pm Link I have some old files that I am not using for anything that I can submit for people to retouch. - Phen Jul 06 09 12:56 pm Link I didn't see this in the post so I will ask. Can we set a size limit so the thread doesn't go all weird when the page loads? Say no more the 800 horizontal? Jul 06 09 01:00 pm Link Gibson Photo Art wrote: you missed it! Jul 06 09 01:10 pm Link Gibson Photo Art wrote: it is there. Jul 06 09 01:15 pm Link MasPhen wrote: PM or cam the mods and we will add them. Jul 06 09 01:15 pm Link Andrew Thomas Designs wrote: lol. Yes I did. I should try not to read these long posts from my phone. Jul 06 09 01:20 pm Link I guess I will submit an edit. Original: http://www.stepheneastwood.com/mm/rtf/p … as_001.jpg Edit:  Process: >General edit- fix skin, add contrast to specific areas (eyebrows, eyes,etc,) whiten teeth. >Color Range to select green, and hue sat to add a fall colors. (shot in the fall but Louisiana has no real fall) >Curves for color correcting purposes > Hair Highlights Fixed . Selected surrounding color used a brush set to color blend mode, then painted the highlights to remove color cast. > Burn over lit bench bar (bottom right) > Darken areas around face via luminosity layer and brush tool set to a low opacity < Liquefy the corners of the head (not needed but I did it anyway) > Sharpen via unsharp mask and I painted out any excess areas that my threshold might have missed. > Add Grain - (new layer filled with middle gray,set to soft light) then filt>noise>addnoise (set to color Gaussian very low amount) then I blur the layer very slightly. To make a low iso film grain, though there are many ways of making grain. That's about it, I think. - Phen Jul 06 09 03:04 pm Link EDITED: Added original image for comparison. OK...This sounds like a thread I can learn something from so I will be the first to step in front of the bus with one of Stephen's images. Original Image  Retouched Image  Jul 06 09 05:18 pm Link Here is one of Mr Eastwoods pics. Let me know what you guys think Before http://i31.tinypic.com/347hair.jpg After http://i25.tinypic.com/21nio82.jp Jul 06 09 06:44 pm Link Sorry, DWolff, you aren't the first. Not even the second. I posted one of his in the previous thread but there were shenanigans going on, so I guess a new thread was started. Anyway, here is (was) my attempt at a retouch of one of Mr. Eastwood's images.... Original...  Here is what I did: 1. Sharpened the eyes just a bit along with a slight capture sharpen. 2. Spatial separation for tone/detail. I worked on the tones and got rid of the light on her left cheek. Then worked on the details for skin imperfections. I tried to keep the skin texture intact as much as I could. 3. Ran it through some curves and Shadows/Highlights (yes I use Shadows/Highlights but sparingly.) 4. Worked on her eyes to add just a bit of color for more contrast to make them pop out a little more. 5. Added that damned beauty dish catchlight. Thought about removing it, then figured how can I learn how to do it if I remove it. 6. Resized and sharpened for web output. And again, I tried to add a beauty dish catchlight to her eyes but I'm not happy with the results. I left it in so that can be discussed along with other aspects. I really enjoy working on eyes so would appreciate any help there. Here it is....  Fullsize version: http://www.model-citizens.com/Photoshop/2H1X6962_HR.jpg Small size RGB/8 PSD: http://www.model-citizens.com/Photoshop/2H1X6962A.psd Edit: For disclosure, the PSD file linked here is not my full workflow. I flatten a couple times during my editing process. Otherwise, my PSD files would be near 1 GB each. I don't have the disk space for that. And Mr Eastwood, if you need/want any images to add to the cache, I have a lot I wouldn't mind making available. If you'd like to preview them to make sure they are OK for this thread, I can make those available. Granted, I'm not a very experienced photographer, but I'm also not concerned with others copying/using the images. Jul 06 09 06:46 pm Link pwphotography wrote: I like what you did. The skin looks great and the colors overall look great! Jul 06 09 09:57 pm Link   My process may be a little weird compared to most, but here it goes. First I mess with the lighting and white balance. Then I fixed any blemishes. The hair on the face bigged me so I selected the other half of her face then copied to a new layer, played with warp a little to get it where I needed it on the other side of the face. Then I blended to my own liking. I then did 3 layers of coloring a warm, a green, and a yellow. Then I fixed eye color and makeup. Everything I did I only used the clone stamp, healing brush, dodge and burn, liquify, and just normal coloring. No filters or processes I've been trying to really take time on skin lately. Hopefully I'm getting better  I'll check back when I get home b/c this computer at work isn't calibrated so what I see may not be what everyone else sees lol. Edit* Yeah the color is off...I'll fix it a little later. Jul 07 09 02:02 am Link DWolff Photography wrote: Thanks. I was so wrapped up in the D&B that I forgot about the stray hair. I was'nt really focusing on that lol Jul 07 09 05:20 am Link I will throw up a quick one as well.  full size http://stepheneastwood.com/mm/rtf/_ED18687.jpg Stephen Eastwood http://www.PhotographersPortfolio.com Jul 07 09 10:56 am Link StephenEastwood wrote: Hmmmmmmm...so many questions I want to ask along the lines of how did you do that? Jul 07 09 05:38 pm Link Here's me trying out for the big leagues:  -Used the clone tool to remove acne. -Removed the high level of red from skin tone using "Selective Color" filter -Tried to match makeup with her head gear by hand painting on new layer with "Color" blending. Jul 07 09 06:15 pm Link   process in lightroom color process again in photoshop clean skin with healing brush and clone stamp liquify tool to alter hairline, eyebrows, face shape, eye shape, lips, chin, and direction of hair basic carving [50% gray layer, overlay, dodge + burn midtones 14%] duplicate base layer, high pass, soft light, 11% opacity. Jul 08 09 05:51 am Link ^^^^Bananas! Nice Job!!! Jul 08 09 01:06 pm Link DWolff Photography wrote: haha ditto. Jul 08 09 01:16 pm Link StephenEastwood wrote: Hey Stephen, I noticed you added texture to areas of her face in your quick retouch. What kind of texture is that? Looks kind of like fine grained orange peel. Jul 08 09 01:41 pm Link Here's my go at this one...  Higher-res version here. I used the spot healing brush (and regular healing brush), clone stamp, some masked-in brighten-y curves layers, masked in smart sharpen on the eyes, and a solid color layer in color blending mode on the lips. And, to be honest, lots of other stuff that I can't remember. Oh! Dust & scratches, yes, to try to tighten up the pores a bit. Jul 08 09 07:38 pm Link MasPhen wrote: Hi, Phen. Jul 10 09 07:10 am Link pwphotography wrote: I see you cleaned up the skin some. Is there anything else you did? What did you do to clean up the skin? It looks pretty good from what I can see. Jul 10 09 07:13 am Link Touched by Yolie wrote: I kinda like the color as-is. It's different. Jul 10 09 07:19 am Link Eastfist wrote: How did you bring out the color in her eyes like that? Did you paint the color in or use some adjustments? Jul 10 09 07:22 am Link Photons 2 Pixels Images wrote: I look for overall balance of color in the composition. Her original eye color was brownish, but since a lot of her headgear was green, I wanted to match her eyes to that. It's a simple layer on top that I handpainted applying the "Color" blend. Notice I colored her lips and earring, too, to triangulate the focus on her face. Jul 10 09 08:20 am Link Eastfist wrote: Yes, I noticed that also. I did something similar in my avatar. Matched her eyes to the color of the 2 violet colored flowers and lips to the red flower on top. However, the way I do it is to add a photo filter layer inverted mask, set the color, uncheck "Preserve Luminosity", turn the density all the way up, and use a low opacity brush to unmask the color. I use an action to set up a bunch of layers for the typical colors I use for this. Then, I can tweak the color later (or color match) if needed. Jul 10 09 08:37 am Link Photons 2 Pixels Images wrote: Rube Goldberg vs. Occam's razor Jul 10 09 09:20 am Link |


