|
Forums >
Digital Art and Retouching >
Flyaway hair retouch help
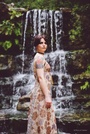
I've got some photos of a model outside. Conditions were quite windy and behind her are a variation of tree colors (greens) as well as sky and tree trunks and branches. I've found a few tuts on flyaway hair editing using liquify, patch tool, spot healing brush, etc. but none seem to work perfectly without it being really obvious. Any help is appreciated. Best, P Apr 27 15 09:09 am Link Try different blend modes, for both the brush (heal or clone stamp) and the clear layer you're going to. Oh, and be sure to do so to a separate layer. Other than that, it's just a slow and painstaking process. Apr 27 15 09:59 am Link Hi Phillip, There are a few video's, that I think will help. - https://www.youtube.com/watch?v=nPAvr5_CWl8 - https://www.youtube.com/watch?v=_1Z6Ht3egf0 Hope the videos help. Apr 27 15 10:24 am Link Re-painting hair partially or entirely is the only(most efficient way) way. Apr 27 15 11:10 am Link Cutting out hair over a complex background is a real challenge. It may be time for a "Cover UP" Having a complex background behind single hair strands is almost impossible to cut out even with strong cutting programs like vertus fluid mask or topaz. These programs (and you yourself sometimes) can hardly tell where the hair ends... and the confused background begins. It is quite difficult to make so many color blend changes and transitions along the length of a fly away hair strand.. especially over a complex background like trees, walls, or buildings. Complex Backgrounds are a real challenge! What I have done over the years is to collect hair brushes, create my own custom hair brushes, and store parts of cutouts that have those nice clean hair strands... with no halos or edging in them. These allow me to re-use them... and to add in new clean hair strands or patches " O V E R " the troubled spots... and to hide over these problem areas. In the past in making my own brushes and patches for re-use over troubled hair cutout areas...I have had to go into perfectly lit studio setups... and specially shoot perfect hair strands, and hair edges, and larger pieces of hair. If you create these brushes and patches once... And Save Them...then they can be reused over and over again... to cover up those scraggly problem areas that are almost impossible to cut out cleanly. Whenever a piece of hair cuts out cleanly without halos or fringe on the edges...then snip it out and save it so you can use it as a patch later on! I have also tried hand painting hair patches on clear transparent layers...and these will sometimes work OK if im very careful. Having a tablet, turning the image on its side so you can get the flow, and reading about how to create hair strands and layered coloring from scratch are really helpful. The "pencil portrait artists" have learned how to draw hair that looks pretty good and have some good tutorials themselves. Many times even the fix up hair strands do not perfectly match the original hair... in terms of its color, flow, direction, character, and blending....so I have to go into a 3 step additional process unfortunately to make it perfectly match. I first have to color match the new hair strands to match the original hair color, then I usually have to transform the shape and flow of the hair fixes to match the flow of the surrounding hair, and then I have to blend it all into the original hair using a layer mask so the new hair flows into the old hair smoothly and seamlessly. This 3 step blending process is pretty common for difficult challenges. I know its a total pain in the neck! But sometimes the hair and the background is so inter-tangled that its almost impossible to separate them...so you have to "Cover It Over"...and then possibly "Match It and Blend it In"... to hide over those nearly impossible problem areas. That way nobody knows what a terrible mess was underneath it all...and it ends up looking good. To Level Set: It can take a considerable amount of retouching time and effort to get the hair done so it looks well. I dont usually assume anymore that working on hair is going to be an easy job! On important images...it can sometimes take a couple of hours or more of highly patient work. OUCH. If youre a photographer...and want to cutout your model possibly...then use simple smooth backgrounds to start with, use seamless light gray, blue or green background papers in a studio, or shoot against the sky possibly. You want as little complex texture as possible behind your model. Start saving your own patches...that way you can maybe "Fix Over" something quicker the next time. My empathy to the OP. Its these kinds of complex and unruly retouch situations... that causes ME to have a bad hair day sometimes too! Youre not alone. This is one time where a "Cover Up" might be a good thing. LOL ------------------------------ Here is the concept of what im talking about...when you find pieces of hair that cutout perfectly once...save them... on a transparent background for later re-use. They are great to reuse for future Cover Ups. And if you use a mask...you can selectively use just only the parts you actually need.  Apr 30 15 08:27 am Link TMA Photo and Retouch wrote: Some Great information here.. May 03 15 07:29 pm Link CLICK retouch wrote: 100% agree. repaint the hair is h best way to go. You have full control over it. May 05 15 10:41 am Link |