|
Forums >
Photography Talk >
Lighting Setup Tutorials: basic to advanced
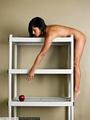
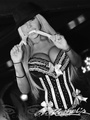
Hump and bump. Do the humpty hump. Mar 15 07 01:55 pm Link Digital Underground. Mar 15 07 01:56 pm Link Mar 15 07 02:14 pm Link This really should be stickied. Mar 18 07 10:50 am Link LightLab Studios wrote: Man look at that space, I hate you.........well not really. Ok I guess I do but in a good way. BTw, that shot, im really diggin it. Mar 18 07 10:56 am Link Brandon Ching wrote: love the lighting - any chance on an original? Mar 18 07 11:58 am Link slow death in progress.... please revive. thanks! Mar 27 07 02:06 pm Link Most useful post ever!!!!!!!!!!!!!!!!!!!!!!!!!!!!!!!!!!!!!!!!!!!!!!!!! Mar 29 07 01:00 am Link saaka wrote: From one of the before/after threads.... Mar 29 07 01:38 am Link Bumpity Bump Apr 04 07 05:03 pm Link We can't let this thread die off yet! Apr 05 07 12:25 am Link fantastic thread, I've learnt so much, please keep them coming here's my avatar setup...   Apr 09 07 10:02 am Link Great thread Apr 13 07 05:35 am Link Keep this thread ALIVE!!!! Apr 20 07 12:11 am Link  One big softbox on a boom placed directly above the models with angle about 45 degrees. Apr 21 07 11:06 pm Link Well I am now going to have to say (ARG!) LOL - and thank you, as I will now be stuck on this topic trying to saturate my brain with all of the knowledge! Great topic, and good to see some terms in which I can understand (photos of the setups!) heh... Thanks for the topic and for all of the photographers willing to share this setups with all of us, including the (ignorant) such as my self! If any one is in Orlando and wouldn't mind someone as an onlooker I would love that... Can't wait to see what is to come! Damon Apr 21 07 11:32 pm Link this needs a bump May 03 07 10:56 am Link Bump May 06 07 07:54 pm Link Good God... I'm not worthy. I'm going to go cry for a while now. May 06 07 08:28 pm Link LightLab Studios wrote: all that is totally unnesessary to get that shot... well thought out, but could be done more simple with the same results... May 06 07 08:36 pm Link Beach wrote: That is quite possibly the nicest shot I've seen from a Rebel. I've seen some really nice ones too. May 06 07 09:00 pm Link Nothing special but had to contribute! One snooted light overhead.  May 07 07 08:27 pm Link My first studio shoot - big mahalos to warren -IX for setting things up and to Brandon Ching for his 1001 answers to my 1001 questions!   Sorry about the lack of depth of information on the settings ... all I can say was that I had so much fun and im hooked now! May 16 07 08:42 pm Link Brandon Ching wrote: ok seriously, thats beautiful post work, but i find it really hard to believe that you got the eyes out with no real light on them. did you composite the eyes from an additional shot? Is this just a lot of fill light? It is an amazing shot, don't get me wrong. I freaking love it, and your work is nothing besides quality. I am just curious as to the method you used to PP this. May 16 07 09:59 pm Link Love and Wonder wrote: The eyes were not a composite. The face was underexposed intentionally in camera (originally shot contrasty for Sin City feel), but then I decided I wanted more light so I upped the exposure in ACR and applied a curve adjustment to bring out the midtones. May 17 07 07:54 am Link LightLab Studios wrote: Why did you use the Beauty Dish to light the background? Would it make a big difference between using a direct light source with gel or an umbrella with gel? May 18 07 09:31 am Link Possibly. I suppose you could always PS out the catchlights from her eyes...but I think it did a great job of even lighting and avoiding blowing out her skin tone ..... all that is totally unnesessary to get that shot... well thought out, but could be done more simple with the same results... May 18 07 11:16 am Link actually, i don't believe the Beauty Dish is directed at the model. From the schematic it seems the light is directed at the backdrop. May 18 07 11:46 am Link That's right. A blue gel over the beauty dish is aimed at the white seamless. A white umbrella is aimed at the model with two reflectors for fill and to stop spill onto background. May 26 07 11:32 am Link    From my shoot last week, I am including the original capture and final image. I shot this with blue gels on the kickers and decided in post to desaturate and remove the blues. Also did some cleanup on the background, light dodging and burning, some color tweaks, added a mild sepia filter, and sharpened. May 26 07 11:38 am Link   Basically the same exact setup, except I changed the gels to red and orange, moved the orange kicker more directly behind the model to get some lens flare, added a little more fill with the reflector and softbox, and opened up my camera by 1/3 stop. This is the original capture and I have done no RAW adjustments or retouching. May 26 07 12:02 pm Link Here is a very simple one light set up. I loved looking through this info and will post more when i use some of the techniques I learned here.  Not edited  Final product  May 26 07 02:10 pm Link Ransom-The Cheese-J wrote: I was wondering about using a back up computer battery or even my automobile emergency battery kit to power my AC powered Lumedyne or a Spedotron 805. What do you think? May 27 07 01:18 am Link Great work, keep 'em coming. May 27 07 12:00 pm Link LightLab Studios wrote: AWESOME work. I really love your studio shots as well! Excellent work all around and I love your studio. May 27 07 01:12 pm Link Here's the shot...here's the set-up    and the stuff  1 rear fill 2 set lights 1 masked out key 1 "face light" on boom 1 ringlight on camera (profoto) May 27 07 01:59 pm Link I really like this thread and I just wanted to put my $.02 into it... Thank you to everyone who has posted to this thread. I have learned quite a bit. Gabe  May 27 07 08:15 pm Link Simple but effective natural light   Focal Length 300 mm Exposure Time 15.00 sec Aperture f/29 www.chipshotz.com May 27 07 10:26 pm Link yes, agreed-- one of the best threads I've ever seen anywhere. I vote for stickie. Mucho kudos to the OP. May 28 07 01:17 am Link I like the product shot- very nice setup, and great photo! May 28 07 01:50 am Link |