
Photographer
Kantorka
Posts: 115
Berlin, Berlin, Germany
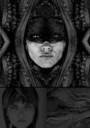
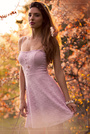
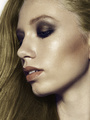
OK, that's a weird title, but here goes: I took this shot yesterday. The hip bone is blocking the rim light, and I find the shadow very irritating. I tried lightening it with curves, D&B, etc. but the thing is, the little hairs above the shadow are illuminated by the rim, but the ones in the shadow aren't of course. Lightening just doesn't look right. I tried cloning/heal stamping the hairs into the shadow area, but it's not good either. Any help? ![https://img594.imageshack.us/img594/4880/14329720.jpg]()
Retoucher
K o r a y
Posts: 251
Ankara, Ankara, Turkey
have you tried to copy a large area, paste over and then transform, clone, d&b, mask etc to make it look better? it usually works 

Retoucher
Natalia_Taffarel
Posts: 7665
Buenos Aires, Buenos Aires, Argentina
K o r a y wrote:
have you tried to copy a large area, paste over and then transform, clone, d&b, mask etc to make it look better?
it usually works this
Koray I'm all over you 

Retoucher
Krunoslav Stifter
Posts: 3884
Santa Cruz, California, US
K o r a y wrote:
have you tried to copy a large area, paste over and then transform, clone, d&b, mask etc to make it look better?
it usually works +1
Only I used Healing brush, D&B and color layer. But make sure you are using hard edge brush for Healing Tool and select the panties than contract/expand the selection 2px. So you prevent color/tone contamination while you are healing.
![https://img831.imageshack.us/img831/4880/14329720.jpg]()
Is that good enough for you?
Photographer
Kantorka
Posts: 115
Berlin, Berlin, Germany
Thank you for the fast help, amazing Perfect result for me too, I'm trying that right now. Thanks!
Retoucher
GabrieleMonte
Posts: 691
Padova, Veneto, Italy
Natalia_Taffarel wrote:
this
Koray I'm all over you Don't want to say a stupid thing, but... can the little hairs be replaced with the Split? Or the HighFrequency.

Photographer
Sean Baker Photo
Posts: 8044
San Antonio, Texas, US
Gabriele M89 wrote:
Don't want to say a stupid thing, but... can the little hairs be replaced with the Split? Or the HighFrequency. Very easily.
And probably even more easily in this case if separated with Dust & Scratches.
Retoucher
Krunoslav Stifter
Posts: 3884
Santa Cruz, California, US
SRB Photo wrote:
Very easily.
And probably even more easily in this case if separated with Dust & Scratches. Can you demonstrate?
Photographer
Sean Baker Photo
Posts: 8044
San Antonio, Texas, US
Krunoslav-Stifter wrote:
Can you demonstrate? I suppose, if the OP posts permission. I really just mean to do the separation as you would normally, but using D&S at fairly low settings (I'll guess 3px and a mid range threshold offhand) instead of GB. But, if the OP consents, I'll post an example showing what the hairs would look like separated here [and yes, I'm focusing on the hairs in this response - not that shadow, which can be handled separately if so desired].
Retoucher
Krunoslav Stifter
Posts: 3884
Santa Cruz, California, US
SRB Photo wrote:
I suppose, if the OP posts permission. I really just mean to do the separation as you would normally, but using D&S at fairly low settings (I'll guess 3px and a mid range threshold offhand) instead of GB. But, if the OP consents, I'll post an example showing what the hairs would look like separated here [and yes, I'm focusing on the hairs in this response - not that shadow, which can be handled separately if so desired]. Maybe some other similar image that, with the same hair problem. I'm curious. Thanks!
Retoucher
GabrieleMonte
Posts: 691
Padova, Veneto, Italy
Krunoslav-Stifter wrote:
I'm curious. So am I! 
Photographer
remerrill
Posts: 3880
Arcata, California, US
Gabriele M89 wrote:
So am I! Me too... the whole world is curious!
Photographer
Kantorka
Posts: 115
Berlin, Berlin, Germany
Sure, go ahead I want to see it too!
Photographer
Sean Baker Photo
Posts: 8044
San Antonio, Texas, US
Kantorka wrote:
Sure, go ahead I want to see it too! Thank you!
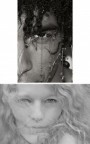
So below is a separation done with the Dust & Scratches filter with a Radius of 4 and Threshold of 14. On the left is the original cropped segment, the middle the result of the D&S run, and on the right a contrast-enhanced version of the separated portion. You see that it magnificently pulls out the hairs while leaving the majority of the skin texture in tact, allowing for either the with or without hair segments to be cloned / healed to match the rest, while working with the skin and the bone structure through more familiar means without worrying about cloning in / out the hairs.
It's not the fix to the situation, but is worth knowing how to do - it's awesome for flyaways  . .
![https://www.twicebakedphoto.com/download/DSDemo.jpg]()
Photographer
Kantorka
Posts: 115
Berlin, Berlin, Germany
SRB Photo wrote:
It's not the fix to the situation, but is worth knowing how to do - it's awesome for flyaways .
![https://www.twicebakedphoto.com/download/DSDemo.jpg]() That is some great work. Thanks for sharing
Retoucher
Krunoslav Stifter
Posts: 3884
Santa Cruz, California, US
Ah, hell! This is ridicules. It actually took me longer to figure out how to export the damn GIF file, than it took me to clean the hairs. lol I wish Peano was in the neighborhood.  Anyway this is Sean's method + touch of Portraiture and a stroke of healing brush. Peace of cake. ![https://img839.imageshack.us/img839/8690/14329720.gif]() Thanks Sean!
Photographer
Kantorka
Posts: 115
Berlin, Berlin, Germany
Retoucher
Krunoslav Stifter
Posts: 3884
Santa Cruz, California, US
Kantorka wrote:
This is my retouch, by the way
Rollover Looking good.
Some areas on her stomach could use a bit of D&B and maybe her right leg. That harsh shadow that separates the muscles. Maybe to tone that down a bit. Other than that, nice work

Photographer
Julian Marsalis
Posts: 1191
Austin, Texas, US
SRB Photo wrote:
Thank you!
So below is a separation done with the Dust & Scratches filter with a Radius of 4 and Threshold of 14. On the left is the original cropped segment, the middle the result of the D&S run, and on the right a contrast-enhanced version of the separated portion. You see that it magnificently pulls out the hairs while leaving the majority of the skin texture in tact, allowing for either the with or without hair segments to be cloned / healed to match the rest, while working with the skin and the bone structure through more familiar means without worrying about cloning in / out the hairs.
It's not the fix to the situation, but is worth knowing how to do - it's awesome for flyaways .
![https://www.twicebakedphoto.com/download/DSDemo.jpg]() Works like magic I swear this separation stuff is off the chain most excellent...
Retoucher
FLEXmero
Posts: 1001
Madrid, Madrid, Spain
SRB Photo wrote:
...if separated with Dust & Scratches. That gave me a lot to think. Didn't think that the apply image opperation can be done with any couple of layers... rendered clouds if i wanted to.
It's gonna be a technically creative day for me.
Photographer
Sean Baker Photo
Posts: 8044
San Antonio, Texas, US
FLEXmanta wrote:
That gave me a lot to think. Didn't think that the apply image opperation can be done with any couple of layers... rendered clouds if i wanted to.
It's gonna be a technically creative day for me. That was always where I hoped we could get the conversation - using the difference between any two things, whether it be for simulating multiple exposures (even compositing), for removing (healing / cloning / etc) undesirable features, etc. In light of the desire for quicker turnaround, and above all for better quality, it's just sooooo important to know how to do - done properly, both come free. Hope you're finding all the great tricks .
Photographer
Lone Leaf Photography
Posts: 46
Ottawa, Ontario, Canada
SRB Photo wrote:
So below is a separation done with the Dust & Scratches filter with a Radius of 4 and Threshold of 14. On the left is the original cropped segment, the middle the result of the D&S run, and on the right a contrast-enhanced version of the separated portion. You see that it magnificently pulls out the hairs while leaving the majority of the skin texture in tact, allowing for either the with or without hair segments to be cloned / healed to match the rest, while working with the skin and the bone structure through more familiar means without worrying about cloning in / out the hairs.
It's not the fix to the situation, but is worth knowing how to do - it's awesome for flyaways .
![https://www.twicebakedphoto.com/download/DSDemo.jpg]() Hello,
It's not clear to me from the above description what is being done on what layer of the separation, and whether it's being done before or after the separation. I'm new at this, so forgive me if my hamster is slow on the wheel
On an image I'm working on, I've started the separation with a GBlur on the LowF layer, and then I'm running the D&S filter directly on the HighF layer, and the results seem okay, to my untrained eye. (It does however leave some subtle trace of the "texture" of the hairs on the skin, however I'm more inclined to leave that there, as a more natural alternative to cloning in skin texture from elsewhere.)
Is my method what Sean is describing above? I get the impression he is instead applying the D&S to the *LF* layer, presumably before the separation. If this is the case, I'm not understanding why---the hair detail will still be on the HF layer after the separation, and require removal.
If someone could please clarify, that would be great!
Thanks so much,
KDJ
Photographer
Sean Baker Photo
Posts: 8044
San Antonio, Texas, US
Lone Leaf Photography wrote:
Hello,
It's not clear to me from the above description what is being done on what layer of the separation, and whether it's being done before or after the separation. I'm new at this, so forgive me if my hamster is slow on the wheel The trick is that D&S is the "separation". It takes the roll of the Gaussian Blur in what around here is a traditional frequency separation.
Lone Leaf Photography wrote:
On an image I'm working on, I've started the separation with a GBlur on the LowF layer, and then I'm running the D&S filter directly on the HighF layer, and the results seem okay, to my untrained eye. (It does however leave some subtle trace of the "texture" of the hairs on the skin, however I'm more inclined to leave that there, as a more natural alternative to cloning in skin texture from elsewhere.)
Is my method what Sean is describing above? No. Sorry for the confusion.
Lone Leaf Photography wrote:
I get the impression he is instead applying the D&S to the *LF* layer, presumably before the separation. If this is the case, I'm not understanding why---the hair detail will still be on the HF layer after the separation, and require removal.
If someone could please clarify, that would be great!
Thanks so much,
KDJ Try this:
1.) Start with the base image.
2.) Convert to 16bit.
3.) Make an extra copy of the original image (a second layer, not a second document).
4.) Run D&S as described on the bottom layer.
5.) Select the top layer.
6.) Chose Image->Apply Image.
7.) Select the D&S'd layer as the Source.
8.) Check the Invert box (so that it is on).
9.) Blending 'Add'.
10.) Opacity 100%.
11.) Scale 2.
12.) Offset 0.
Doing it this way, you have a few options about what to then do with the distracting hairs, which largely live in your "HF" layer. You can simply mask off that portion of the image, so that only the "LF" is visible in the composite image. Or, if you'd like a bit more realistic result, you can heal / clone across the "HF" layer to replace the problem-hair regions with hair-free ones. You could do the same with the GB "traditional" FS of course, but this has the advantage of (for the most part) not transposing skin texture orientation into the wrong parts of the image.
HTH, and if I'm just confusing you further let me know where I made it worse.
Photographer
Lone Leaf Photography
Posts: 46
Ottawa, Ontario, Canada
SRB Photo wrote:
1.) Start with the base image.
2.) Convert to 16bit.
3.) Make an extra copy of the original image (a second layer, not a second document).
4.) Run D&S as described on the bottom layer.
5.) Select the top layer.
6.) Chose Image->Apply Image.
7.) Select the D&S'd layer as the Source.
8.) Check the Invert box (so that it is on).
9.) Blending 'Add'.
10.) Opacity 100%.
11.) Scale 2.
12.) Offset 0. Thanks, much appreciated! I had tried this method as well before I posted, and wasn't able to detect much difference between the two approaches (GB vs. D&S). (I had also tried the method of a curve adjustment, to clip the highlights off a masked portion of the HF layer, but I found that a bit muddy/posterized.)
SRB Photo wrote:
You could do the same with the GB "traditional" FS of course, but this has the advantage of (for the most part) not transposing skin texture orientation into the wrong parts of the image. I suspect if my starting image had finer detail in it, I might notice this difference more.
If my GB-based separation with D&S (or other methods) applied to the HF layer continues to work satisfactorily for the images I have, I'll probably just stay with that as much as I can, for simplicity/commonality of workflows.
My confusion was that I got the impression from your original post that your approach was a frequency band filter (i.e., a separation with a frequency gap between the two), such that the hair details were conveniently dropped out in the frequency separation, neatly appearing in neither the LF nor HF layers. I couldn't figure out how this was practically doable, given that the hairs are such high frequency that it would be difficult to isolate them from any (useable) HF layer without losing other desirable detail. (Okay, I suppose it *could* be done, but it'd blast out a bunch of desirable HF detail as well, requiring more masking to control...)
My other confusion was terminology. While I understand (now ) that the frequency used in the separation is set by what is done to the LF layer, mentally I keep associating it with the settings in the Apply Image step. Thus your statement of "a separation done with the D&S filter" had me scratching my head. I've since learned today that the frequency is established by the initial action on the LF layer (GB, D&S, etc), not within the Apply Image step.
Y'know, it's a dang good thing I work with frequency domains and filters in my day job (engineering). When I first learned of the frequency separation method for editing images a few weeks ago, I could readily understand thanks to that background. Without it, this stuff would have me doing the labrador retriever head tilt!
Thanks a million!
Photographer
Ashley Daws
Posts: 27
Auckland, Auckland, New Zealand
Lone Leaf Photography wrote:
Without it, this stuff would have me doing the labrador retriever head tilt! You mean like I'm doing? LOL
Sean, once I do the D&S layer and then the Apply Image thing you then clone, heal or whatever on this "HF" layer, yeah?
Ok, once that's done how do you get the "LF" & "HF" layers to blend into a usable layer, change the "HF" layer blend mode to "Overlay" or "Softlight"?
EDIT: Also can you give a little break down on what the 2 variables actually do (their relationship), radius and threshold?
Cheers mate and sorry for being a dumb arse ;-)
Photographer
Lone Leaf Photography
Posts: 46
Ottawa, Ontario, Canada
Ashley Daws wrote:
You mean like I'm doing? LOL Don't worry, I was there this morning!
Maybe I can help (...add to the confusion, lol).
Ashley Daws wrote:
Sean, once I do the D&S layer and then the Apply Image thing you then clone, heal or whatever on this "HF" layer, yeah?
Ok, once that's done how do you get the "LF" & "HF" layers to blend into a usable layer, change the "HF" layer blend mode to "Overlay" or "Softlight"? First Q: that's what I've been doing. All your fine detail is on the HF layer, so if you want to work with fine details, such as rub some out, you work there. The LF layer has the broader colour and tones ("contours"), so if you want to work with that, such as smoothing shadows, you work on that layer.
2nd Q: by "useable layer", do you mean a consolidated layer with both the HF and LF details on it? Normal techniques for layers would apply... you could select the HF and LF layers and select Merge Layers from the menu. That gives you no way to go back though. More preferable would be to Duplicate those two layers, and then Merge the duplicates. The new merged layer is your consolidated one with all level of detail on it (both LF and HF), and the LF and HF layers you worked on are also still there underneath if you want to go back.
Hope that helps
Photographer
Ashley Daws
Posts: 27
Auckland, Auckland, New Zealand
Lone Leaf Photography wrote:
2nd Q: by "useable layer", do you mean a consolidated layer with both the HF and LF details on it? Normal techniques for layers would apply... you could select the HF and LF layers and select Merge Layers from the menu. That gives you no way to go back though. More preferable would be to Duplicate those two layers, and then Merge the duplicates. The new merged layer is your consolidated one with all level of detail on it (both LF and HF), and the LF and HF layers you worked on are also still there underneath if you want to go back.
Hope that helps Yeah, a final layer with everything completed.
If I just merge the layers though I end up with a layer that just look like the HF layer (grey colour) without any colour.
Retoucher
DerW
Posts: 254
Willich, North Rhine-Westphalia, Germany
You can combine the LOW and HIGH frequency layers (whatever the low is based on) using the "Linear Light" blending mode for the high frequency layer.
If you did everything right, you should be left with your original image again, but separated into different amounts of detail (e.g. shape/detail, skin/hair, clouds/image etc.).
Now you can do all your healing/cloning on this high frequency layer with the advantages of not having to worry about the low layer which isn't affected.
Best regards,
Jonas
Photographer
Lone Leaf Photography
Posts: 46
Ottawa, Ontario, Canada
Ashley Daws wrote:
If I just merge the layers though I end up with a layer that just look like the HF layer (grey colour) without any colour. Okay, I think I understand now the source of your question. It sounds like you are missing a key step in setting up your separated layers.
After you do the Apply Image step, it's essential that you change the Blending mode of your HF layer to Linear Light. This will then make your stack of layers look like a normal image, rather than the grey map. (Of course anytime you show only the HF layer by itself, it will still appear as a grey map).
If you miss this step I think you will get undesirable results from your edits.
Hope that helps
Photographer
Sean Baker Photo
Posts: 8044
San Antonio, Texas, US
Lone Leaf Photography wrote:
Thanks, much appreciated! I had tried this method as well before I posted, and wasn't able to detect much difference between the two approaches (GB vs. D&S). (I had also tried the method of a curve adjustment, to clip the highlights off a masked portion of the HF layer, but I found that a bit muddy/posterized.) You're quite welcome!
Lone Leaf Photography wrote:
My other confusion was terminology. While I understand (now ) that the frequency used in the separation is set by what is done to the LF layer, mentally I keep associating it with the settings in the Apply Image step. Thus your statement of "a separation done with the D&S filter" had me scratching my head. I've since learned today that the frequency is established by the initial action on the LF layer (GB, D&S, etc), not within the Apply Image step.
Y'know, it's a dang good thing I work with frequency domains and filters in my day job (engineering). When I first learned of the frequency separation method for editing images a few weeks ago, I could readily understand thanks to that background. Without it, this stuff would have me doing the labrador retriever head tilt!
Thanks a million! Terminology and language are the source of the most confusion about this, honestly. It's not a difficult concept once you've mastered it, but it's the range of technical background and DSP experience which causes all of the confusion. I try to write as much in the vernacular I see being used on the site as I can to minimize the confusion, but obviously when someone with a bit more applied background reads it, it can be confusing  . Please continue to ask whenever you have questions - it's entirely likely that I'll abuse the vernacular again and leave others doing "the retriever". . Please continue to ask whenever you have questions - it's entirely likely that I'll abuse the vernacular again and leave others doing "the retriever".
Photographer
Sean Baker Photo
Posts: 8044
San Antonio, Texas, US
Ashley Daws wrote:
Sean, once I do the D&S layer and then the Apply Image thing you then clone, heal or whatever on this "HF" layer, yeah? That's one way of doing it, and for the most believable results (assuming that you got a good separation in the first place!) is a good way to go about it. The key is getting that good separation in the first place, and that's where picking a technique which works for the image you're working on is so key - there is no easy, universal answer to which will be best.
Ashley Daws wrote:
Ok, once that's done how do you get the "LF" & "HF" layers to blend into a usable layer, change the "HF" layer blend mode to "Overlay" or "Softlight"? As noted above, "Linear Light" is the appropriate blend to bring it back into the image. IMO, Overlay and SoftLight have more use for creative effects vs. when we're trying to redefine reality.
Ashley Daws wrote:
EDIT: Also can you give a little break down on what the 2 variables actually do (their relationship), radius and threshold? D&S is sort of a (very) simple statistical filter. It goes through all of the pixels in the image, at each one doing three things:
1.) It calculates the average of all of the pixels within the Radius of the current pixel.
2.) It compares the current pixel's value to that average.
3.) If the difference is greater than the Threshold, it replaces the pixel with the average value we calculated in (1). If not, it leaves it alone.
HTH!
Photographer
Lone Leaf Photography
Posts: 46
Ottawa, Ontario, Canada
SRB Photo wrote:
it's entirely likely that I'll abuse the vernacular again and leave others doing "the retriever". Nope, you had it good, I just had it mixed up in my head.
Thanks
Photographer
Lone Leaf Photography
Posts: 46
Ottawa, Ontario, Canada
SRB Photo wrote:
D&S is sort of a (very) simple statistical filter. It goes through all of the pixels in the image, at each one doing three things:
1.) It calculates the average of all of the pixels within the Radius of the current pixel.
2.) It compares the current pixel's value to that average.
3.) If the difference is greater than the Threshold, it replaces the pixel with the average value we calculated in (1). If not, it leaves it alone. Dunno if this will help add to the clarity, but here goes...
Since the image is compared with the Threshold, you can think of Threshold as the "sensitivity" for the filter---how likely it will find something in the image to adjust. If the Threshold is large, fewer parts of the image will exceed it, and thus not many parts will be affected by the filter. Conversely, if the Threshold is small, many parts of the image will affected, thus "sensitivity" is high. So you need only keep in mind that the number is reverse-sense: small Threshold = more affected, big Threshold = less affected.
Radius, as mentioned above, will determine how much the adjusted pixels will be affected. A larger radius will have a greater effect, thus you can think of Radius as the "strength" of the filter.
If you play with the sliders and the Preview you can see these trends.
Threshold = "(inverse) sensitivity" (lower affects more)
Radius = "strength" (higher affects more)
So in it's use here to blot out hairs on the skin, you set the Threshold low enough so that you can see the hairs being affected, but not so low that it affects too many other details (such as nearby skin pores/texture). Then you set the Radius to control how much the hair pixels will be averaged with the surrounding pixels---high enough to have the desired effect without being so high as to cause blotchy / muddy / posterized areas. The optimum settings will vary from image to image, and even between areas within the same image, depending on the details' local size, contrast/sharpness, etc.
Hope that helps (someone)
Photographer
Ashley Daws
Posts: 27
Auckland, Auckland, New Zealand
Sean, Jonas & L-F-P thanks heaps, makes sense now.
Retoucher
Pascal Flor
Posts: 82
Berlin, Berlin, Germany
I'm trying to use the D&S on the following areas. But I can't really achieve what I want and as you do it. It's the first time I heard about the D&S technique and it looks like it does a decent job. Can you help me out? What am I doing wrong? I just want to understand the technique! Have tried a couple of radius/threshhold mixes (4/10) and wanted to clean the hair on the "HF" layer with clone stamp set to darken, cause it didn'T really work for me with the brush or normal clone tool. Please help me out! :-) ![https://www10.pic-upload.de/thumb/24.10.12/6ygqtieupgn.png]()

Retoucher
gfrodo
Posts: 2
Paraná, Entre Ríos, Argentina
Pascal Flor wrote:
Have tried a couple of radius/threshhold mixes (4/10) and wanted to clean the hair on the "HF" layer with clone stamp set to darken, cause it didn'T really work for me with the brush or normal clone tool.
Please help me out! :-) Hi, this is my first colaboration in MM!
I tried the same but a higher radius (radius: 23 - threshhold : 4) . Is it far from acceptable?
What I ve got: PSD
Im stinky, I know... but I can make Gifs too > <
![https://img33.imageshack.us/img33/8930/removinghair.gif]()
Retoucher
Retouch007
Posts: 403
East Newark, New Jersey, US
Just clone stamp on darken and d&b only (no freq sep stuff done). This was quick though. ![https://photos.modelmayhem.com/photos/130103/18/50e63dc355d49.jpg]()
|


 .
. 

 . Please continue to ask whenever you have questions - it's entirely likely that I'll abuse the vernacular again and leave others doing "the retriever".