Photographer
le roy le croix
Posts: 1268
Grove Place, Saint Croix, Virgin Islands of the United States
George Anchev wrote:
There you go:
TIFF file download Using LAB and RGB... you know the way to my heart.... So do you correct in RGB first and then tweak in LAB? or....?
I would also like to say Benski, you rock. I've been using your curves on color desaturation method on all my photos lately. LOVE....
So far I'm still trying to figure out what you're talking about in this post, but as soon as I understand it I'm sure I will fall in love again.
Retoucher
Benski
Posts: 1048
London, England, United Kingdom
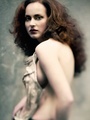
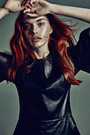
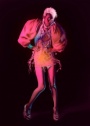
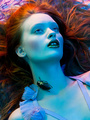
Heh, thanks! Yeah I was rushing a bit. It's a technique that looks like it's going to become (very) over-used before long. It's the "Technicolor" look. "Bourdin did not look like a fashion photographer but like a peasant... He portrayed a dark side, but in Technicolor." It's an old way of making colour film, where the image is recorded on separate B&W film reels through a number of different colour filters, and then combined on print with various dyes. When you use a digital camera or colour film, you get colour pollution everywhere: bits of green in the reds and bits of blues in the green. Technicolor gives you very distinctive PURE and bold colours. ![https://aviatorvfx.com/media/color/1.jpg]() ![https://aviatorvfx.com/media/color/2.jpg]() ![https://aviatorvfx.com/media/color/3.jpg]() You see the complex, 3-dimensional skin-tones everyone had in the original are replaced with a very uniform skin colour. And the sky's gone to a very pure blue. Oddly, I can't recall ever reading a good Photoshop guide to Technicolor processing. The problem with the original image here is that there's only one central colour, so the bold, saturated Technicolor look only gives you a very clean yellow. If you had a strong green or blue in the scene too, you'd get more of the characteristic look.
Photographer
Grafanovitchi
Posts: 573
San Marcos, California, US
The sand has taken on a bluish cast and the red ribbon on the tent is now well saturated. I think this could be a very useful technique.
Dr. Herbert Thomas Kalmus the principle founder of Technicolor was a distant relative of mine. Unfortunately, I inherited neither his wealth nor his intellect.
Would love to hear more about how to achieve this look digitally.
Photographer
Fashion Photographer
Posts: 14388
London, England, United Kingdom
GRAF wrote:
The sand has taken on a bluish cast and the red ribbon on the tent is now well saturated. I think this could be a very useful technique.
Dr. Herbert Thomas Kalmus the principle founder of Technicolor was a distant relative of mine. Unfortunately, I inherited neither his wealth nor his intellect.
Would love to hear more about how to achieve this look digitally. Look at the woman's swimsuit.
Photographer
Clint Earhart
Posts: 109
Denver, Colorado, US
Benski wrote:
Heh, thanks! Yeah I was rushing a bit. It's a technique that looks like it's going to become (very) over-used before long. It's the "Technicolor" look.
"Bourdin did not look like a fashion photographer but like a peasant... He portrayed a dark side, but in Technicolor."
It's an old way of making colour film, where the image is recorded on separate B&W film reels through a number of different colour filters, and then combined on print with various dyes. When you use a digital camera or colour film, you get colour pollution everywhere: bits of green in the reds and bits of blues in the green. Technicolor gives you very distinctive PURE and bold colours.
![https://aviatorvfx.com/media/color/1.jpg]()
I like this Bourdin was one of my favorites.!!!! STILL IS!
![https://aviatorvfx.com/media/color/2.jpg]()
![https://aviatorvfx.com/media/color/3.jpg]()
You see the complex, 3-dimensional skin-tones everyone had in the original are replaced with a very uniform skin colour. And the sky's gone to a very pure blue.
Oddly, I can't recall ever reading a good Photoshop guide to Technicolor processing.
The problem with the original image here is that there's only one central colour, so the bold, saturated Technicolor look only gives you a very clean yellow. If you had a strong green or blue in the scene too, you'd get more of the characteristic look.
Photographer
Fashion Photographer
Posts: 14388
London, England, United Kingdom
Clint earhart wrote:
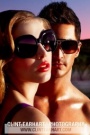
on my website the image is technicolor...
www.clintearhart.com > fashion II Your website is too slow.
Retoucher
Benski
Posts: 1048
London, England, United Kingdom
GRAF wrote:
The sand has taken on a bluish cast and the red ribbon on the tent is now well saturated. I think this could be a very useful technique.
Dr. Herbert Thomas Kalmus the principle founder of Technicolor was a distant relative of mine. Unfortunately, I inherited neither his wealth nor his intellect.
Would love to hear more about how to achieve this look digitally. Cool! Yeah it's kind of the tip of the iceberg of a whole load of ways to simplify a colour palette.
Basic principle can be demonstrated by going to the Channel layers, and copying and pasting the Green channel onto the Blue channel.
What you've got now is the blue channel and green channel displaying the same information. So where you did have complex, 3-dimensional (RGB) colours, with millions of variations, you've now got 2-dimensional colour, with a very limited range of hues, constructing a full colour image. Next step is to balance the colours - in cinematography they'd have added yellows to the dyes until they got a believable sky or skin tone. The easiest way to adjust in Photoshop is just with a Hue/Sat layer - you can usually dial in the right skin tone just using Hue. (3-strip Technicolor's pretty complicated and I don't know of a good way to do it in Photoshop yet.)
Photographer
Fashion Photographer
Posts: 14388
London, England, United Kingdom
Benski wrote:
Cool! Yeah it's kind of the tip of the iceberg of a whole load of ways to simplify a colour palette.
Basic principle can be demonstrated by going to the Channel layers, and copying and pasting the Green channel onto the Blue channel.
What you've got now is the blue channel and green channel displaying the same information. So where you did have complex, 3-dimensional (RGB) colours, with millions of variations, you've now got 2-dimensional colour, with a very limited range of hues, constructing a full colour image. Next step is to balance the colours - in cinematography they'd have added yellows to the dyes until they got a believable sky or skin tone. The easiest way to adjust in Photoshop is just with a Hue/Sat layer - you can usually dial in the right skin tone just using Hue. (3-strip Technicolor's pretty complicated and I don't know of a good way to do it in Photoshop yet.) +1
Possible duplicate the OP image with this technique.

Photographer
394872
Posts: 532
Sofia, Sofija grad, Bulgaria
Clint earhart wrote:
http://www.clintearhart.com/#a=0&at=0&m … 00&s=0&p=0
this is what i did! The gradient you placed killed the local contrast. And the Gucci bag (which should obviously be the target of the picture) is kind of polarized/banded. I am not sure a client would like the greenish fringing on top left too. Just saying what I see.
NocoJoe wrote:
Thanks for sharing your TIFF. I really enjoyed seeing your workflow. Would you be able to clarify what you did on the LAB Enhance and the LAB Colorize layers? I assume it had something to do with the LAB color space, but other than that I am not quite sure that happened there. Thanks! What I used was what I had learned from Dan Margulis's LAB lessons and added some things from me in the colorization part.
1. The first Curves layer in Luminosity mode corrects local contrast based on the Green channel (which seemed to be the best choice for this image as Red is too bright/white and Blue is too dark at the face)
2. CTRL+SHIFT+E and Convert to Smart object, call it Lab Enhance 1
3. Double click the SO and conver to LAB.
4. This step is sth that Dan calls "Man from Mars" method for enhancing local luminance and color contrast. In this case I picked a target point at the flat zone of her left arm (right on the photo) and dragged to make curves steeper.
5. It seemed a bit reddish to me in the darks after the enhancement. So I applied a mask (Background's Lightness channel) to have the effect only in the bright zones.
6. Turned opacity to 30 as it looked good to me.
7. Save S.O. and back to RGB to prepare for "the look"
8. I measured the Lab values of the Gucci image (original OP's example). The (a,b) values of the darks were (0, -8) and lights in the skin zone were sth like (4, 24). So using this curves layer in Color mode I moved the shadows and skin tones in the direction desired. This is the "Color correct" layer
9. CTRL+SHIFT+E and Convert to Smart object -> Lab color space
10. This time the Man from Mars didn't really work as I was going for a certain look and I already had the enhancement done so far. That's why I applied some luma contrast only. In the b-channel (which was the choice for yellow/blue palette) I made some curve that added some color variance in the Y/B tones. Again as it made some undesired darkening of the shadows, I masked it with the primary layer's Lightness channel.
11. Next layer had to give me the final look. L-channel was there already. In 'a' and 'b' channels I locked the mid-points so I was sure the neutrals won't move to destroy the color contrast created so far. Then I moved the lights and darks in the direction desired.
Photographer
394872
Posts: 532
Sofia, Sofija grad, Bulgaria
Benski, I have seen this examples of 2/3-strip Technicolor long time ago. There was the video showing the channels which were supposed to create this look. I tried to do it in Digital fusion following the steps shown. I even had a graphics programmer in hand who wrote a special Python script which repeated the steps shown in the video. The result was not what is shown. There is something more they do to achieve this look and afaik the LUTs for such processes are a technical know-how that is kept secret. Also note that their original image is not really what you would get from a RAW. It already has some look.
Photographer
Fashion Photographer
Posts: 14388
London, England, United Kingdom
 I've figured out how to do it, pretty much perfectly - the post processing, that is. To get the Gucci look exactly, you need to use hard light and a polarizing filter. But I can do the colours from that look - that quasi technicolor look - exactly. I'm going to be mean and charge people $30USD to adjust the colours, and do no further retouching, or 300USD per hour of video footage. I figure it's a trendy look, and I can justify that :p
Retoucher
Benski
Posts: 1048
London, England, United Kingdom
George Anchev wrote:
Benski,
I have seen this examples of 2/3-strip Technicolor long time ago. There was the video showing the channels which were supposed to create this look.
I tried to do it in Digital fusion following the steps shown. I even had a graphics programmer in hand who wrote a special Python script which repeated the steps shown in the video. The result was not what is shown. There is something more they do to achieve this look and afaik the LUTs for such processes are a technical know-how that is kept secret.
Also note that their original image is not really what you would get from a RAW. It already has some look. Oh I hadn't seen that vid before! That's quite useful.
I know that particular method was developed by their cinematographers to emulate the film process digitally. I'm not *sure* you need to do anything anywhere near that convoluted. I'll see if I can get from their a -> b using the simple method because I don't quite see the logic in treating digital images like film frames.
But yeah, 3-strip takes some work. I've done it once, which involved using the Math function about a dozen times and wasn't fun at all. I could approximate it quite closely just using Channel Mixer and upping each channel's own colour while reducing the other two (so in principle you're getting something similar - a sort of purified saturation boost).
Retoucher
Benski
Posts: 1048
London, England, United Kingdom
David-Thomas wrote:
I've figured out how to do it, pretty much perfectly - the post processing, that is. To get the Gucci look exactly, you need to use hard light and a polarizing filter.
But I can do the colours from that look - that quasi technicolor look - exactly.
I'm going to be mean and charge people $30USD to adjust the colours, and do no further retouching, or 300USD per hour of video footage.
I figure it's a trendy look, and I can justify that :p Reckon you might be able to charge 10x that if you corner the market early!
It'll probably become the next 'cross-processing' and look hideously played out by this time next year - so get on it quick.
Photographer
394872
Posts: 532
Sofia, Sofija grad, Bulgaria
I found more on the Technicolor look: http://pavel-kosenko.livejournal.com/18754.html That's in Russian, don't know how many of you can read it. There is a zip file with the actions made by this guy that follow the mathematical process. He confirms the LUTs are film company's secret but shows the principle. Nice article but not much news revealed. Maybe someone can use it as a basis to take the image to the final look and share the decoding 
Retoucher
Benski
Posts: 1048
London, England, United Kingdom
George Anchev wrote:
I found more on the Technicolor look:
http://pavel-kosenko.livejournal.com/18754.html
That's in Russian, don't know how many of you can read it. There is a zip file with the actions made by this guy that follow the mathematical process. He confirms the LUTs are film company's secret but shows the principle. Nice article but not much news revealed.
Maybe someone can use it as a basis to take the image to the final look and share the decoding Couldn't get the action to show up in my Photoshop for some reason.
One thing I've just stumbled on which I can't work out whether I'm just being slow about, is how to filter colours in Photoshop? On their aviator diagram, they show a 'Green filter' which seems to show the green swimsuit in dark black, and everything else in the scene pale.
Closest I can get to that is Selective Color... and put the Black down to -100 on everything, +100 on Green... Hmmm...
Photographer
Fashion Photographer
Posts: 14388
London, England, United Kingdom
Benski wrote:
Couldn't get the action to show up in my Photoshop for some reason.
One thing I've just stumbled on which I can't work out whether I'm just being slow about, is how to filter colours in Photoshop? On their aviator diagram, they show a 'Green filter' which seems to show the green swimsuit in dark black, and everything else in the scene pale.
Closest I can get to that is Selective Color... and put the Black down to -100 on everything, +100 on Green... Hmmm... I can, but I don't really like the effect....
Photographer
Fashion Photographer
Posts: 14388
London, England, United Kingdom
Benski wrote:
Couldn't get the action to show up in my Photoshop for some reason.
One thing I've just stumbled on which I can't work out whether I'm just being slow about, is how to filter colours in Photoshop? On their aviator diagram, they show a 'Green filter' which seems to show the green swimsuit in dark black, and everything else in the scene pale.
Closest I can get to that is Selective Color... and put the Black down to -100 on everything, +100 on Green... Hmmm... A colour mask!
Photographer
Clint Earhart
Posts: 109
Denver, Colorado, US
thanks for all the feedback great tutorials 
Retoucher
Benski
Posts: 1048
London, England, United Kingdom
David-Thomas wrote:
I can, but I don't really like the effect.... Hah, just going to have to outsource all my Technicolor work to you if that's alright 

Photographer
Kelvin Hammond
Posts: 17397
Billings, Montana, US
I spent a little while yesterday trying to write an action that would do this type of color change, and what I found was that it was more predictable for me to convert to CMYK, split channels, convert all back to RGB, and then assemble the 4 layers using c, m, y, k to mix using various opacity and blending modes, and that led to some very creative coloring possibilities. (Previously I had tried doing this using 3 RGB layers, and for some reason, it was harder for me to get a good looking mix, and even the extended mixing possibilities seemed weak.)
I left K on a normal blending mode, and then I used various combos of lighten, darken, multiply, and screen on the other cmy layers, along with the ability to change hue/sat or color balance on those layers. I also found that using RGB layers tends to require the lighter blending modes, while a cmyk split favors darker blending modes.
While I think it's possible, my mind wanders too much... so I never did really replicate the Technicolor look after I saw the other possibilities.
Retoucher
Digital Soup Retouch
Posts: 1433
Los Angeles, California, US
We film guys used to get this sort of effect slightly under exposing slide film. It still needed some post to achieve the over all look. Those saturated blues come from a polarizer!
Retoucher
Han Sam
Posts: 169
Guangzhou, Guangdong, China
Benski wrote:
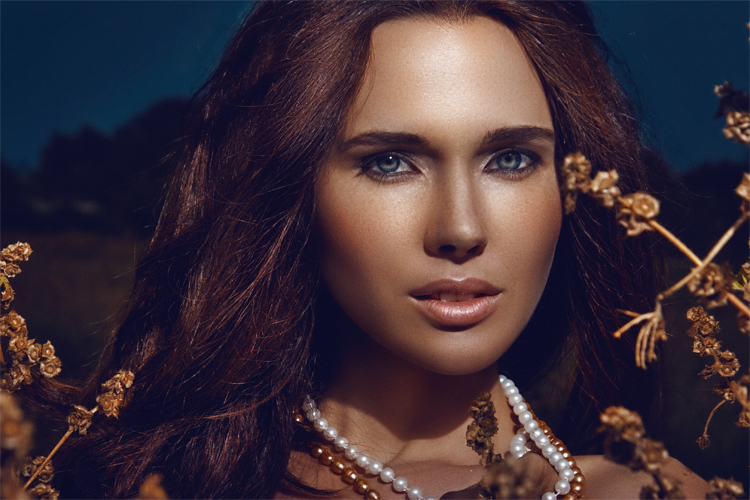
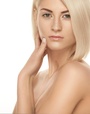
I got really into this look a little while ago. Wish I'd done more with it as it seems like everyone's using it at the moment.
Here's the saturation map and colour map.
![https://www.the-shoe-horn.com/wp-content/uploads/2011/03/facolor.jpg]() Thks your explained but i wonder how to created saturation map and color map like this? would really love to learn how to read these maps properly.
Photographer
Herman van Gestel
Posts: 2266
Amsterdam, Noord-Holland, Netherlands
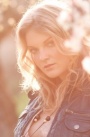
thank you....it was helpfull/inspiring in doing this image... ![https://photos.modelmayhem.com/photos/110615/07/4ff8c442de8c3.jpg]() h. h.
Photographer
Ryan Bater
Posts: 3631
London, England, United Kingdom
It's easy to get the 'Gucci' colouring effect, by using Selective Colouring, and Colour Balance alone. Send me an image, I would show you an example, but the only work I have is from a recent editorial which is not published yet.
Retoucher
lukau13
Posts: 154
Trebinje, Republika Srpska, Bosnia and Herzegovina
A while ago i did this image inspired by Gucci look, which is awesome, and in same time a bit boring since everybody start using this color style. I don't know how they do this, but my way is duplicate blue channel/Multiply 50-80%/Shadow-Highlights on B channel, with a small touch of saturation. ![https://photos.modelmayhem.com/photos/110516/03/4dd0fa64037b1.jpg]() and this is before version. ![https://i51.tinypic.com/2i7xto8.jpg]()
Retoucher
Digital Soup Retouch
Posts: 1433
Los Angeles, California, US
Benski wrote:
Couldn't get the action to show up in my Photoshop for some reason.
One thing I've just stumbled on which I can't work out whether I'm just being slow about, is how to filter colours in Photoshop? On their aviator diagram, they show a 'Green filter' which seems to show the green swimsuit in dark black, and everything else in the scene pale.
Closest I can get to that is Selective Color... and put the Black down to -100 on everything, +100 on Green... Hmmm... Go do a channel split from the channel dialog box.. It will split all of the channels into separate jpegs that you can then affect color on in photoshop! You will need to restack them into one image!
Photographer
394872
Posts: 532
Sofia, Sofija grad, Bulgaria
lukau13 wrote:
I don't know how they do this, but my way is duplicate blue channel/Multiply 50-80%/Shadow-Highlights on B channel, with a small touch of saturation. Can you please tell more? Somehow this didn't give the same result for me.
Photographer
Herman van Gestel
Posts: 2266
Amsterdam, Noord-Holland, Netherlands
lukau13 wrote:
A while ago i did this image inspired by Gucci look, which is awesome, and in same time a bit boring since everybody start using this color style.
I don't know how they do this, but my way is duplicate blue channel/Multiply 50-80%/Shadow-Highlights on B channel, with a small touch of saturation.
![https://photos.modelmayhem.com/photos/110516/03/4dd0fa64037b1.jpg]()
and this is before version.
![https://i51.tinypic.com/2i7xto8.jpg]() I can interpret this in different ways...
did you duplicate blue channel and did the multiply, all on a new file and put the output back into th B-channel of the original image?
or
did you copy the blue chanel onto the original image, and did there the multiply?
I can's seem to get the same effect....

Photographer
Mister Monday
Posts: 509
Toronto, Ontario, Canada
Just playing.... ![https://photos.modelmayhem.com/photos/110620/02/4dff0eacebf28.jpg]()
Photographer
Neil Snape
Posts: 9474
Paris, Île-de-France, France
Herman van Gestel wrote:
I can interpret this in different ways...
did you duplicate blue channel and did the multiply, all on a new file and put the output back into th B-channel of the original image?
or
did you copy the blue chanel onto the original image, and did there the multiply?
I can's seem to get the same effect.... Yeah it's not clear. I tried this on an rgb, then tried on a Lab.
Photographer
Marcus Turner Photo
Posts: 201
Chicago, Illinois, US
Herman van Gestel wrote:
thank you....it was helpfull/inspiring in doing this image...
![https://photos.modelmayhem.com/photos/110615/07/4df8c442de8c3.jpg]()
h. do you have an psd to go with it?
Photographer
Herman van Gestel
Posts: 2266
Amsterdam, Noord-Holland, Netherlands
Marcus Turner Photo wrote:
do you have an psd to go with it? now that i've seen lukau's version, which I think comes closer, i will go back to the drawing board....
so sorry ...no i can't
Retoucher
lukau13
Posts: 154
Trebinje, Republika Srpska, Bosnia and Herzegovina
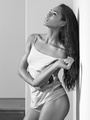
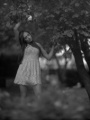
Make a copy of blue channel, than use Multiply mode, and bring opacity down on 60-90% (it all depends of image exposure, or brightness). than do some Shadows/Highlight adjustments on existing Blue Channel layer, your results should have look like this: ![https://i52.tinypic.com/5jy4ol.jpg]() Bring back colors with saturation, and if it's needed do sky or anything "cyan/blue" more bluish than it is (originally in this image, sky was more "grey" than blue, so i did some coloring on it), and do more colors corrections with Selective colors (black is indigo blue), make colors strong. Here's another example of original gucci image (which i use as leader), and my version of some other image: ![https://fbcdn-sphotos-a.akamaihd.net/hphotos-ak-ash1/168405_1794567341717_1165685516_32109069_5328116_n.jpg]() Do some experiments, if it doesn't work with blue channel, than try another one (red or green, or mix all of three) till you get what you want. And to make something clear, this color thing, you won't get on images with soft lights and shadows! I'm saying this, because some photographers want these results on "a la Leibovtz" lighting! Never gonna happen. I hope you'll get something from here. P.S. On second example gucci vs. desert girl, i use mix of blue and green channels, (blue-multiply-70%, green-overlay-50%)
Photographer
Neil Snape
Posts: 9474
Paris, Île-de-France, France
Thanks Lukau13,
That works just fine for my playground.
I don't have any images of my own to try it on so I just hacked a low res jpg.
I'll agree on lighting, you need the source material to make it strong, it will work on images that have the background, light, contrast from the start.
Photographer
Herman van Gestel
Posts: 2266
Amsterdam, Noord-Holland, Netherlands
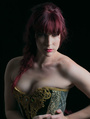
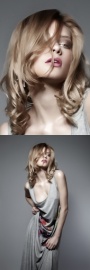
ok..based on Lukau's explanation, looks more to it indeed... previous version ![https://www.hermanvangestel.com/mm/C1A229499_3.jpg]() new version ![https://www.hermanvangestel.com/mm/C1A229499f.jpg]() Herman Herman
Photographer
Grazian
Posts: 104
Wolfsburg, Lower Saxony, Germany
dont know if this is a stupid question, but how do i copy a blue channel onto another layer, cant get it to work, im always gettin a alpha channel ? maybe im doing something wrong ?
Retoucher
lukau13
Posts: 154
Trebinje, Republika Srpska, Bosnia and Herzegovina
Neil Snape wrote:
I'll agree on lighting, you need the source material to make it strong, it will work on images that have the background, light, contrast from the start. my point exactly!
you're welcome!
In layers palette, switch on channels, and leave just blue one ON (RG/OFF), than copy that channel , turn back on all the other channels, go back to layers palette, and paste it!
Photographer
Grazian
Posts: 104
Wolfsburg, Lower Saxony, Germany
lukau13 wrote:
my point exactly!
you're welcome!
In layers palette, switch on channels, and leave just blue one ON (RG/OFF), than copy that channel , turn back on all the other channels, go back to layers palette, and paste it! thx a lot for your fast answer, but i still dont get it this way, i have tried what youve said but no luck, i cant copy it , i cant use ctrl+c and ctrl+v, nothing happens, i think i miss something....
how do you copy it exactly, do you duplicate the channel in the channels ? how do you paste it exactly...... loool i think im really blind :-)
i have a copy of the blue channel in the channels named " Blue Copy" but how do i get it to the layers?
|


 I've figured out how to do it, pretty much perfectly - the post processing, that is. To get the Gucci look exactly, you need to use hard light and a polarizing filter.