|
Forums >
Digital Art and Retouching >
Chris Crisman retouching
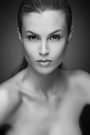
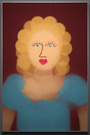
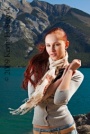
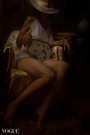
Hi there. Does anyone have an idea of how his photos are retouched, some main bullet points? They have this painterly look to them and I can't for the life of me figure out how it's done. I think I know the shooting / lighting stuff that goes into it - usually it's a big Octa lighting the subject pretty close to the ambient (not overpowering the sun or anything, but bringing model's face to the same level as ambient) + shot with a wide aperture, but it's not enough, there's certainly some serious retouching that goes into it that I'd like to understand.    That last one they actually underexpose the background but it still shows that painterly look. As far as I know these are not composites, at least not the last one. Thoughts? Aug 09 13 03:47 pm Link i think lighting has a lot to do with the final effect. my deeper softboxes give a different look than my octobox. i dont think he is shooting wide open, the depth of field seems too large to me for that. he has a wonderful color palette in each of these that may be where the post work comes to play. just my guess Aug 09 13 04:11 pm Link #3 looks like a composite to me. The fact that the model has his finger on the trigger prevents me from thinking about it any further. Idiots shouldn't handle guns, not even for photographic purposes. Aug 09 13 04:21 pm Link Here is behind the scenes for that shotgun photoshoot http://www.crismanphoto.com/blog/?p=7521#more Cmon Peano, I count on you here, could you please look past the trigger finger and help the brother out? We can agree that this is a toy gun if that would help  Aug 09 13 05:57 pm Link robert christopher wrote: Yeah the lighting certainly plays part but my guess - it still wouldn't be anywhere close to the final result. I'd be interested in seeing how that colour palette is achieved Aug 09 13 06:00 pm Link look at the shadows and see all the flaws in the comps. Aug 09 13 06:01 pm Link sdgillis wrote: Which comps? I'm 100% certain that at least some of those are not comps. Aug 09 13 06:24 pm Link To make this more specific - I have a photoshoot coming up this Sunday and I'd like to get that look in the end. I did a lighting test shoot last weekend and this is what I came up with:  Image is straight out of the camera with a bit of adjustments in the ACR such as exposure, fill light and colour temperature. Now, where do I take it from here? Did I get the lighting right? I think I did, to a point. I don't have a deep octa, I used soft silver PLM instead. I think I should wrap it in softening fabric to make the lighting softer, but I'd say it's fairly close. Maybe I should allow the ambient to be a bit brighter (it was 5PM at that time) too. What else? How to go about retouching it to introduce that painterly feel, if that's even possible on that image? And if not, what did I get wrong? Aug 09 13 07:00 pm Link  1) crop original 2) adjust luminosity by colour 3) adjust saturation by colour 4) colour correct (to get skin tones to target) 5) add some vignette (and not a single brush stoke or mask, if we don't count the vignette) suggestions - find green grass to get better contrast Aug 10 13 01:36 am Link cwwmbm wrote: Somewhere here? Aug 10 13 01:57 am Link George Thomson wrote: Any chance you could post a bigger sample of the final image? I have a feeling all you did was colour-luminocity adjustments and this is not enough. I can do all of that by powering the strobe more 1 stop or so and then descreasing the saturation. Aug 10 13 02:51 am Link Tulack wrote: I gotta say, I don't understand if you're joking or serious, but on the off chance you are serious - your final results have nothing to do with the examples I posted in the OP Aug 10 13 02:53 am Link I guess we understand color different. Aug 10 13 02:59 am Link It might be; and yours might be more correct. But could you perhaps be a bit less mysterious about it and reveal what you think I don't understand?  I mean, from where I stand, your examples are not anywhere close to what I posted in the opening post. If you think they are closer that I believe, then maybe you could elaborate? I mean, you already went through the trouble of doing work on them, might as well write something up Aug 10 13 03:10 am Link Okay no wait, I think I'm starting to get it. I really didn't get what you meant by "grandma" until now It does look a bit close (I guess the sky wouldn't be close anyway because of different shooting conditions). Could you describe a bit what did you do? Aug 10 13 03:12 am Link cwwmbm wrote: There is one nice plug in from Alien skin called snap art with pretty good results with paint effects . Aug 10 13 04:49 am Link you may want to contact Robert Randall and notify him of this thread, cause I believe he's good at this kinda stuff: https://www.modelmayhem.com/97702 Aug 10 13 06:47 am Link He's got bts videos Most of his work ARE composites. Follow him on Twitter he posts step by step often x Aug 10 13 07:03 am Link cwwmbm wrote: of course this is not a full retouch, just something that will get you "closer" Aug 10 13 09:06 am Link A few ideas you might play around with ... - B/W adjustment layer in multiply mode to darken and dull background colors - Another B/W layer to tint the grass (if you want it green) - Selective color on the subject - Selective color to tweak sky color - Curves to throw a little light on the ground in front of the subject  Aug 10 13 10:25 am Link I would consider including a softbox in the shot, closer to the model, and shooting a clean plate (tripod) to retouch it out. Aug 10 13 10:49 am Link Peano wrote: Can you please expand on how you would use a B/W layer to tint the grass green? Aug 10 13 01:12 pm Link Stecyk wrote: Tick the "tint" box, experiment with the greens in the color picker, lighten or darken using the yellow slider. Aug 10 13 02:50 pm Link dp Aug 10 13 03:03 pm Link Peano wrote: Thank you! Aug 10 13 03:11 pm Link Hi Andrey, What you want to use is a beauty dish without the diffusion socket in the front. Place it close to the model such that when you have the composition and framing right, your light or the lights stands don't show up in the frame. In a scene like this, you NEED an incident light meter. Input the fastest shutter speed your camera allows. My Canon 7D is 1/250 s. I know some Nikon models only go up to 1/200 s. Enter "1/250" as the shutter speed and meter the ambient light with your incident light meter. What ever the f-stop your meter gave you, over-power the sun look on your strobe by 2-3 stops above the ambient reading. You should get about 60% of the "look" you're after with that. The remaining is dodging and burning. cwwmbm wrote: Aug 10 13 03:35 pm Link RONALD NZ TAN wrote: Why not let them show in frame if the lighting works, then remove them later? de0rbit wrote: Aug 10 13 03:40 pm Link Why remove them later in post when you could physically take care of it right then and there?!?! de0rbit wrote: Aug 10 13 03:46 pm Link RONALD NZ TAN wrote: What if keeping the lighting out of frame results in inferior lighting?!?! Aug 10 13 03:48 pm Link Guys, you got hang up on the last picture, I guess I shouldn't have posted it. I know how to overpower the sun, that's not what I'm asking. I'm asking how to achieve the painterly effect these images have to them. Can we all ditch the third image and concentrate on the first two? There is no overpowering the sun there, there is matching the aambient light, be it the old lady outside or old man in the church. And then there is SOME retouching that goes into getting that painterly effect. What I'm asking is WHAT happens in photoshop. All advice I'm seeing here is how to turn my image into "overpower the sun" image, but that's not what I'm after. If I was after it - I would have done it in camera. Aug 10 13 05:27 pm Link Try this thread: https://www.modelmayhem.com/po.php?thread_id=348771 Part of what he does is mix in a gradient map with 30 degree hue orange in the middle, which is his way of desaturating blue skies. Of course there are other ways, but the images in the OP seem to preserve saturation at the warm end and lose it in the cool hues. Aug 10 13 05:39 pm Link Also the Crisman images' widescreen horizontal format looks more cinematic. Aug 10 13 05:53 pm Link cwwmbm wrote: You posted a shot of a guy standing outside in a field. You want that shot to look like he's sitting inside a church with diffuse lighting through stained glass? Aug 10 13 06:11 pm Link What I see is actually D&B on LOW and HI frequencies. You can skip frequency separation, but it becomes more time consuming task then. Something REMOTELY similar could be achieved using some plugins (Lucis, Topaz etc), but results, universally applied, gonna be DRAMATICALLY worse, producing much more noise, especially in shadows, etc. Basically, I think this technique (so called "pure clean look", or in the ad industry even worse, almost nonhumanly ueber-super-clean sometimes) is some kind of sculpting/carving on different levels, of small details and changing or increasing/decreasing the major elements of lights/shadows/tones. It's not just technique, but eye and how you use it. He creates the new layers of depth, plus eliminates all imperfections or busy elements by smoothing out tiny details. https://www.google.com/search?q=chris+c … 80&bih=844 Aug 10 13 07:04 pm Link Peano wrote: How about old woman in the field? Aug 11 13 12:47 am Link This is as far as I got. Still not satisfied but at the same time dunno how to improve it.  Aug 11 13 03:51 am Link http://strobist.blogspot.kr/2011/04/chr … tment.html http://www.iso1200.com/2011/04/additive … chris.html http://photography-on-the.net/forum/sho … p?t=956908 http://blog.advancedphotoshop.co.uk/tut … t-process/ The guy does quite a few interviews and things, some of which are about his actual technique. I'd try piecing together as many sources as I can and see how much it reveals about his technique. Aug 11 13 04:31 am Link cwwmbm wrote: I think you're attributing too much of the painterly feel to color. It's simple enough to mimic the color. But the feel of the target image comes much more from the clothes blowing on the line, the clouds, and the shadows. Those all convey the sense of a breeze blowing on a sunny day. Your image lacks all of those elements. Aug 11 13 05:17 am Link  Reminded me a bit of these http://flypapertextures.com/spring-pain … -textures/ But now that I see them they are not that similar Aug 11 13 10:45 am Link Nice shoot, just playing...     Aug 11 13 07:53 pm Link |