|
Forums >
Photography Talk >
Digital Backdrops
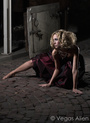
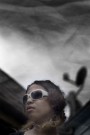
I am trying to figure out the best way to put subject in front of digital backdrop using PS I just started shooting green screen and have digital backdrops Can someone help me out to get a great image. Smitty Sep 13 05 07:52 pm Link Yadda yadda The best way i found is to put the background in instead. have two windows open or as many backgrounds as you want open and then switch them until you find one you like and want to use. The purpose of the green background is to remove it so you can put a new one in its place. Sep 13 05 07:58 pm Link FYI try and keep the light even on the background also. You know yuor doing the lighting good when you can click once to remove the green and you take it all off in one shot, maybe two shots. If you have to keep clicking to remove green more than a few times the light needs to be more even across the green background. Shadows and dark spots make it a different shade thus another click to remove it. Blue works good too and so does bright yellow depending on what the model is wearing. Sep 13 05 08:01 pm Link Pete wrote: EDIT: The site is not my personal site. It is a site i had in my favorites for the CD's for the backgrounds for shooting green backgrounds. Sep 13 05 08:04 pm Link Open the image shot on the green screen. Duplicate the layer, and turn off the eyeball to the underlying layer on the layers pallete (this will make sense in a minute). Take the magic wand, set the amount to about 20 and check the contiguous box. Click on the green background. If the green was lit nice and evenly you should get most of it with one click. I if you don't get the vast majority of it, hold down the shift button and click anywhere on the green that wasn't originally selected to include it in your selection. When you have the vast majority of the green color selected, hit the delete button. This is where turning off the bottom layer will help, you should see your model drifting on a clear background. If you simply try to select the green background without the duplicate layer and hit delete, your background color will show up in it's place. Try to get as much of the green background with just the magic wand and hit delete. When you get as much of the green selected and deleted as you can, take the move tool and drag the model onto your digital background. Then, carefully use the eraser tool to go around the edges and get the last little annoying pieces (or use a layer mask, if you are skilled in that) IF you really want to do this, it is important to set up shots right in the first place. Have the model as far away from the backdrop as possible to avoid green bounce back and color fringing on the edge of the model. Watch for flyaway and "see through" areas of hair. Anything see through, will show the green color and give you fits in post process. Light your green screen as flat and evenly as possible. It's not hard, once you get the hang of it, just tedious. As for making a real model on a fake background look right, that is quite hard as you have to try and match the light direction and intensity of the backdrop to the model. Mark Sep 13 05 08:17 pm Link i never useds a green background or green screen for this purpose. they useing a white background, jest make sure that the background is light evenly, and the model two stops lower. exmp. background at f.16- subject-f.11, if your shooting digital, you may to adjust. this is call a blowout, cutout, whiteout, and other diffrent names. once you get the photo in to photoshop, do the basic adjustment to the model only. the very best way of doing this is through masking on the channels. i can give you the short detail here, but check out Martin Evening, photoshop cs for photographers book. basicly with this way, you drag the background to the image (that is mask) and use a overlay blending mode. this way you'll get great detail on the hair. the above is basic shooting idea, but you can make this work with any background. also, become freinds with your pen tool. Peter idea will work, i have done it, but masking is great for hair, if the model have hanging earrings, and so on. fyi- he did one for cs2, basicly the same book, i'm sure the one for cs is cheaper, and has been use as a college text book, and you really don't need the disk. also, no he didn't pay me. LEE Sep 13 05 08:36 pm Link Here's something I did in photoshop in under 60 seconds. I even created the fake backdrop. This was done on a low res image. You ideally want to do it on a hi res image, but this is just to demonstrate the idea. Mark  Sep 13 05 08:45 pm Link I missed a bit of the black background on her arm on the left, but getting rid of that last little bit will make or break the image. I do agree that it can be done on any solid color. I prefer white or black over green. If you know you are going to drop the model on a dark toned background, black can work well, and if you are going to drop the model on a light backgroud, white can work well. IF you are advanced in your photoshop skills, once you get the vast majority cleaned up, you can use the wand to click anywhere in the "clear" portion of the top layer, then go to select, modify, and "expand" your selection by a couple of pixels (since you selected the void area "expanding" actually contricts down on the model) then hit delete, you can also "feather" your selection a few pixels and delete that as well and then fade the deletion from the edit menu. I hate the pen tool, but others swear by it. When you get a little more advanced, you can overlay a tropical sunset onto a girl wearing a white t-shirt, so it looks like the shirt has the sundown painted on it. The trick is to add the t-shirt weave back in, which can be done by equalizing a copy of the t-shirt and overlaying it on the photo in overlay mode....but I digress. Mark Sep 13 05 08:53 pm Link Here's one I did taking a little more time. What do you think....something like this? Original photo was done on a black backdrop. Mark  Sep 13 05 08:58 pm Link Peter Dattolo wrote: Uhh, have you ever done this? Sep 13 05 10:57 pm Link Gunfitr wrote: You've obviously got some time on your hands tonight. Sep 13 05 10:59 pm Link When not lighting the model evenly (using grid spots, etc) and when you want shadows on the ground and/or wall, this process takes more time. Shoot your own backgrounds and remember the angles of light, angles of view, eye-perspective and amount of foreground. After pasting the model in, go back & grab the original shadows. Paste them in fully black and then adjust the opacity down so you can see through to the background. Time consuming but it gets faster as you do it more. My Red Doors shot is a good example of the above. I pasted the original shadows in and wrapped them around the contours of the ground and door. Sep 14 05 12:15 am Link Thanks all for your expertise, Mark that is what I am trying to achieve. The one you took some time on. I guess like anything practice makes perfect. Sep 14 05 06:28 am Link If you are interested in making your own "digital backdrops", set your foreground/bacground color to 2 complementary colors (the two color boxes over on the tools pallete) Then go to Filters-Render-Clouds. This will give you a boring two color cloudy looking image. Then go to Filters-Render-Lighting effects, and render a spotlght or omnilight on the background. You can pull on the handles to make the light bigger or smaller, and fade the intensity. While you have that menu open, look at the bottom and there is a box for selecting the "texture" channel. Click the red/green/ or blue channel and then slide the slider over to 100%, (where it says "mountainous") and it will give your background a 3d rocky looking surface. You can then go to the edit menu and fade the effect a bit. Add a bit of gaussian blur, and voila....instant backdrop. Try filling an empt backdrop with a "pattern". Choose the paint bucket, and set the mode at the top to "pattern" and select one of the pre-existing patterns, and run a lighting effect on it.... that can be cool. As for cutting and pasting the model off of one background to another, 95% of it is quite easy, the edge work is hard and tedious, but with practice, you can do it in about 10 minutes of work. Once you get the model onto the background, go to the Edit-transform-scale menu, and you can make the model bigger or smaller by pulling on the handles that appear. Once you have clicked on transform-scale, up at the top will be a dialouge that allows you to see the percentage of increase you are making to the image....click the lock box that appears between the x and y scale boxes, and your image will get bigger in height and width automatically as you drag the sliders, instead of just stretching her wider or taller. Once you get the model the size you want, you can take the move tool and move her up, down, left or right with the move tool to put her where you want her. Mark Sep 14 05 09:45 am Link The edgework can be harder depending on original background, hair, and most importantly, made for a website viewing only or printing large? If just for website and using a less contrasting background you can get away with less edge perfection. There's some programs and plugins for chromakey specialty: primatte - very expensive ($299!) and doesn't perform that well at all (wayyy overpriced) maskpro3 - pretty good program, fair to high learning curve (practice curve) Corel Knockout2 - low cost and does a suprisingly good job very fast, deals with hair really well. I think it's only $49-$99 (will run standalone or as ps plugin) Or, use exising PS tools. Usually a combination of both especially if background has some lighting differences or the subject and desired background contrast a lot. The blue or green chromakey backdrops that are foam backed are much better than fabric for many reason. Craig Sep 14 05 09:57 am Link Here's one I did in 7 minutes flat. From downloading the image from my port to reposting. It isn't that hard once you get the hang of it. I missed one small spot near the bottom right, where I accidently cut off some of her hair just above the shoulder, but I had already dragged her over to the backdrop and it was too late to use the history brush to paint it back in. But this gives you the idea. If you or anyone else is interested in any further explanation or tips, just let me know. Mark  Sep 14 05 09:59 am Link I guess nobody here uses the extract tool in PS...? Sep 14 05 10:12 am Link Gunfitr wrote: Mark, yes I agree when there isn't high contrast bewteen subject and background but take the same shot and, say, put her in front of the eiffel tower (combine with an actual photo) with a bright blue sky, wind blowing and then print an 11x17 or something. If you can do that in 7 minutes then you should give paid lessons because it can be extremely tedious to not show any fringe problems and be noticeable in situations like that. Sep 14 05 10:24 am Link Paul Ferrara wrote: I have done some here and there but just practicing. I bought a smaller background to do some test shooting on but it is to tedious work for me to do with models. So i have not used it with models nor do i intend to anytime soon. Sep 14 05 11:47 am Link Paul: You are absolutely correct. In my original post, I said getting it to look right is another story and hard to pull off. For web purposes, with the lowered res, it's not so hard. If I was going to do this for a print bigger than 4x6, I might spend over an hour at a minimum. In some cases, you have to enlarge the photo to pixel view and manipulate single pixels along the edge. That's the "tedious" part. While there are some decent extraction tools and you can create an alpha channel and load it as part of the extration dialouge which I can do, when it is all said and done, for the most part I consider green screening a gimmick of limited usefullness, unless you are going for more of an "artys" composite. There is a boy in New York who goes by the name of Photoknight, who does some really quite incredible composites, but I would guess he spends hours and hours putting them together. No one would think they were created as a singular image, but they are quite spectacular. In the end, I am never quite satisfied with the "believeability" of the photo, although some "nice" effects can be generated. Even if you do the perfect "extraction" the hardest part is getting the whole concept to look "real". I didn't say I was great at it, I was just trying to answer the posted question on how to get a start at it. Mark Sep 14 05 12:03 pm Link Thre is a video tutorial on Russel Brown's site that you may find helpful. It's called Advanced Masking and is near the bottom of the page. It's for PS 7 and later. http://www.russellbrown.com/tips_tech.html Sep 14 05 05:20 pm Link Hey Mark, You just reminded me of a shot I did back in '02.   Sep 14 05 10:38 pm Link If the shadows had been captured and applied and the contrast matched between model and doorway, it wouldn't be half bad. Sep 14 05 11:26 pm Link |


 Nice job on all of them. I thought about this seriously at one time but getting the color out of the hair was too much like work.