|
Forums >
Photography Talk >
Photo Retouching
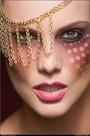
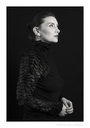
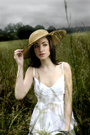
What is the best way in PS to retouch photos of models like the ones you see in magazines or the ones on this site I have played around with the gaussian blur, but if there is any other way to get that magazine like touch up I am all ears. So if you could jot down the steps that would be awsome. I touched up my avatar I guess it looks ok..I am always looking for improvement Jun 29 05 08:38 pm Link You mean kind of like this?  If it is, let me know and I'll tell you... it took me about 10 minutes to do... Jun 30 05 01:17 am Link I'd like to know how you retouched that photo, even if the thread author isn't interested.  Jun 30 05 02:26 am Link Yes exactly like that tell me in detail how you did that I know a little but a lot more would help Jun 30 05 08:43 am Link I'd like to know more about this as well. I often end up outsourcing my retouching but would like to be able to do it myself within a reasonable amount of time. I actually show a pretty good article about it on OMP. It's here: http://member.onemodelplace.com/newslet … ticle7.cfm I think only members can see it, though. Jun 30 05 09:46 am Link Making the link clickable... http://member.onemodelplace.com/newsletter_glamour_article7.cfm That is Glamour / "Maxim" style of retouching. That may not be the look you end up liking for every photo you take. There are several ways to retouch a photo. Some are more effficient with various techniques while others are more detailed. A quick Google search on Photo Retouching Techniques will bring up a few links explaining some techniques. I would go into detail about how I retouch my photos, but I've been training my interns about the same subject for the past month and I really don't want to go over it again at the moment. Retouching is an art form in a lot of cases, and you will need a Mediocre to Advanced level of knowledge of Photoshop to become talented at it. Jun 30 05 11:10 am Link 1- copy the file and resize to screen so you can use as color reference next to the file being edited. Keep it open behind the full-sized version. 2-Using the heal tool resized to just less than each blemish, sample clear skin as close to the blemish as possible and use that to heal the blemishes. 3- Once you have all the skin clear, use the skin near the eyebrows to heal there and remove stray hairs. (In this image I actually reshaped the brows they way I wanted the model to have them done so she's have a reference to bring to her salon of choice). 4- Copy the image as a new layer and change the layer style to "soft light" 5- Zoom out of the edited image so you can see your reference image. 6- Use the color/hue tool to restore the skin tones as close as possible to the original. 7- Use the brightness/contrast settings to bring the look of the image as close as possible to the original. You may have to go back to color/hue ot fine tune the color. 8- Make sure the top (soft light) layer is selected and bring up "gaussian blur" 9- Bring the face to the tool's preview window and zoom in/out until the whole face fill it. 10- Increase/decrease the blur until you can just make out the whites of the eyes and click OK. 11- Using the history brush bring the eyes and mouth (lips and teeth) back to full sharpness. Flatten the image. 12- If necesary, use the sponge to desaturate 45-42% on the teeth and the whites of the eyes. That's it! It would be great to see samples of your experiments with my technique :-) Jun 30 05 12:46 pm Link Jun 30 05 01:34 pm Link If the work is aimed for portraiture, or the audience excludes bookers, agents, and casting directors, blurring is a very valuable time saver. For photorealistic results, though, blurring skin will almost always reduce the believability of the image if it's examined carefully. (If the work is done poorly, it doesn't require careful examination.) In the majority of cases, it changes the visible contours of the face, introduces edge artifacting where the capture texture changes to the blurred one (adding noise helps, but does not eliminate this), and risks inconsistencies of "feel" in the image as a whole. (Notice how Carlos' example shows marked differences in facial contours, for example, even in a low resolution example.) It CAN be done, but in most cases, it's much more work to fix a blur than it is to heal, clone, paint, and otherwise handle the image directly. The majority of the results from the "Maxim Look" are via lighting and makeup, with careful post-production. If you look at those images carefully, you'll notice that the models' skin looks real--texture, pores, peachfuzz, and so on are all present. The article from OMP is one method to get an acceptable result with less skill than is needed to match the magazines' levels of retouching, but a delicate touch is needed if you expect a critical audience to accept the work. Jun 30 05 10:41 pm Link If you skip the gaussian blur part you still wind up with a good image. I just added that affect for the soft focus glamour look... As you said, using the heal tool for the imperfections you are correcting is the best... Posted by Kevin Connery: Jul 01 05 12:39 am Link Since I model, photograph, do makeup and have been doing graphics/wed development since I can remember, here are my few tips. 1. dont EVER over do the blur, it just makes the best image look bad. 2. If you really need a smooth surface use airbrushes matched to the skin color but you will need some practice or your subject will become one color of plastic. 3. use the healing brush or patch, really works great for minor imperfections. 4. dont ever over expose, or make an image too saturated... color doest mean neon colors  ) ) .... ok, here are some samples from what I've retouched for others in the past. This is more glamour, a ton of skin airbrushing - very fakin'bake.  this is really drastic I rarely change face/body features but this was not the case.  another 'glamour model'  and another...  Also dont believe everything you see in magazines heres what I mean... more natural retouching. A.Jolie  C. Aguilera  >NO ONE BETTER STEAL THESE IMAGES FROM HERE, THIS IS FOR SHOWING PURPOSES ONLY. ALL CONTENT IS COPYRIGHTED!!!< Jul 01 05 07:51 am Link Got this technique from a friend who used to edit pics for MAXIM. -Copy the original layer -On original layer (below copy layer) click >Filter>noise>remove dust and scratches.. around 4-10 px ..this works better than Gaussian blur because it doesn't spread out the pixels as much... -make a cross hair target on original by pulling guides from side -use clone tool, make sure aligned is checked>cmd click to mark target by palceing over cross hair until it turns red -go to copy layer>you have to hold down cmd key to see clone target, line up over same crosshair as before, release cmd key and click - now just clone bottom image that is smooth onto top layer.. hints...you can play with opacity in brush settings to not completely wipe out skin texture... also by painting from lower copy to top you can maintain hard edges and lines..just stay in side..might have to zoom way in just applying a guassian blur to an image in an attempt to soften it will wipe out these egdes now...practice..practice..practice Jul 01 05 01:56 pm Link what kind of software do you guyz use? I want to purchase some to also be able to edit my own pictures when photographers are too busy. Thanks! Jul 01 05 05:28 pm Link I think it's silly to share your retouching techniques. Now selling them is another thing. Jul 01 05 05:41 pm Link pixel by pixel, dodging and burning, precise cloning, healing brush sparingly, no magic shortcuts. Now, repeat after me in the voice of Joan Crawford: "No gaussian blur...EVER!" Jul 01 05 06:10 pm Link Posted by Eryn Ashwyn: Adobe Photoshop - about $600. You can get a legit copy for free, it often bundle with flat bed photo scanner, or student Photoshop version at any college bookstore for $100 Jul 01 05 06:20 pm Link Carlos, Your technique works beautifully. I have Corel Paint, not Photoshop but was able to duplicate your technique with GREAT results. Thanks a LOT. Jul 02 05 01:01 am Link Glad I could help :-) And I would never dream of selling m,y photoshop techniques because they are an amalgam of techniques taught to me by other free of charge and some experimenbtation on my own... so I am just "paying it forward" Posted by photog2b: Jul 02 05 04:21 am Link Adobe Photoshop CS... getting ready to upgrade to CS2 soon :-) Posted by Eryn Ashwyn: Jul 02 05 04:22 am Link Dear Eryn, I shoot film and then scan. In my line of business (commercial photography) and in fine art what I hand over to a commercial client or someone who buys a print, what they get is the finished product. The idea that one of my subjects (or models) would tinker with one of my images would ever so slightly upset me. That, fortunately does not happen to me. This very idea (a model modifying a photographer's photograph) would make a worthy subject for this forum. On the other hand the first image in this thread shows a woman's face, so manipulated that the skin does not look real. This gaussian tool gives me the creeps! Jul 02 05 12:24 pm Link Posted by Eryn Ashwyn: Most photographers prohibit any modification of their images. Jul 02 05 12:31 pm Link Dear Xtreme, What happens is that, particularly in OMP and here, a model is sent digital files and the model can, and could and does tinker with the images before they are posted. I think that the bulk of the activity here is the sharing of images. Jul 02 05 12:35 pm Link As far at that is concerned, if I model changes my images in any form and I find out about it, we have a lawsuit. My modeling agreement prohibits any changes of the images that are distributed to them. Jul 02 05 01:14 pm Link Posted by Paul Ferrara: Nice work, I like that.. I sometimes use the smudgetool as well if it is really bad and move it back and forth real fast and real small.. Jul 02 05 01:27 pm Link I use the rubber stamp/clone tool... plus lassoing certain areas for brightness and contrast adjustments but keep one thing in mind folks... PS is a tool... it won't save a bad picture... so don't use it as a crutch the image is a confluence of eye, brain and camera... nothing more than that... a great photographer can get a great image with a polaroid, and goodness whatever did we do before Photoshop came along? David Jul 02 05 01:28 pm Link I should also say I have been playing with lighting as well to prevent the need for retouching. MORE LIGHT, less chance of retouching it seems.. The color and hue matters as well. I have 14 lights and all give 14 effects to the skin. SUNLIGHT at a haze works the best.. For me at least,,, Jul 02 05 01:30 pm Link We used to do the same thing PS does but with an airbrush and masks in the darkroom. Posted by David Klein: Jul 03 05 02:03 am Link I trued out Carlos's technique and wanted to post my before and after but I'm not sure how to insert images into a post. Please tell me. ThanksJul 03 05 11:09 am Link The tag before the image url is as follows, no spaces: [ i m g ] The tag after the image url is as follows, again no spaces: [ / i m g ] Make sure you type in lower-case or it won't work. I can't wait to see your results :-) Posted by Kathleen Larsen: Jul 03 05 12:17 pm Link Posted by EMG STUDIOS: Totally agree - and I make that compleatly clear before the shoot - THou i have a model now that wants me to help her learn photoshop - well and photography, so that will be a different story Jul 03 05 01:25 pm Link Retouching is the easy part.... all it takes is hundreds of hours of getting a sore neck at the computer.... and trying thousands of different techniques...  Jul 03 05 01:26 pm Link |