|
Forums >
Digital Art and Retouching >
"glazed" photo look
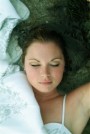
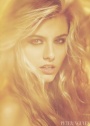
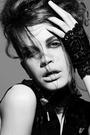
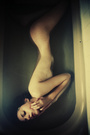
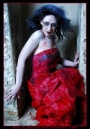
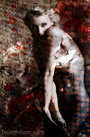
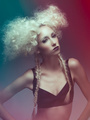
This is my version of the style; I do like it a little more sharp. Model is Heather  This is the unedited image  Dec 31 09 01:38 pm Link Kiko Land wrote: I really like the retouch. At least, the "glaze" part was done effectively. Kiko Land wrote: Yes, but that's an easy change. Dec 31 09 05:10 pm Link MinisterC wrote: Thanks. As you can see, Besides the extra USM step, on the Difference layer I extended the brush beyond the model to create that glow behind her and improve the 3D effect. I could've desat just a tad more. Dec 31 09 06:31 pm Link FSG Photography wrote: make a duplicate layer and mess around with USM $.02 Jan 03 10 07:51 pm Link Strange Babes wrote: It's a bit more involved that that...heh. Jan 05 10 05:30 pm Link I'm simplifying greatly, but it seems like you could go for this faded Polaroid look by doing what happens to a Polaroid over time. You lose contrast and colors. So, in hue/saturation or levels or curves or whatever tool you like, start pulling out the midranges of the yellows, then the reds and then the blues until you get what you like. You also have to clip the highs and lows of those colors as well. You want to make sure there are no true blacks and no true whites in the photos. Experiment with the hue/saturation panel, it's a great learning tool. Then see what you can do in levels and curves as well. Jan 05 10 06:51 pm Link   Jan 06 10 12:07 am Link 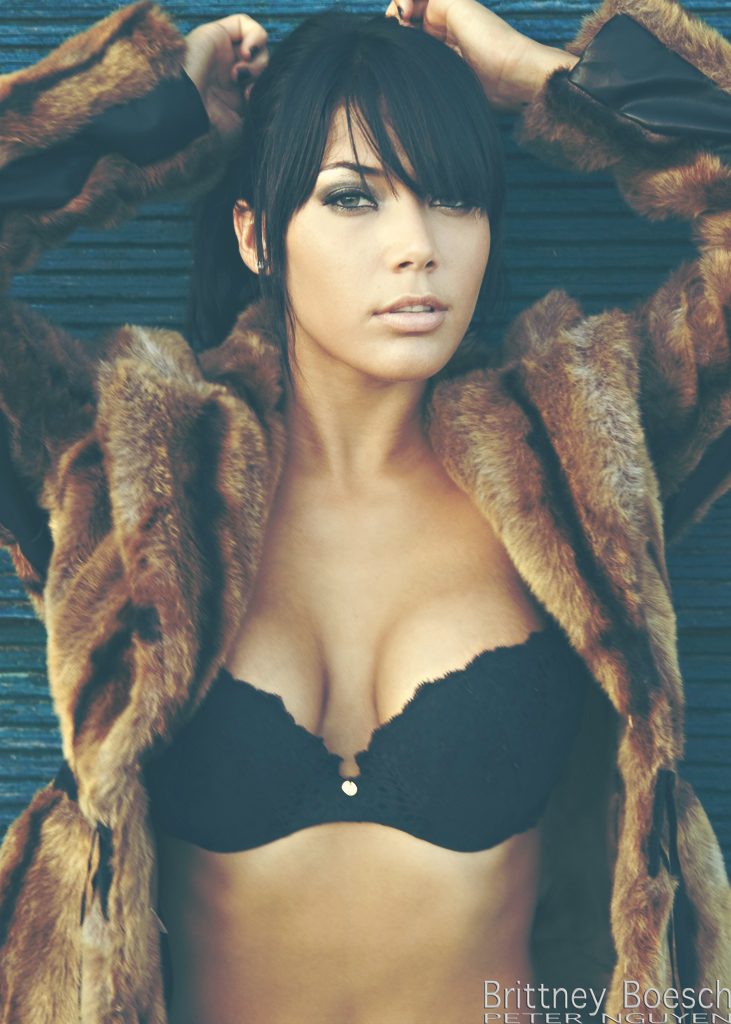 Jan 09 10 01:11 am Link Peter N Photography wrote: Ooooooooh, that one's yummy. Terrific tones. Still love that you're making it your own. Jan 09 10 01:28 am Link Peter N Photography wrote: Oh wow...nice one, brother! Jan 09 10 04:41 am Link Peter N Photography wrote: very cool! is there a chance we could see the unedited version? Jan 09 10 09:29 am Link MinisterC wrote: thx MinisterC. Still trying to adapt what I learned to my own style. btw great new pic. Jaime Ibarra wrote: props from the man! Jan 09 10 10:44 am Link wbphotography wrote: thx. Jan 09 10 10:49 am Link Peter N Photography wrote: wow ... quite a change ... thanks Jan 09 10 11:43 am Link  Just had an idea of a alternate quick way to do a similar look and tried it out. The numbers if you can't read them at 60% in the blue, and 35% in the constant. Jan 10 10 03:07 pm Link Hope you don't mind me using the thumb of your shot Peter, but figured since the threads about figuring out ways to achieve the look you would not mind since it provides a reference point. If you do, I'll remove it. Jan 10 10 03:15 pm Link did anybody notice that the OP also figured it out somehow but never bothered to let us know Jan 10 10 03:51 pm Link Maybe he paid Jaime for a tutorial. Or just figured it out himself...since it's really not that hard. Jan 10 10 03:53 pm Link wow... like wow.... I've been looking for a topic on this type of post-processing FOREVER! thank goodness you guys are so talented and so kind enough to share this info! the "glazed" effect seems to be pretty popular right now. It's good to know that i know how to do it now! Jan 10 10 07:50 pm Link I have a Nik filter that does this. One click, done. I personally don't like that hazy look but I guess it has its place!  Jan 10 10 07:56 pm Link Duncan Hall wrote: Getting a "glaze" is certainly not that hard. Jan 11 10 11:27 am Link Glam Girl Photography wrote: Your response shows pretty much exactly why I avoid this forum. A person comes in here, asks for help, a few people try to genuinely offer help, and then one person comes in with an answer that isn't anything more than a waste of time spent reading. Jan 11 10 09:21 pm Link MinisterC wrote: No argument from me there. I just hope the people chasing this look understand the holistics of making a good picture. Jan 11 10 09:50 pm Link Jynxs Photography wrote: i do something similar, but I use the exclusion layer style. Jan 12 10 09:37 am Link I have used this action here with pretty good success. http://coffeeteaphotography.blogspot.co … pspse.html Jan 12 10 10:41 am Link Ed Frazier Photography wrote: That, at least, has thoughtful use of layers in respect to the color in lights & shadows. Jan 12 10 05:46 pm Link Koray wrote: No, I did not know that. Jan 12 10 07:27 pm Link Glam Girl Photography wrote: Nice but keep in mind anything you can do with a click or a filter, so can anyone else, and inevitably your image treatments/styles will look cookie cutter. Jan 12 10 07:29 pm Link MinisterC wrote: Jaime's a great photographer, the "glazed" look is nothing special imo. What is special is the models he uses (Jessa!), lighting and composition of his shots. Also the colors he chooses to use which seem to always mesh with his post... go figure Jan 12 10 07:37 pm Link Virtuoso Skins wrote: Then do it. Snap2 wrote: This is as close as anyone's come to some of Jiames workflow. It's as much in your understanding of aesthetics as it is post work. Color harmony is so important. Usually can't get it right by just pushing and pulling the curves. Jan 12 10 07:47 pm Link as is often the case with these 'how does he do this' threads - is much more to do with the photography than the retouching. the composition of the shots, and the attitudes of the models. having said that concentrating on the easiest bit - the photoshop - within some of the images there are also signs of localised color masking or perhaps strong selective color adjustments which have concentrated certain colors. this has been done with a good eye for color harmony. The images have obviously had a cross process look applied, and there are many ways to do this - but its not as if this has just been applied as a once over to the image as a whole. just my observation Jan 13 10 06:01 am Link Here is my attempt with a bunch of other steps after playing around with curves, selective color, and some feather gaussian blur. I was going to play around with a sepia layer like someone mentioned but I will try that some other time. I was really lots of steps. I just kept going until I saw something better or closer should I say...I hope you guys like it.  Jan 14 10 12:42 am Link OK! It is 4;06am...Since I had already spend all this time I was like, let me just do it, man. So I just made a copy layer of the first version I posted and I should have probably work on the original but (I really am tired) I just tried it this way to see what happens...So, I did a Hue&saturation layer and press the colorize check and played with it until I got a sepia finish and then turned down the saturation...Again, I was just trying to see what happens so I was not paying attention to numbers. Then I went through every single blending mode playing with opacity values and I used the linear burn with an opacity of 18 or 20 something like that and then masked that layer with a circular selection around the face and filled with with 50% gray, since I used black but I lost a bit of that bit of glaze that I can not completely recreate. This is the new result  Jan 14 10 01:22 am Link Danny Rodriguez wrote: This is not the worst way to learn. I've learned to ask, but Jan 14 10 01:12 pm Link In this version, I pumped up the blues and added some noise so it's kind of a slight departure from the main theme of this thread, but at one point in time I had it glazed, I might have screwed it up, though. It's 18+ https://www.modelmayhem.com/pic.php?pic … up_id=&ua= Jan 14 10 04:59 pm Link It's not quite the 'glazed' look, because he doesn't fog the blue channel, but the green treatment DP Stu Maschwitz gives the shadows - and his thought process behind it - is worth a look - "Creating a Summer Blockbuster Film Look" http://library.creativecow.net/articles … torial.php and for me it answers a question I had some time ago Jan 14 10 06:00 pm Link Danny: The first photo in your portfolio is closer to the look this thread is focused on than either of the ones you've posted. You should post that one and tell people how you made it. The reason some of you aren't getting the "glaze" (I really hate calling it that, btw) is you're not softening the tones as you increase the contrast. Open the "Exposure" adjustment in PS, raise Offset (no more than ~ 0.0123), then increase contrast by raising Gamma. If it becomes too dark, make precision adjustments in curves with inverted masks, don't just kick the brightness or exposure. Jan 14 10 06:11 pm Link Duncan Hall wrote: Haha, I thought I was the only one- I don't understand it at all and haven't since the start of this thread Jan 14 10 07:20 pm Link NothingIsRealButTheGirl wrote: Hey, I was just wondering the other day where you'd gone! Jan 14 10 07:37 pm Link Kiko Land wrote: I super like it. It's definitely a departure from the glazed style... but since you began with that effect and ended up somewhere else... isn't that what it's all about!? The post effect is terrific to my eyes. Michael Bonner II wrote: That really is a better description. But we all know what the look is. NothingIsRealButTheGirl wrote: This is excellent. Jan 14 10 07:41 pm Link |