|
Forums >
Digital Art and Retouching >
How this look can be achieved?
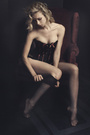
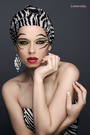
Hello Mayhems, Sorry about one another "how to" topic  I am really wondering about the looks linked below. Any ideas would be hepful Thanks in advance https://cdn.lundlund.com/ll/large/84966 … hm%201.jpg https://cdn.lundlund.com/ll/large/84967 … hm%202.jpg May 31 19 06:20 am Link It starts with the lighting and exposure. You want detail in the lights and darks, and you want fairly hard lighting. It’s possible that the skin tones were darkened, especially in the second photo. It’s likely that contrast and clarity were increased, and possibly dehaze was used to make the image crisper. Rather than using the contrast slider, I’d work with the highlights and shadows sliders. Most likely the tones (especially the skin tones) were manipulated somewhat using HSL in ACR or Lightroom. My guess is that the final color toning was done with a LUT and/or a gradient map. The exact LUT or gradient map values depend on the image you’re starting with as much as the look you’re going for. You could create a gradient map direct from the reference photos using something like Nino Batista’s NBP ColourmapX or manually. Either way, it will probably need to be tweaked a bit to get the exact look that you’re going for. There’s going to be some trial and error involved in post. May 31 19 11:48 pm Link |