|
Forums >
Digital Art and Retouching >
Discussion of an Image
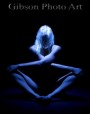
This has nothing to do with my delusions of grandeur (though I do have them), nor with actually thinking terribly much of my processing in this image. But I'm not going to pollute that thread with discussion about how it was done, so I've chosen to do so here instead. Tarton asked here about the photo below and the processing involved in its creation. I'll briefly run through what I can recall offhand about what I did and will answer whatever other questions you have.  The image was shot with a Canon 5D2 with a 24-70mm f/2.8 lens at 1/200, f/7.1, ISO 100, with a CPL filter on the front of the lens. It's lit from camera left and 5-10ft away with an Elinchrom Ranger 'A' head firing into a Deep Octa modifier, somewhere near full power. The image was very 'dramatic' in-camera, with the model a couple stops above ambient - that part I would not have cared to try to PS. In post, I did a bit of skin work, a bit of toning, but mostly simply filling the unpleasant shadows I'd not had time to light better - all this was done with manual "D&B" (curve layers). I popped the brights a bit by creating a custom channel with (2XRed - Blue) - High-Highlights, using this to curve the skintones up a bit and stand out from the scene even more. A few highlight and shadow masked curves came next to get the toning the way I wanted it, but by that point the background wasn't doing it for me anymore. I pulled three versions of the original RAW at different exposure adjustments from LR into Photomatix and generated an HDR composite which I then tonempapped fairly heavily. I copied the result over the original, set to luminosity, and then manually masked it in to accentuate the shadow detail in particular. I think its final opacity was something like ~40% in Luminosity. The image was finished with a bit of sharpening much as I've discussed in other threads, and then given a bit of a grain overlay courtesy of Nik's Color Efex (though Bob's technique really works at least as well). Hope that helps, and as I say, just ask if there's something I've left out. Aug 28 09 06:43 am Link Thanks Sean. Good explanation. Like the image a lot! Her face and chest are a tad bright, but I know that's the effect you were going for.  Aug 28 09 09:09 am Link which three different lightroom exposure settings did you transfer exactly...I dont need the numbers, just wondering the name of the settings?  Aug 28 09 09:58 am Link Koray wrote:
Aug 28 09 10:04 am Link what exactly does photomatix do that we cant by opening 3 exposures in ps? Aug 28 09 10:07 am Link Koray wrote: Nothing which can't be done; only something which is much more easily done with their tonemapping operator (TMO). The exposure blending, as best I can figure (recognizing that I have not made the effort to study it from a scientific / mathematic perspective), is in some small part based on their TMO, and so plays better with it than the simple "Make HDR" command which gives the user less control and (IMO) a worse result. The tonemapping itself is something which I've been advocating Adobe include in CS5 (economy; users looking for more for their $$; open source code out there which could be implemented; etc.) but which as of now has to be very deliberately done by hand in order to achieve the same results. Similar ones can certainly be achieved as you've noted by combination of some of the edge-preserving blend methods with image subtraction ('HP'-style) then run through Shadows/Highlights + Curves; but each TMO has its own method for breaking down the image into constitutive parts and therefore imparts a different look. In the case of this image, I was feeling lazy (and since I had a ridiculously cheap student license of the software), used it instead of more manual techniques for bringing back more of the detail in the background. Aug 28 09 10:15 am Link Where was Mr Randalls post on grain? I remember wanting to bookmark it...Drat. Aug 28 09 10:57 am Link Darin B wrote: Aug 28 09 10:59 am Link Bless your heart! Aug 28 09 11:03 am Link Do you have the original image that we can compare with Sean? I have been curious about this image since you uploaded it. Aug 29 09 12:57 pm Link Gibson Photo Art wrote: I have the original, but will need to go back to look to see if it's one I'd be comfortable releasing. I have no problem with everyone seeing how bad my photography & PS skills are (pain teaches), but never want to release a 'before' frame which a model might not approve of. I'll take a look in a bit and update this if I can post it. Aug 29 09 01:06 pm Link Sean Baker wrote: lol. I have seen your before pics and there isn't any "bad" about it. Aug 29 09 01:16 pm Link thanks for the info, this is a good technique to know. I see it being more useful for a commercial client and not something I would use for model photography per se. Good job Aug 29 09 01:21 pm Link Gibson Photo Art wrote: I'll think my photography is "good" when I don't have to open PS except maybe if I want cross-processed coloration Myshkin wrote:
Aug 29 09 01:32 pm Link It's a nice style Sean, good stuff. I don't know if your into or ever check out 3D renderings, but this process produces a similar effect. I'm not big into 3D, but I have done a considerable amount of 2D skins to be be overlayed on UV Maps for the MMO Second Life. Harder than it seems it would be and things have to be pixel perfect literally or you get errors... but I digress. So it's kinda interesting if there are similarities to the treatment your doing and that mimic the 3D process. If you look at Hill's soldier image, then google a high end graphical video game called "Crysis"... at least I see a lot of similarities in those screen shots. Aug 29 09 04:24 pm Link Sean Baker wrote: Gibson Photo Art wrote: I'll think my photography is "good" when I don't have to open PS except maybe if I want cross-processed coloration That's perfect Sean thanks. Right out of camera that image is very very good IMO. Your processing really made it pop. I really need to get on the HDR processing. So much to learn still. Aug 29 09 06:03 pm Link Virtuoso Skins wrote: I spent some time with POV-RAY back in the day, as well as some of the original terrain generation engines (all free ones of course), but never really got into the modelling aspect itself, nor was I even good at what I attempted. But yes, I've done a bit with it and marvel at what can be done by the folks who really know what they're doing. Gibson Photo Art wrote: pfstmo (part of pfstools) is a free tonemapping option which you can use (albeit external to PS). It implements a number of the published operators, though the interface is neither magical nor terribly good for giving accurate previews. But it is free and therefore a great place to start, at least until Adobe take my advice about CS5 Aug 29 09 07:34 pm Link Much props on the technique and the braindump on this.. it's always awesome to see people share out the shots.. RC www.layersmagazine.com Aug 30 09 12:46 pm Link I always seem to end up with kinda gray looking skin whenever i try to create hdr images of models. I feel like my current avatar would be a decent shot to process like this, but photomatix never gives me results like sean gets Anyone happen to have source images and a preset that works well? Aug 30 09 10:27 pm Link grahamsz wrote: Perhaps try doing your HDR Tone Mapping on a separate layer(s) to affect the other elements in the scene rather than on the model's skin. Then use the various ways to D&B and color correct the skin of the model onto other layers to achieve that toned look. Aug 30 09 10:50 pm Link thank you Sean, ive learned to really apreciate you and Ive always been a fan of Korays. As for the image, its pretty kool Aug 31 09 07:00 am Link Sean, Thanks for the explaination. I think I was misunderstood in the other forum post. I was simply asking if the technique you discussed is how the image became so sharp and clear.. Aug 31 09 09:12 pm Link Thanks for the info Sean! Sep 05 09 10:59 am Link |


 . I'm pretty sure it was -3, +0.33, and +3, but no other difference from the way the original was processed out of LR (WB tweaks, a small amount of FL & Blacks). I did run the TIFFs I created through Noise Ninja before taking them to Photomatix, though - forgot that in the writeup above. Ran them through Photomatix' Exposure Blend command (an underrated / underdiscussed feature IMO) to generate the HDR, then TM'd as discussed.
 .
.  Oh that I had the option!