|
Forums >
Digital Art and Retouching >
Photoshop Actions and Scripts Depository
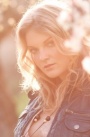
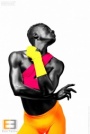
I thought maybe it's time I shared some of the things in Photoshop that I'm at least competent with since everyone is sharing retouching techniques. I'm hoping this can be helpful to people in their workflow to perhaps cut down on some time spent by letting the automation within Photoshop do some of the work quicker. Anyone is welcome to post your own. If you're not familiar with adding/running scripts, here is a link to the help file at Adobe.com on the subject. You can use any text editor to make these scripts or copy-paste into a text editor such as Notepad in Windows. Creative Suite editions of Photoshop were packaged with the Extendscript Toolkit which makes writing/debugging/using scripts easier. Save to your Photoshop/Presets/Scripts folder with a .js extension. You can also use a .jsx extension. Example: myscript.js Close Photoshop and restart so the script will appear in your File > Scripts menu. You can then point a hotkey combination to it or create an Action to run the script. To create the Action to run the script, go to your actions palette and record a new action. Set it up as you want with the F key combination if you so desire. Once that initial record dialog is to your liking, click Record and immediately click the stop button in the actions palette. Now, go into the Actions Palette menu (upper right hand corner) and choose "Insert menu item..." You will see a dialog appear. Ignore this. Go under File > Scripts and find the script you wish to run. Click on that script in the menu. Now click on OK in that dialog you ignored earlier. Now your action should run that script. If you have any more questions about basic writing/using scripts just ask here in the thread and I'll answer and update the second post with Q&A's Oct 06 09 09:24 am Link . Oct 06 09 09:24 am Link The first script that is useful to me is using a 50% gray Softlight layer to dodge/burn out shadow areas. This can also be used to darken lighter areas to match a darker area. Edit: I forgot to mention when I originally posted this. This script will work in RGB, CMYK, or LAB modes. This script will also take into account color casts in shadow vs light areas whereas simply using white and/or black won't always do this for you. This will set up your foreground color and background color to values that are close (in my experiments) to adjust a shadow area to look like a lighter area and vice versa if used at 100% opacity and 100% flow. It may not be perfect and may require you to make your own adjustments to the script for your own taste. To use this, set your background color to the area you want to adjust and your foreground color to the area you want as a reference. Set up your Softlight layer with 50% gray fill. Run this script. Select the foreground color and using your brush, paint on the Softlight layer the area you want to adjust to match the reference area. You may have to take a few samples or even use more than one Softlight layer if the adjustment is a large one. Here is the script: //This script will allow for dodging/burning a darker/lighter area to match a lighter/darker area by using //a 50% gray layer in SoftLight blend mode. To use this, select the area you want to adjust as your //background color, select the reference area as your foreground color, then run this script. Create a //50% gray SoftLight layer above the current layer. Select the foreground color and paint the area you //want to adjust.. The default settings will make the background color slightly lighter than the foreground //color for a lighter (brighter) adjustment. var shadowColor=new SolidColor; var lightColor=new SolidColor; var fgColor=new SolidColor; var bgColor=new SolidColor; shadowColor=app.backgroundColor; lightColor=app.foregroundColor; cmykMult=1.2; // A multiplier in CMYK mode that I found works well. You can change this to your taste. rgbMult=1.5; // A multiplier in RGB mode that I found works well. You can change this to your taste. labMult=1.0;// A multiplier in LAB mode that I found works well. You can change this to your taste. switch (app.activeDocument.mode) { case DocumentMode.RGB: var fBase=122; // The base number I found works best as a midpoint/starting point in RGB mode. Adjust to taste var bBase=134; // The base number plus a little extra. Adjust to taste. var corMult=rgbMult; fgColor.rgb.green=Math.min((corMult*(lightColor.rgb.green-shadowColor.rgb.green)+fBase),255); fgColor.rgb.blue=Math.min((corMult*(lightColor.rgb.blue-shadowColor.rgb.blue)+fBase),255); fgColor.rgb.red=Math.min((corMult*(lightColor.rgb.red-shadowColor.rgb.red)+fBase),255); bgColor.rgb.green=Math.min((corMult*(lightColor.rgb.green-shadowColor.rgb.green)+bBase),255); bgColor.rgb.blue=Math.min((corMult*(lightColor.rgb.blue-shadowColor.rgb.blue)+bBase),255); bgColor.rgb.red=Math.min((corMult*(lightColor.rgb.red-shadowColor.rgb.red)+bBase),255); break; case DocumentMode.LAB: var fBase=50; // The base number I found works best as a midpoint/starting point in LAB mode. Adjust to taste. var bBase=55; // The base number plus a little extra. Adjust to taste. var corMult=labMult; fgColor.lab.l=Math.min((corMult*(lightColor.lab.l-shadowColor.lab.l)+fBase),100); fgColor.lab.a=Math.min((corMult*(lightColor.lab.a-shadowColor.lab.a)),93); fgColor.lab.b=Math.min((corMult*(lightColor.lab.b-shadowColor.lab.b)),93); bgColor.lab.l=Math.min((corMult*(lightColor.lab.l-shadowColor.lab.l)+bBase),100); bgColor.lab.a=Math.min((corMult*(lightColor.lab.a-shadowColor.lab.a)),93); bgColor.lab.b=Math.min((corMult*(lightColor.lab.b-shadowColor.lab.b)),93); break; case DocumentMode.CMYK: var fBase=50; // The base number I found works best as a midpoint/starting point in CMYK mode. Adjust to taste. var bBase=45; // The base number plus a little extra. Adjust to taste. var corMult=cmykMult; fgColor.cmyk.cyan=Math.min((corMult*(lightColor.cmyk.cyan-shadowColor.cmyk.cyan)+fBase),75); fgColor.cmyk.magenta=Math.min((corMult*(lightColor.cmyk.magenta-shadowColor.cmyk.magenta)+fBase),68); fgColor.cmyk.yellow=Math.min((corMult*(lightColor.cmyk.yellow-shadowColor.cmyk.yellow)+fBase),67); fgColor.cmyk.black=Math.min((corMult*(lightColor.cmyk.black-shadowColor.cmyk.black)+fBase),90); bgColor.cmyk.cyan=Math.min((corMult*(lightColor.cmyk.cyan-shadowColor.cmyk.cyan)+bBase),75); bgColor.cmyk.magenta=Math.min((corMult*(lightColor.cmyk.magenta-shadowColor.cmyk.magenta)+bBase),68); bgColor.cmyk.yellow=Math.min((corMult*(lightColor.cmyk.yellow-shadowColor.cmyk.yellow)+bBase),67); bgColor.cmyk.black=Math.min((corMult*(lightColor.cmyk.black-shadowColor.cmyk.black)+bBase),90); break; } app.backgroundColor=bgColor; app.foregroundColor=fgColor; And here is a before and after to give you an idea of what it does. This was using the brush at 100% opacity and 100% flow. BEFORE  AFTER  When using a white brush to dodge the shadows, I would get a slightly red color cast on the wall where the shadow was. This was most likely from a light reflection off of her pants. Using this script, the brush colors were set to adjust for that color cast. Oct 06 09 09:35 am Link The next script was discussed here by Sean Baker. It basically does everything he outlines for output sharpening. This script will determine whether you are working in 8bit or 16bit and adjust accordingly. The image must be in RGB mode, though. A big thanks to Sean for outlining this method. The script is located here. You can just save it to your computer and copy it to your Photoshop/Presets/Scripts folder. To use it: 1. When you are ready to output your image for the web or wherever else you need to output, just run this script. 2. You will be presented with a dialog. This is where you choose your output size. The dimension you enter here will be the dimension you want the long side of the final output image to be. Dimensions are in pixels. 3. The script will run the proper Gaussian Blur on the image as per Sean's instructions based on the resizing you ask for. It will then go through the steps to set up the output sharpening including resizing your image. 4. You will be presented with 1 Gaussian Blur dialog and 2 Smart Sharpen dialogs. These you will have to determine the settings that work best for you. 5. When finished, you will have your original layer and a "Sharpened" layer with a mask attached. You can paint black on the mask to tone down the sharpening effect wherever you like. 6. Enjoy!  Oct 07 09 07:15 pm Link Very nice I was wondering if a script can be created to match colors by number in an image. My concept is open image one measure the diffused skin highlight and skin shadow on skin control point one and control point 2 and do the same on image number two then run a script that would create adjustment layers on image number 2 matching the outputs to image one. I currently do this by hand any ideas would be appreciated. Oct 08 09 10:04 am Link Here's a simple, and potentially useless for most, script that is just a basic timesaver for me. I do a lot of keyart development so am constantly going back 'n forth between Photoshop & Illustrator/InDesign etc. And I hate placing huge layered files in those apps, so i always save as flattened TIFFS. Basically, i hated tweaking my layered doc, and then going to File > Save As... > blah blah. This script saves a TIFF file of your working PSD into a predesignated folder directory. In my case, all my projects have a 'Layered Files' folder, and a 'Placed Art' folder. So no matter what project folder I'm in, this script will save a flat TIF to the Placed Art folder within it. Note, it does not ask you to overwrite the old, so it will by default, REPLACE THE EXISTING FILE, if there is one. I assign the script to a key command for quick use. If you use this, I sugggested trying it out on a dummy file just to get the hang of it. It won't do anything to your PSD file, just saves a copy of it as a flat TIFF. But it will replace the old if one is existing. Anyway, just wanted to contribute to a great thread idea. Here it is: //This script saves a flattened TIFF file of your working layered file into a predesignated folder //To change the folder where it saves, look at the first line and replace "/../Placed\ Art/" //with your preferred folder hierarchy. in my example, the script will back up one directory //from the current working file directory, then save the TIFF to a folder called "Placed Art" //be sure to keep the "" around the folder path. var saveFile = new File(activeDocument.path + "/../Placed\ Art/" + activeDocument.name); SaveTIFF(saveFile); function SaveTIFF(saveFile){ tiffSaveOptions = new TiffSaveOptions(); tiffSaveOptions.embedColorProfile = true; //this will embed your currect color profile tiffSaveOptions.alphaChannels = false; //change to true if you want to save alpha channels in your TIFF tiffSaveOptions.layers = false; //this simply flattens the TIFF and saves without layers. Does not affect your PSD file tiffSaveOptions.imageCompression = TIFFEncoding.NONE; //this sets it to zero compression app.activeDocument.saveAs(saveFile, tiffSaveOptions, true, Extension.LOWERCASE); } Oct 08 09 10:41 am Link Julian Marsalis wrote: If I'm understanding you, you don't need a script to do this. Once you have a curves or any adjustment layer set on one image, you can drag it and drop it onto another image to duplicate it for that image. Oct 08 09 04:48 pm Link Bret McMichael wrote: Very nice and useful. With a little tweaking you can make this so it won't overwrite the existing file. I do something similar in my workflow when I output for web and save as a jpg. If a jpg file exists, it gets renamed to filename-1.jpg unless filename-1.jpg exists then it tries filename-2.jpg and so on until it gets to a number that doesn't exist. This way my most current is always just filename.jpg and I can see if it's better or worse than the others if I'm trying new techniques. Oct 08 09 04:53 pm Link Photons 2 Pixels Images wrote: definitely. In my workflow, I just didn't want to have to re-link to a new file each time I go back to InDesign. But yes, writing a new file is always a 'safer' bet. Oct 08 09 04:58 pm Link Bret McMichael wrote: Here's the code as it is for .jpg files that steps through and renames the old file to filename-1.jpg before saving the new file to filename.jpg.... Oct 08 09 05:08 pm Link Photons 2 Pixels Images wrote: Not exactly copying the adj layer did not give the same effect or color shift I just tried it to be sure. Maybe a better explanation of how the process I am doing works. Oct 09 09 05:47 am Link Julian Marsalis wrote: OK! I got you now. You want to match chosen point to chosen point between images. Oct 09 09 11:15 am Link Julian Marsalis wrote: Photons 2 Pixels Images wrote: OK. Just so I'm clear on this before I get too far into it. Oct 09 09 06:39 pm Link Photons 2 Pixels Images wrote: Julian Marsalis wrote: OK. Just so I'm clear on this before I get too far into it. Yep the only moves are the Red Green Blue values the rest of the curve stays the same. Oct 09 09 08:16 pm Link Julian Marsalis wrote: OK. I got the meat of it done now. For an interface, how do you want to do this? I can have it 2 separate scripts....one to set the reference color and the other to apply that to the active document or a single script that pops up a dialog asking if you want to apply the color the the document. If you say no to this, it will take the color selector point as a new reference. This will give you a dialog each time you want to apply the color to an image so I'm not sure you'd want this. Oct 10 09 09:03 am Link Photons 2 Pixels Images wrote: Awesome sauce I think 2 scripts would be cool. Thank you very much!!!!!!!!! Oct 10 09 11:35 am Link Julian Marsalis wrote: Sorry. I had a wedding to shoot today and I have a model shoot tomorrow but in between I'll try to get them done for you. Oct 10 09 07:30 pm Link Photons 2 Pixels Images wrote: Cool cool can't wait to check the scripts out thanks again!!! Oct 10 09 09:23 pm Link Julian Marsalis wrote: Try these and see if they work for you. Oct 11 09 04:55 am Link Totally awesome but I was wrong I do need to adjust the RGB value after testing on various image guess I missed that one the numbers came across slightly off without adjusting the rgb value of the curve this is sweet as hell. Man this will make matching color in a series of photos so much easier when I get heavy handed retouching or need to steal a tan lol. Thanks alot!!!!  Oct 11 09 07:06 am Link Julian Marsalis wrote: So this works for you? Oct 11 09 07:34 am Link Photons 2 Pixels Images wrote: Cool cool IC Thanks again awesome work. Now I understand whats going on if its only one point vs an average dang ps it should allow reading the info panel as is lol. Oct 11 09 08:02 am Link Julian Marsalis wrote: What version of Photoshop are you running? It also could be something to do with the active layer. I'll have to check it out. Oct 11 09 04:34 pm Link Photons 2 Pixels Images wrote: CS4 Oct 11 09 05:36 pm Link Julian Marsalis wrote: Normally this error comes up when the script tries to do something on a layer or document that isn't allowed. For this, that line is in the curves settings step where it sets the points on the curve. This could happen if for some reason the wrong layer is selected (not a curves layer) or it's trying to set a point that can't exist. Oct 12 09 07:04 am Link Photons 2 Pixels Images wrote: I will try to pay more attention next time on whats selected on the image excellent work again. Oct 12 09 07:32 am Link Julian Marsalis wrote: Ive got a similar script being written for a function like this by a company in California, started it a few months ago with a guy named Don and its nearing being completed. I have different specifications...but the concept looks somewhat close. Oct 12 09 08:10 am Link Julian Marsalis wrote: That is entirely possible. This can be set up with a dialog to allow you to set up your own colors and save them into a database type thing (*.ini file) and retrieve them with a dropdown menu. Also, the RGB values can be set with slider controls or direct input into a text box or grab from a point on an open document. TMA Photo and Retouch wrote: What I have here is simple, really. Although it can be expanded. I'm guessing yours is quite a bit more involved. Oct 12 09 10:10 am Link This thread has me juiced on scripting I already have created a dialog to control curve creation and building a list of skin swatch images from xml file to set the adjustment colors if I can figure out the best way to turn the colorsampler from a point to a pixel averaging tool this would be over the top cool. I believe I maybe able to retrieve the colorsampler position then just measure the colors around its position creating my own average based on different sampling sizes. A fun project. Oct 15 09 07:05 am Link Julian Marsalis wrote: If you want an average of your color picker sampler as set in your settings, use the method I used in the Shadows Dodge/Burn script. This might be a bit of a pain, but it will at least give you the average. Oct 15 09 07:14 am Link Here is a script to multiply decompose a given image into any number of spatial frequency bands, selectable by the user. Includes options to add clipped curves adjustment layers to each intermediate band, and works on both 8 and 16bit images. Go easy on me, I'm new to this script thing. Oct 18 09 07:00 pm Link Dec 20 09 03:22 pm Link hello guys )) this thread is a bit old already, but... hmmm... this sounds very useful but still can't get completely what author is trying to achieve. for example pick a sample and then match a batch with the first image (to apply the same skin color to all images)? but it will work only for the same type (from the same photo session images), right? because in one image R44 can be different from other R44, it maybe more like R87, for example. Sep 16 10 09:19 am Link erik ERXON wrote: To which author do are you referring here? There are a few different scripts and ideas going on in here. Sep 16 10 06:07 pm Link Huge thank you to the valued contributors of this thread... it's fun to geek out and read about experimentation. I may not understand all of these conversations but this proves I have a lot to learn. Just when you think you have mastered PS, someone shows you that you have only just begun. Bows to valued contributors. hopefully I can find and follow you on FB Jun 11 11 06:40 am Link |