
Retoucher
Natalia_Taffarel
Posts: 7665
Buenos Aires, Buenos Aires, Argentina
R.EYE.R wrote:
I remember times when Maxim and FHM published quality material. I still keep scans from amazing work done by numerous photographers for calendars and publication itself. I remember too.
R.EYE.R wrote:
By ego I don't mean misanthropy - I refer to a way of using a technique and making it into identity. Quite similar to advent of Photoshop and digital photography and all the bricks shart at digital shooters by oldfags (pardon crude wording). Rings a bell?
Or endless Canon/Nikon holy wars going on.
When you start associating yourself with what you do and not who you are you get this result. But there's where you don't seem to understand.
The technique WILL give you the best results, you only have to do it right.
Is not assiciating with the technique, since D&B is only a thing you do, added to a lot of other things - Mostly to do with color, color and light make or break the image.
But between D&B and portraiture, there's really no debate, only ignorance (don't add a negative connotation to the word, I mean it literally) arguing with experience and consistent results.
R.EYE.R wrote:
There we have two directions - sell mass produce to a large audience cheaply or sell to limited expensively and make others grind their teeth and wetting their beds at night desperately wishing they would be members of the exclusive elite blissfully ignorant of all liquify, puppet warp, d&b, content aware fill and other bells and whistles  Pretty much, yes
R.EYE.R wrote:
Many here studied art, colour theory (Goethe), lighting, composition, but many failed to read on social psychology and art of human mind manipulation. I sincerely recommend to check it out... I majored in Advertising comunication and Graphic design.
I'm also self tought in psicology - both Psychological behaviorism and psychoanalysis.
I'm highly interested as well in cognitive neuroscience and follow studies closely on the subject.
I'm very well aware of human mind and manipulation.
R.EYE.R wrote:
Don't get me wrong - and I really enjoyed reading your post Natalia. You are a proffessional and an a highly skilled such. I just find it extremely patronising to agree with someone no matter what - as we say in Russi: truth is born in an argument. Is not "no matter what" - When someone has basis for their opinion and a portfolio/clients/network to back it up... arguing the same points over and over is pointless.
I agree however in truth being born from arguments. That's why I'm still here and not ignoring this thread.
R.EYE.R wrote:
I just question the devotion with such you hold on to D&B when only professionals will appreciate it? Results ARE better. Only the ignorant or contaminated eyes can't tell.
My son is 8 he makes me hide bad images and enjoys good ones
The reaction in the brain is direct and effective.
When you follow rules, such as composition, color theory, light behavior... you can give pleasure to the brain.
R.EYE.R wrote:
This is an endless debate, and rather than typing this on iPhone would love to chat in a café over a bottle of wine or something similar so I will call it a day. Is not endless for those actually in the market. We already know the answer. We are just trying to help those who don't.
R.EYE.R wrote:
Perhaps it's up to me to try and create a comparison using Portraiture and D&B. Just don't expect it to be too professional 
If there is an interest in this:
I will have a shoot with a model this sunday and will use my CY35-70/3.4 Zeiss which is known for its microcontrast - it should capture the pores abd texture very well in harsh lighting.
I will use Portraiture on one of the shots and use my D&B best I can. Please, note that despite my posts here I am impartial to either method.
Additionally, certain level of grain will be added on top and colour tweaked in exactly same manner for both shots.
Best Regards You keep saying this.
Yes... a bad cheff will be better off with instant cake.
The good cheff wouldn't touch that crap.
Photographer
Nick Peluffo
Posts: 120
Brooklyn, New York, US
If you're in PS, and you've already split your image for hi/low, try selectively reducing contrast or play with levels on the high pass layer for your pore issue.
Retoucher
Natalia_Taffarel
Posts: 7665
Buenos Aires, Buenos Aires, Argentina
Nick Peluffo wrote:
If you're in PS, and you've already split your image for hi/low, try selectively reducing contrast or play with levels on the high pass layer for your pore issue. jfyi reducing contrast in the high is exactly the same as bluring.

Digital Artist
RixDigital
Posts: 159
Crystal Lake, Illinois, US
Natalia,
From what I've been reading, I would definitely agree that D&B techniques are at the very top (to produce best possible results). Having said that, there are different types of workflows, and am curious as to how you would rate each one. Here's a short list:
1. D&B with separate layers; one for lightening; other for darkening.
2. D&B with single 50% gray layer. I am gravitating towards this method myself.
3. Frequency separation
4. other important technique I'm missing?
Thank you!
Retoucher
Natalia_Taffarel
Posts: 7665
Buenos Aires, Buenos Aires, Argentina
RixDigital wrote:
other important technique I'm missing? For skin or workflow ?

Digital Artist
Koray
Posts: 6720
Ankara, Ankara, Turkey
RixDigital wrote:
Natalia,
From what I've been reading, I would definitely agree that D&B techniques are at the very top (to produce best possible results). Having said that, there are different types of workflows, and am curious as to how you would rate each one. Here's a short list:
1. D&B with separate layers; one for lightening; other for darkening.
2. D&B with single 50% gray layer. I am gravitating towards this method myself.
3. Frequency separation
4. other important technique I'm missing?
Thank you! I know you asked Natalia but I'm quite sure she'll say usually all of them are needed for every image especially if its beauty retouching. for full body images you can get away without separation.

Photographer
L Bass
Posts: 957
Nacogdoches, Texas, US

I use an on-lens soft focus filter if I'm working with a model that has large pores. #3 for up close & personal, #2 for 3-5 feet away, and #1 for anything past around 6 feet. But that's just me Oops... I just realized that this was posted in the "Digital Retouching' forums, and I know VERY little about that. So... nevermind My bad.
Digital Artist
RixDigital
Posts: 159
Crystal Lake, Illinois, US
Natalia_Taffarel wrote:
For skin or workflow ? Skin mostly.

Retoucher
Mike Needham Retouching
Posts: 385
Cheltenham, England, United Kingdom
L Bass wrote:
Oops... I just realized that this was posted in the "Digital Retouching' forums, and I know VERY little about that. So... nevermind My bad. Lynching party assembled.

Photographer
R.EYE.R
Posts: 3436
Tokyo, Tokyo, Japan
Natalia_Taffarel wrote:
You keep saying this. Actually I was hoping someone would do that in stead of me - my D&b is shite, and results won't be comparable.
I hate writing from IPhone - combining input & output devices in one is like brewing tea in the toilet. I will answer on other points when I will have enough energy to turn on my machine at home...

Photographer
A_Nova_Photography
Posts: 8652
Winston-Salem, North Carolina, US

Natalia_Taffarel wrote:
I didn't say the industry didn't like portraiture, I said the industry doesn't like to get rid of texture like that.
I don't like portraiture, tho I've seen it used right (NOT on pores) and only as a compliment for other techniques, never on its own.
I can recognized the use of it and so can most people with a budget for retouching. I wonder if you and I may be on the same page but I never use portraiture on texture, I find it to be great for blotchy skin on a low pass layer to quickly even it out and masked in as needed. I've already pulled the fine texture onto its own layer and that it cleaned up with clone/healing brush.

Model
Countess Grotesque
Posts: 1425
Mandurah, Western Australia, Australia
AndyPaul wrote:
If you do not have portrait professional or any other face manipulation software here is a basic technique in photoshop. This may seem like a lot to do but once you have done it and got used to it, it will only take a few minutes for a basic picture. I teach photoshop at 6th form and I am sure I have created a video to show students how to do this. I will have a look for it, upload to YouTube and paste the link, in the meantime:
1. Duplicate your layer
2. Add a slight blur to the top layer (try which one works best, I just use Gaussian blur, make the blur a little too much, this will make it easier to see what is sharp and what is not, this will be sorted finally in step 8)
3. Add a masking layer to the top layer
4. Ensure you are drawing on the masking layer and choose the brush tool.
5. Using the black brush, draw black over where you do not want the blur, ie eyes, hair, jewellery. If you are drawing on the mask layer, you will see the area become its original sharpness. Use a big brush as possible to cover the area. If you do not want an area 100% sharpness, take the brush opacity down a bit. Remember to put it back up though.
6. If you make a mistake, choose the white brush to bring the blur back in.
7. To check you have covered all the areas you want sharp, turn off the bottom layer and you will see through the parts that will be sharp.
8. Finally, turn down the opacity of the top layer and the blur will start to become less, drop it down until you are happy with the outcome. This merges the sharpness if the bottom layer with the blur to create the perfect final. It is a good way to try out different smoothness and if client or model is not happy you can reload and just change opacity.
Hope this helps. I'd like to thank you for this tip...seems quite simple now that I think about it, but it'll be helpful to me as I only use photoshop.

Photographer
Jakov Markovic
Posts: 1128
Belgrade, Central Serbia, Serbia
L Bass wrote:
I use an on-lens soft focus filter if I'm working with a model that has large pores. #3 for up close & personal, #2 for 3-5 feet away, and #1 for anything past around 6 feet. But that's just me
Oops... I just realized that this was posted in the "Digital Retouching' forums, and I know VERY little about that. So... nevermind My bad. Don't do that. Soft focus is nothing more than a large radius blur on a low opacity.
And you can't go back once it's blurry out of the camera.

Digital Artist
Michael C Pearson
Posts: 1349
Agoura Hills, California, US
Dodge and burn will produce superior results for a few reasons: 1. Plugins and blurs are basically using math to blur certain bandpasses of detail. I don't like the idea that an algorithm is deciding how the skin will look. With dodge and burn, there's still math involved behind the scenes, but every stroke is decided by a human's extremely intelligent (relative to what we know) brain. So much subconscious thought goes into each stroke of the stylus. 2. Some skin detail is good, some is bad. Good details visually communicate realism to the viewer, while bad details draw attention. Portraiture wipes away an entire range of frequency detail, regardless of how certain low frequency noise-like details make the skin look more realistic. 3. The images that have had portraiture demonstrated on have been, for the most part, easy images with very little low frequency blotching. More often than not, the skin has blotching in some place or another as well as uneven gradients. Portraiture cannot fix a big ugly low frequency blotch that would have been taken care of within the first minute of d&b. There are just so many limitations of plugins like portraiture that d&b doesn't have to worry about (ie. freckles). 4. D&b allows a workflow that targets the worst compositional snags of the image first. This means that the first five minutes of so of d&b improve the image much more dramatically than minutes 25-30. If your boss calls you and needs the image early, this workflow ensures that the image will be much more usable. I highly recommend workflows that allow jumping around the image for that very reason. 5. D&b forces you to slow down and really look at the image. While the time and skill required for quality d&b isn't appealing for some, it does force you to spend a lot more quality time getting to know the image you're working on. Don't forget to flip the canvas horizontally every ten minutes or so to refresh your perspective of the image, especially when you've been staring at it for a long time. R.EYE.R wrote:
I really want to see Portraiture and d&b methods side by side. Both done properly and unbiased. Just because this will speak to me volumes compared to explanations. I put together the example you requested, but it needs some explanation. My intent was to show the difference in quality/realism of retouching LOW FREQUENCY, and this is because both d&b and portraiture can't work with high frequency texture as well as other methods like cloning/healing on the HF. In order to show the LF work in the most clear way, I prepared the image by doing some basic HF texture cloning to unify the HF a bit and I cloned out a couple large blemishes. The rest of the time was spent with either LF d&b or LF portraiture.
![https://2.bp.blogspot.com/-GW5D6DlnsUY/UhHDO3bd-4I/AAAAAAAAAnc/LLOJtT_S5hs/s1600/db_port_comp_gif2.gif]()
(photographer: Stefan bourson)
This is gif that compares the results of d&b with portraiture. Notice all the grungy smudges that remain in the portraiture version. Smudges can't really be cloned/healed without messing up the flow of texture. Just out of curiosity, what would you do to take care of LF smudges like the ones left by portraiture? Btw I was doing my best to make the portraiture results look as realistic as possible. I tried a few different radius' during the split to see what got the best results, and I found a very high radius of 12 or so got the best results (removed lots of LF grunge without losing form or getting too much of the telltale "blurry yet sharp" LF over-smoothing. IMO she looks a bit waxy with the portraiture, but the d&b needs a bit more smoothing (just a tiny bit). The solution? Run a subtle portraiture after doing d&b for some cleanup. That's where I find portraiture's true strength. Here's a gif that shows the subtle smoothing that portraiture can contribute when used with a delicate touch. (although I did make the smoothing a tiny bit stronger than I usually do to compensate for a gif file's lack of detail).
![https://3.bp.blogspot.com/-FghoNo7_lho/UhHJ1k9T0NI/AAAAAAAAAn0/uYEV3CTDDjI/s1600/d&b_and_port_gif.gif]()
If you're the type to prefer to toggle tabs to compare, finally a section just for you!
-Original: http://4.bp.blogspot.com/-JNi3-71p04U/U … ginal1.jpg
-Only low frequency portraiture: http://2.bp.blogspot.com/--22SNONM7BU/U … aiture.jpg
-Only low frequency d&b: http://4.bp.blogspot.com/-6garSLLh0UA/U … 00/d&b.jpg
-D&b and Portraiture combined: http://1.bp.blogspot.com/-Qt0OC-66ye8/U … _port2.jpg

Photographer
MC Seoul Photography
Posts: 469
Seoul, Seoul, Korea (South)
A lot of these tutorials often deal with models who already have very impressive skin. What about dealing with people who have really less than ideal skin to start with?
I realize we can get out the clone and heal brushes and start going nuts with those, but some people can have tons of tiny little imperfections all over their skin which means you could be looking at hours cloning and healing. Anything else to improve that kind of process and work?

Photographer
cwwmbm
Posts: 558
Vancouver, British Columbia, Canada
MC Seoul Photography wrote:
A lot of these tutorials often deal with models who already have very impressive skin. What about dealing with people who have really less than ideal skin to start with?
I realize we can get out the clone and heal brushes and start going nuts with those, but some people can have tons of tiny little imperfections all over their skin which means you could be looking at hours cloning and healing. Anything else to improve that kind of process and work? I'd suggest models with better skins
Digital Artist
Michael C Pearson
Posts: 1349
Agoura Hills, California, US
MC Seoul Photography wrote:
A lot of these tutorials often deal with models who already have very impressive skin. What about dealing with people who have really less than ideal skin to start with?
I realize we can get out the clone and heal brushes and start going nuts with those, but some people can have tons of tiny little imperfections all over their skin which means you could be looking at hours cloning and healing. Anything else to improve that kind of process and work? I'm guessing you didn't see the original (http://4.bp.blogspot.com/-JNi3-71p04U/U … ginal1.jpg)
In that situation, why would you be working on an image like that? For whatever reason, it's always the same stuff. In this retouch I used more heavy LF portraiture and less d&b than the last example. Just pass up images like this anyway unless you're experimenting.
![https://1.bp.blogspot.com/-RYExsVB_zus/UhLgzDa6ThI/AAAAAAAAAow/vK7DUPPWYQI/s1600/acneasiangif.gif]()
Retoucher
Kevin_Connery
Posts: 3307
Fullerton, California, US
cwwmbm wrote:
I'd suggest models with better skins That works if you're the photographer and are selecting the model.
It's not so effective when the AD picks the model, if you're the digital tech on-set when such a model is being photographed, or you're the retoucher who has been given an already photographed image file.
Also see the forum FAQ, which includes as an example of what not to post "'Shoot with a different model' in a retouching thread ".
Photographer
MC Seoul Photography
Posts: 469
Seoul, Seoul, Korea (South)
Michael C Pearson wrote:
I'm guessing you didn't see the original (http://4.bp.blogspot.com/-JNi3-71p04U/U … ginal1.jpg)
In that situation, why would you be working on an image like that? For whatever reason, it's always the same stuff. In this retouch I used more heavy LF portraiture and less d&b than the last example. Just pass up images like this anyway unless you're experimenting.
![https://1.bp.blogspot.com/-RYExsVB_zus/UhLgzDa6ThI/AAAAAAAAAow/vK7DUPPWYQI/s1600/acneasiangif.gif]() guess I missed the original, but it's not really that bad. And passing up doesn't always work. The one you showed here as an animated gif on the other hand is more like some of the stuff I've encountered and I retouch what I shoot, and I don't generally shoot skin perfect models, I generally don't even shoot models. I shoot regular people. Which means all kinds of regular people body proportions and skin conditions. Where did you get that animated gif? Something you did or did it come from somewhere with a process breakdown?
Digital Artist
Michael C Pearson
Posts: 1349
Agoura Hills, California, US
MC Seoul Photography wrote:
...And passing up doesn't always work. The one you showed here as an animated gif on the other hand is more like some of the stuff I've encountered and I retouch what I shoot, and I don't generally shoot skin perfect models, I generally don't even shoot models. I shoot regular people. Which means all kinds of regular people body proportions and skin conditions. I forget portrait photographers post here as well, my bad.
MC Seoul Photography wrote:
Where did you get that animated gif? Something you did or did it come from somewhere with a process breakdown? I did it a loooong time ago for a challenge thread here on MM. I don't have the psd anymore, but I remember it being a rather quick retouch in regard to clearing up the skin. I spent more time doing d&b "carving" (which means using d&b to adjust the highlights and shadows in a way that changes the percieved form, reshaping highlights and shadows to be more pleasing to the composition, and enhancing the visual clarity of the how the forms read) I'm pretty sure the size of the gif was the same size (or very close to) the size of the original jpeg, and when working on a very small image, there's much less detail to worry about. I can tell you exactly how I'd do it on a larger image. Because this would be retouching for portraiture, I'm going to try to tailor the skin workflow to be as fast as possible while still being able to pull off similar quality to the asian woman gif. It doesn't need to be non-destructive for your purposes, so that already speeds up the process a bit.
- clone/heal major blemishes
- frequency split the image with an initial gaussian blur radius suitable for HF work (lower than if you were planning on spending more time on LF), quick HF cloning to clean up the HF layer. If you have a good split (you chose your initial gaussian blur radius wisely), then unifying the HF texture is EXTREMELY easy. Once you're comfortable with the process, you should expect to spend no more than 5 minutes here on average skin.
- dodge and burn to clean up the big smudges/spots on the LF (5-10min), but don't spend too much time, we're about to portraiture
- stamp image (control+alt+shift+e), then do another frequency separation, this time with a separation radius suitable for LF bandpass, which would be much higher than you'd normally go. You want to barely be able to see the LF grunge while you're previewing the LF split radius.
- Apply portraiture, inverted high-pass, surface blur, or whatever your preferred bandpass filter is (I use portraiture but recently I've been having fun with Nik's smoothing filter found in Nik Color Effex 4)
- create a layer mask on the bandpass layer, then paint it on the skin wherever you need budget LF grunge removal (or use color range to select the skin)
- if it's too "blurry yet sharp" then you can reduce the opacity, or my new favorite trick which is using the luminosity blending sliders (aka. "blend-if sliders") to adjust the way the bandpass layer blends with the LF layer. I find that it's the shadow smoothing that adds more to the fake look, so it's generally better to fade out the shadows. Btw I mean SKIN shadows, not the general image shadows - this is why I don't just use "lighten" blending mode. I need the bandpass filter to affect a very specific range of highlights and the easiest way to get that control is the 'blend-if' sliders
- one final thing I may have done back then was to use Sean Baker's (or was it Photons?) noise script which creates decent fake LF noise which helps make bandpassed skin to look more believable.
Although that's all I did to heal her acne, some of the dramatic improvement came from the adjustments to her makeup and from the d&b contouring, and that stuff took me many years to develop, so don't get frustrated if you have trouble.
Yikes when I glance up at what I just wrote it looks like it would take a long time to do. Well more time than you'd spend on multiple shots from a portrait shoot anyways. Once you get comfortable with the workflow, set up actions and keybindings to make yourself super-efficient, and put in the time required to be able to properly d&b without causing more blotches, then I'd bet you'd be able to do what I did to the asian girl's skin in under 30 minutes.
Photographer
MC Seoul Photography
Posts: 469
Seoul, Seoul, Korea (South)
I forget portrait photographers post here as well, my bad. Not exactly portrait photography, but I guess the thinking applies.
I've got to give frequency separation a try. I've been using Calvin hollywood's skin smooth method
vivid light blend, inverted
high pass at around 24
Gaussian blur at around 2.0
then a play with the sliders to fix the highlights
then hide it and paint it back 40% opacity on the face, 80% on the body. Works pretty well in terms of hiding color blotches and evening skin tone, but doesn't do much for physical blemishes.
Thanks for the steps. I'll give those a thorough going over and try them on a couple images.
Photographer
R.EYE.R
Posts: 3436
Tokyo, Tokyo, Japan
Michael C Pearson wrote:
Dodge and burn will produce superior results for a few reasons:
1. Plugins and blurs are basically using math to blur certain bandpasses of detail. I don't like the idea that an algorithm is deciding how the skin will look. With dodge and burn, there's still math involved behind the scenes, but every stroke is decided by a human's extremely intelligent (relative to what we know) brain. So much subconscious thought goes into each stroke of the stylus.
2. Some skin detail is good, some is bad. Good details visually communicate realism to the viewer, while bad details draw attention. Portraiture wipes away an entire range of frequency detail, regardless of how certain low frequency noise-like details make the skin look more realistic.
3. The images that have had portraiture demonstrated on have been, for the most part, easy images with very little low frequency blotching. More often than not, the skin has blotching in some place or another as well as uneven gradients. Portraiture cannot fix a big ugly low frequency blotch that would have been taken care of within the first minute of d&b. There are just so many limitations of plugins like portraiture that d&b doesn't have to worry about (ie. freckles).
4. D&b allows a workflow that targets the worst compositional snags of the image first. This means that the first five minutes of so of d&b improve the image much more dramatically than minutes 25-30. If your boss calls you and needs the image early, this workflow ensures that the image will be much more usable. I highly recommend workflows that allow jumping around the image for that very reason.
5. D&b forces you to slow down and really look at the image. While the time and skill required for quality d&b isn't appealing for some, it does force you to spend a lot more quality time getting to know the image you're working on. Don't forget to flip the canvas horizontally every ten minutes or so to refresh your perspective of the image, especially when you've been staring at it for a long time.
I put together the example you requested, but it needs some explanation. My intent was to show the difference in quality/realism of retouching LOW FREQUENCY, and this is because both d&b and portraiture can't work with high frequency texture as well as other methods like cloning/healing on the HF. In order to show the LF work in the most clear way, I prepared the image by doing some basic HF texture cloning to unify the HF a bit and I cloned out a couple large blemishes. The rest of the time was spent with either LF d&b or LF portraiture.
![https://2.bp.blogspot.com/-GW5D6DlnsUY/UhHDO3bd-4I/AAAAAAAAAnc/LLOJtT_S5hs/s1600/db_port_comp_gif2.gif]()
(photographer: Stefan bourson)
This is gif that compares the results of d&b with portraiture. Notice all the grungy smudges that remain in the portraiture version. Smudges can't really be cloned/healed without messing up the flow of texture. Just out of curiosity, what would you do to take care of LF smudges like the ones left by portraiture? Btw I was doing my best to make the portraiture results look as realistic as possible. I tried a few different radius' during the split to see what got the best results, and I found a very high radius of 12 or so got the best results (removed lots of LF grunge without losing form or getting too much of the telltale "blurry yet sharp" LF over-smoothing. IMO she looks a bit waxy with the portraiture, but the d&b needs a bit more smoothing (just a tiny bit). The solution? Run a subtle portraiture after doing d&b for some cleanup. That's where I find portraiture's true strength. Here's a gif that shows the subtle smoothing that portraiture can contribute when used with a delicate touch. (although I did make the smoothing a tiny bit stronger than I usually do to compensate for a gif file's lack of detail).
![https://3.bp.blogspot.com/-FghoNo7_lho/UhHJ1k9T0NI/AAAAAAAAAn0/uYEV3CTDDjI/s1600/d&b_and_port_gif.gif]()
If you're the type to prefer to toggle tabs to compare, finally a section just for you!
-Original: http://4.bp.blogspot.com/-JNi3-71p04U/U … ginal1.jpg
-Only low frequency portraiture: http://2.bp.blogspot.com/--22SNONM7BU/U … aiture.jpg
-Only low frequency d&b: http://4.bp.blogspot.com/-6garSLLh0UA/U … 00/d&b.jpg
-D&b and Portraiture combined: http://1.bp.blogspot.com/-Qt0OC-66ye8/U … _port2.jpg Michael, massive thank you for taking your time and posting this.
I would definitely agree that portraiture alone is a rather clumsy approach. But combined with D&B and healing brush it works rather nicely on smoothing the patchy skin tones.
I got rather busy for any Photoshopping since my last post in this thread, but finally got to it and worked out my examples to add to this.
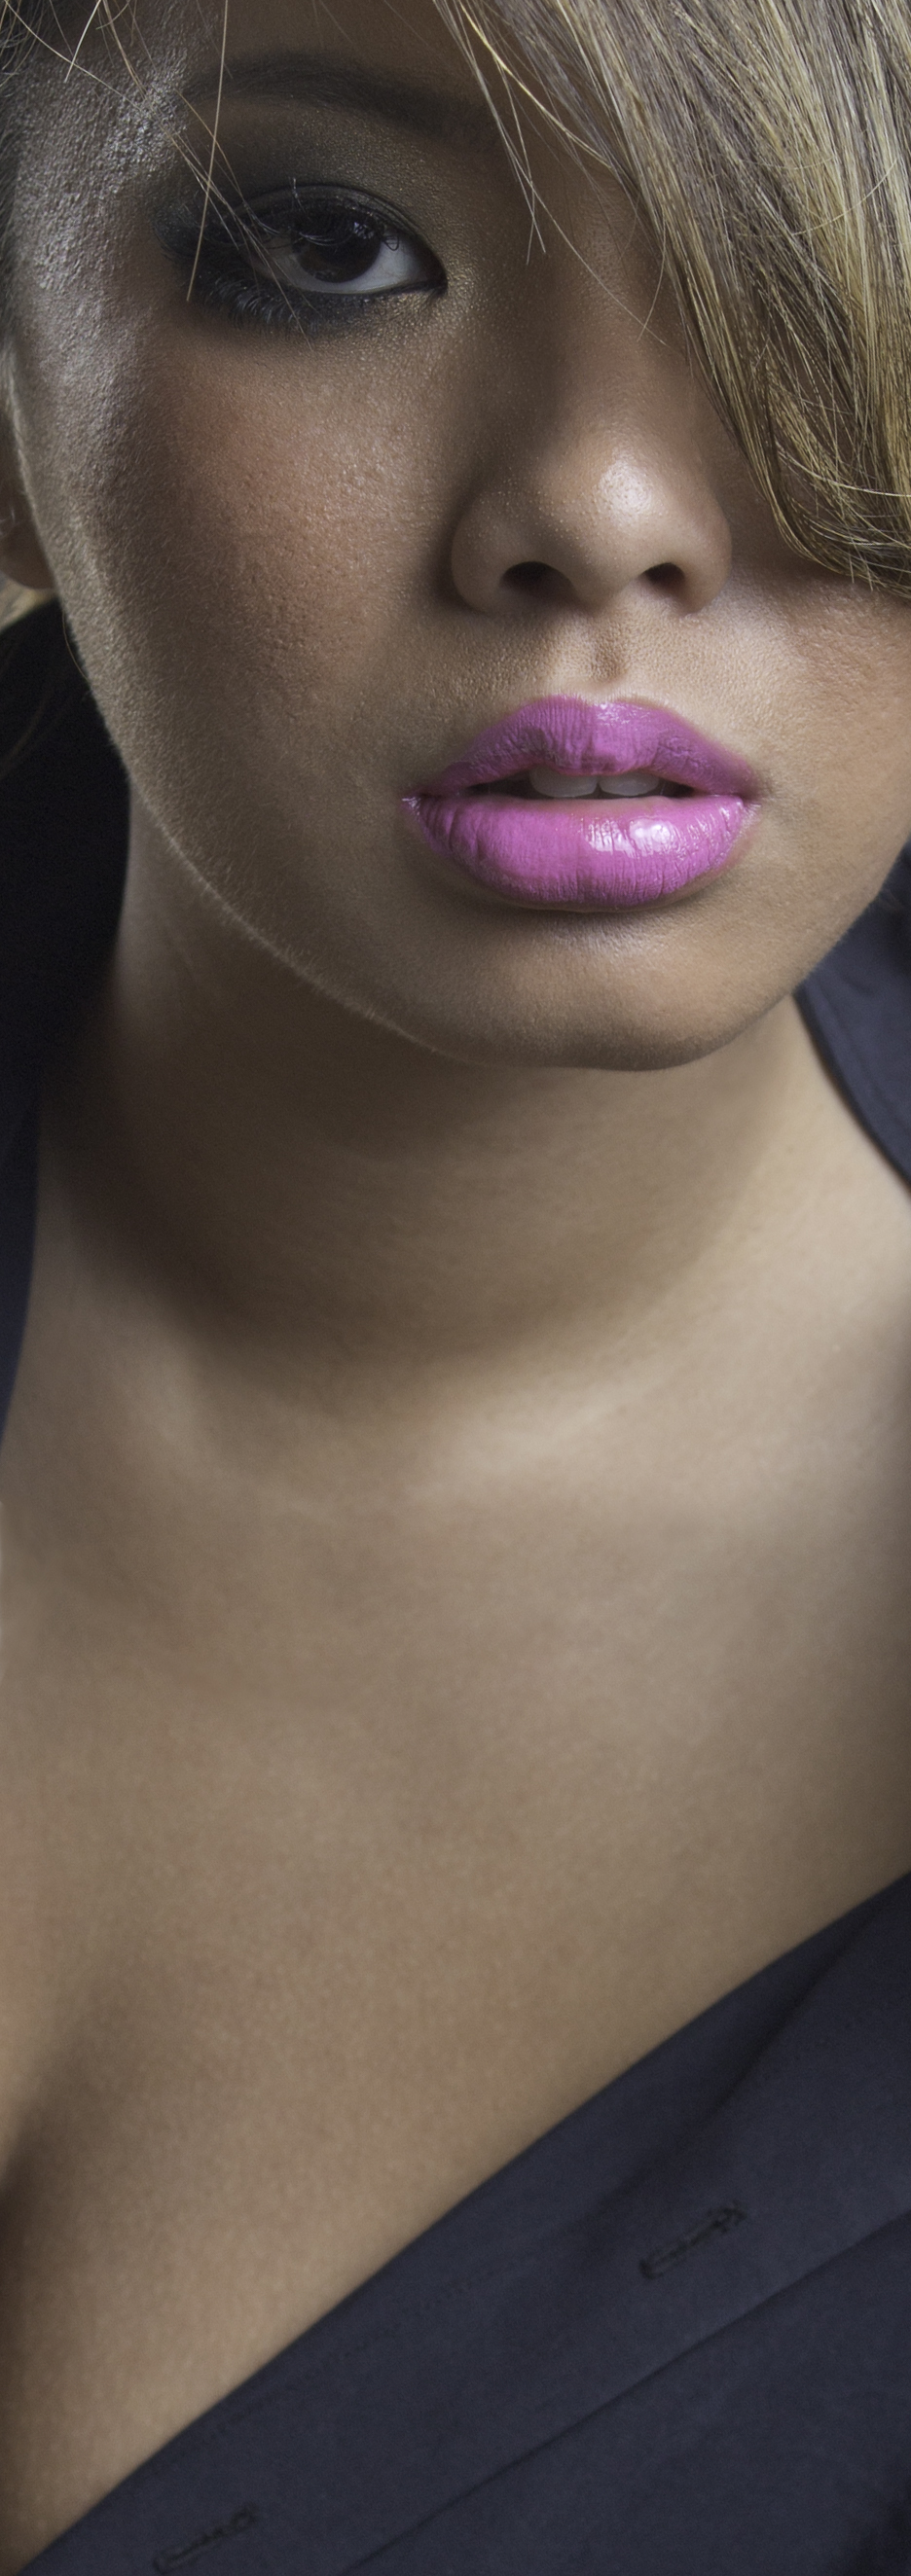
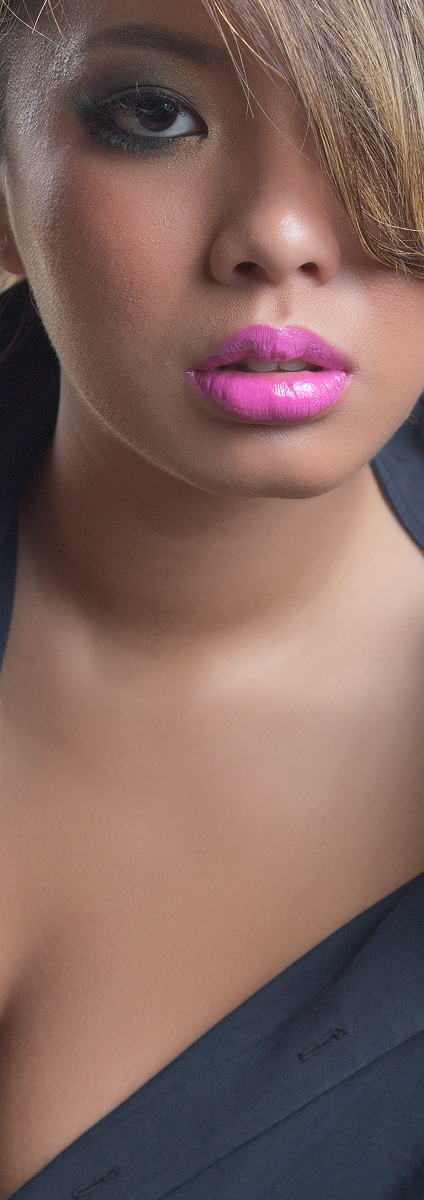
Three images posted below are:
1. Original - http://www.3byk.org/imgposts/psdtest/IM … iginal.jpg
2. Image A - http://www.3byk.org/imgposts/psdtest/IMG_6455_a.jpg
3. Image B - http://www.3byk.org/imgposts/psdtest/IMG_6455_b.jpg
One of them has been reworked using healing + limited D&B + Portraiture (editing time 30-40min), another only healing and D&B (editing time 4hrs).
There are some subtle differences as I got carried away in editing, but I believe it will be easy to spot the technique in each.
Best way to compare is to open all links in separate tabs and flick between them.

Photographer
Mike Fox Photography
Posts: 14
Pearland, Texas, US
MC Seoul Photography wrote:
guess I missed the original, but it's not really that bad. And passing up doesn't always work. The one you showed here as an animated gif on the other hand is more like some of the stuff I've encountered and I retouch what I shoot, and I don't generally shoot skin perfect models, I generally don't even shoot models. I shoot regular people. Which means all kinds of regular people body proportions and skin conditions. Where did you get that animated gif? Something you did or did it come from somewhere with a process breakdown? Glad that someone brought this up. Not all of us are ( or are trying to become) high end retouchers. I'm a portrait photographer that shoots models for portfolio building and concept testing. I would love to learn the absolute best retouching as a way to distinguish my work. But I have to balance that with the economic realities of what I do.
So a method that produces a Vogue quality image but takes 30+ minutes per image, while artistically rewarding, is entirely uneconomical from a business perspective. Assuming that since Mercedes, or Bentley, or whatever is the best car, that no one should drive anything else doesn't make sense. The restaurant analogy has been tossed around a lot here. Just because I'm not a 5 star fine dining restaurant, doesn't mean I'm McDonalds.
I'm here to learn better techniques, I've been working on learning freq separation. But the attitude that the only "right" way is the way they'd do it for Vogue, and everything else is just laziness, or incompetence, is pretty short sighted.
So please, teach. I'll learn whatever will help me. But sometimes, "the best" isn't a reasonable approach, and I'll have to make do with not quite as good, but takes half the time.

Model
Caitin Bre
Posts: 2687
Apache Junction, Arizona, US
cwwmbm wrote:
I'd suggest models with better skins That would probably be the easy way. But what if your constantly working with the public? Will you tell a bride no and pass on her money because she doesn't have perfect skin? Or the senior portrait when the person has a temp acne problem? I'm sure there are many more examples of passing on the money.
I want to select challenging projects to learn more from and improve on my skills.
I don't post in retouch because I don't know it well enough to even contribute. But it is a very awesome read for learning and I am happy people are sharing there different tips and secrets.
Thank you
|

 My bad.


